Android基础教程之----SMS简单发送短信程序(两个模拟器之间的通信)!
前面的范例,示范了如何通过程序拨打电话,在GSM移动通信系统的服务中,除了打电话外,另一个常用的功能,就是发短信.也因为如此,许多电信业者推出专属短信族的专用费率,由此可知短信功能对手机的重要性.
发送短信的关键程序是通过SmsManager对象的sendTextMessage()方法来完成,其中sendTextMessage()方法需传入五个值,依次是收件人地址(String),发送地址(String),发送服务(PendingIntent)与送达服务(PendingIntent),其中收件人与正文是不可为null的两个参数.
本例子通过两个模拟器,5554,5556互相通信,下面我将分5个步骤,讲一下发送短信程序是如何实现的.
Step 1:建立一个Android工程,我们命名为SMSDemo.
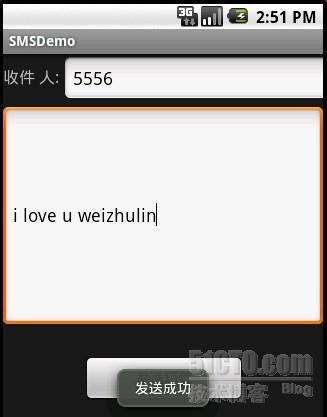
Step 2:设计一下程序的UI,也就是主界面main.xml,这里用AbsoluteLayout,有点丑见笑了!代码如下:
- <?xml version="1.0" encoding="utf-8"?>
- <AbsoluteLayout
- android:layout_width="fill_parent"
- android:layout_height="fill_parent"
- xmlns:android="http://schemas.android.com/apk/res/android"
- >
- <TextView
- android:layout_width="wrap_content"
- android:layout_height="wrap_content"
- android:text="收件 人:"
- android:textSize="16sp"
- android:layout_x="0px"
- android:layout_y="12px"
- >
- </TextView>
- <EditText
- android:id="@+id/myEditText1"
- android:layout_width="fill_parent"
- android:layout_height="wrap_content"
- android:text=""
- android:textSize="18sp"
- android:layout_x="60px"
- android:layout_y="2px"
- >
- </EditText>
- <EditText
- android:id="@+id/myEditText2"
- android:layout_width="fill_parent"
- android:layout_height="223px"
- android:text=""
- android:textSize="18sp"
- android:layout_x="0px"
- android:layout_y="52px"
- >
- </EditText>
- <Button
- android:id="@+id/myButton1"
- android:layout_width="162px"
- android:layout_height="wrap_content"
- android:text="发送短信"
- android:layout_x="80px"
- android:layout_y="302px"
- >
- </Button>
- </AbsoluteLayout>
Step 3:主控制程序SMSDemo.java如下:
- package com.android.test;
- import android.app.Activity;
- import android.app.PendingIntent;
- import android.content.Intent;
- import android.os.Bundle;
- import android.telephony.gsm.SmsManager;
- import android.view.View;
- import android.widget.Button;
- import android.widget.EditText;
- import android.widget.Toast;
- public class SMSDemo extends Activity {
- private Button mButton1;
- private EditText mEditText1;
- private EditText mEditText2;
- public void onCreate(Bundle savedInstanceState) {
- super.onCreate(savedInstanceState);
- setContentView(R.layout.main);
- //获取资源
- mEditText1 = (EditText)findViewById(R.id.myEditText1);
- mEditText2 = (EditText)findViewById(R.id.myEditText2);
- mButton1 = (Button)findViewById(R.id.myButton1);
- //发送短信的响应
- mButton1.setOnClickListener(new Button.OnClickListener(){
- public void onClick(View v) {
- //获取发送地址和发送内容
- String messageAddress = mEditText1.getText().toString();
- String messageContent = mEditText2.getText().toString();
- //构建一取得default instance的SmsManager对象
- SmsManager smsManager = SmsManager.getDefault();
- //检查输入内容是否为空,这里为了简单就没有判断是否是号码,短信内容长度的限制也没有做
- if(messageAddress.trim().length()!=0 && messageContent.trim().length()!=0)
- {
- try{
- PendingIntent pintent = PendingIntent.getBroadcast(SMSDemo.this, 0, new Intent(), 0);
- smsManager.sendTextMessage(messageAddress, null, messageContent, pintent, null);
- }catch(Exception e)
- {
- e.printStackTrace();
- }
- //提示发送成功
- Toast.makeText(SMSDemo.this, "发送成功", Toast.LENGTH_LONG).show();
- }
- else{
- Toast.makeText(SMSDemo.this, "发送地址或者内容不能为空", Toast.LENGTH_SHORT).show();
- }
- }
- });
- }
- }
Step 4:增加拨打电话权限AndroidManifest.xml代码如下:
- <?xml version="1.0" encoding="utf-8"?>
- <manifest xmlns:android="http://schemas.android.com/apk/res/android"
- package="com.android.test"
- android:versionCode="1"
- android:versionName="1.0">
- <application android:icon="@drawable/icon" android:label="@string/app_name">
- <activity android:name=".SMSDemo"
- android:label="@string/app_name">
- <intent-filter>
- <action android:name="android.intent.action.MAIN" />
- <category android:name="android.intent.category.LAUNCHER" />
- </intent-filter>
- </activity>
- </application>
- <uses-sdk android:minSdkVersion="3" />
- <uses-permission android:name="android.permission.SEND_SMS"></uses-permission>
- </manifest>
Step 5:run it!效果图如下,5554给5556发送了一条短信:

