搭建CloudStack
How to install CloudStack 4.2 on CentOS 6.4
http://www.itsprite.com/how-to-install-cloudstack-4-2-on-centos-6-4/
在 CentOS 6.4 上安装 CloudStack 4.2(中文)
http://www.vpsee.com/2013/11/install-cloudstack-4-2-on-centos-6-4/
Apache CloudStack Documentation
https://cloudstack.apache.org/docs/en-US/
NODE |
HOSTNAME |
IP |
OS |
VM |
Control Node |
manage |
192.168.100.75 |
CentOS 6.4 x86_64 |
|
Storage Node |
storage |
192.168.100.90 |
CentOS 6.4 x86_64 |
|
Compute Node1 |
kvm-agent1 |
192.168.100.81 |
CentOS 6.3 x86_64 |
KVM |
Compute Node2 |
kvm-agent2 |
192.168.100.82 |
CentOS 6.3 x86_64 |
KVM |
Compute Node3 |
xenserver-agent3 |
192.168.100.83 |
XenServer 6.2 x86_64 |
XenServer |
Compute Node4 |
xenserver-agent4 |
192.168.100.84 |
XenServer 6.2 x86_64 |
XenServer |
存储
使用一台服务器作为存储,通过nfs发布给CloudStack
查看磁盘及分区情况:
[root@storage ~]# fdisk -l

Disk /dev/sda: 8589 MB, 8589934592 bytes
255 heads, 63 sectors/track, 1044 cylinders
Units = cylinders of 16065 * 512 = 8225280 bytes
Sector size (logical/physical): 512 bytes / 512 bytes
I/O size (minimum/optimal): 512 bytes / 512 bytes
Disk identifier: 0x000c08cf

   Device Boot      Start         End      Blocks   Id  System
/dev/sda1   *           1          26      204800   83  Linux
Partition 1 does not end on cylinder boundary.
/dev/sda2              26         287     2097152   82  Linux swap / Solaris
Partition 2 does not end on cylinder boundary.
/dev/sda3             287        1045     6085632   83  Linux

Disk /dev/sdb: 32.2 GB, 32212254720 bytes
255 heads, 63 sectors/track, 3916 cylinders
Units = cylinders of 16065 * 512 = 8225280 bytes
Sector size (logical/physical): 512 bytes / 512 bytes
I/O size (minimum/optimal): 512 bytes / 512 bytes
Disk identifier: 0x00000000


Disk /dev/sdc: 42.9 GB, 42949672960 bytes
255 heads, 63 sectors/track, 5221 cylinders
Units = cylinders of 16065 * 512 = 8225280 bytes
Sector size (logical/physical): 512 bytes / 512 bytes
I/O size (minimum/optimal): 512 bytes / 512 bytes
Disk identifier: 0x00000000
{将sdb与sdc两块盘分别作为主存储与二级存储}
格式化:
[root@storage ~]# mkfs.ext3 /dev/sdb
[root@storage ~]# mkfs.ext3 /dev/sdc
安装ntp与nfs:
[root@storage ~]# yum install ntp
[root@storage ~]# yum install nfs-utils
创建磁盘挂载点:
[root@storage ~]# mkdir -p /export/primary
[root@storage ~]# mkdir -p /export/secondary
挂载磁盘:
[root@storage ~]# mount /dev/sdb /export/primary/
[root@storage ~]# mount /dev/sdc /export/secondary/
配置开机自动挂载:
[root@storage ~]# vim /etc/fstab
/dev/sdb                /export/primary           ext3    defaults        1 1
/dev/sdc                /export/secondary         ext3    defaults        1 1
设置nfs:
[root@storage ~]# cat /etc/exports
/export/primary  *(rw,async,no_root_squash,no_subtree_check)
/export/secondary  *(rw,async,no_root_squash,no_subtree_check)
[root@storage ~]# exportfs -a
[root@storage ~]# vim /etc/sysconfig/nfs
# For CloudStack
LOCKD_TCPPORT=32803
LOCKD_UDPPORT=32769
MOUNTD_PORT=892
RQUOTAD_PORT=875
STATD_PORT=662
STATD_OUTGOING_PORT=2020
启动ntp/nfs/rpcbind:
[root@storage ~]# service ntpd start
Starting ntpd:                                             [  OK  ]
[root@storage ~]# service rpcbind start
[root@storage ~]# service nfs start
Starting NFS services:                                     [  OK  ]
Starting NFS quotas:                                       [  OK  ]
Starting NFS mountd:                                       [  OK  ]
Starting NFS daemon:                                       [  OK  ]
Starting RPC idmapd:                                       [  OK  ]
设置开机自启:
[root@storage ~]# chkconfig nfs on
[root@storage ~]# chkconfig rpcbind on
[root@storage ~]# chkconfig ntpd on
重启系统:
[root@storage ~]# reboot
控制节点
升级系统
[root@manage ~]# yum update
[root@manage ~]# reboot
设置hosts
[root@manage ~]# cat /etc/hosts
127.0.0.1 localhost.localdomain    localhost.localdomain    localhost4       localhost4.localdomain4 localhost  manage
#::1  localhost.localdomain    localhost.localdomain    localhost6       localhost6.localdomain6 localhost  manage

192.168.100.75 manage
设置yum源
[root@manage ~]# cat /etc/yum.repos.d/cloudstack.repo
[cloudstack]
name=cloudstack
baseurl=http://cloudstack.apt-get.eu/rhel/4.2/
enabled=1
gpgcheck=0
安装ntp/cloudstack-management/mysql
[root@manage ~]# yum install ntp
[root@manage ~]# yum install cloudstack-management
[root@manage ~]# yum install mysql-server
配置mysql
[root@manage ~]# vim /etc/my.cnf
[mysqld]
datadir=/var/lib/mysql
socket=/var/lib/mysql/mysql.sock
user=mysql
# Disabling symbolic-links is recommended to prevent assorted security risks
symbolic-links=0

# For CloudStack
innodb_rollback_on_timeout=1
innodb_lock_wait_timeout=600
max_connections=350
log-bin=mysql-bin
binlog-format = 'ROW'


[mysqld_safe]
log-error=/var/log/mysqld.log
pid-file=/var/run/mysqld/mysqld.pid
启动ntp/mysql并设置开机自启
[root@manage ~]# service ntpd start
[root@manage ~]# service mysqld start
[root@manage ~]# chkconfig ntpd on
[root@manage ~]# chkconfig mysqld on
设置mysql数据库用户密码
[root@manage ~]# mysql_secure_installation
初始化CloudStack数据库
[root@manage ~]# cloudstack-setup-databases cloud:cloud@localhost --deploy-as=root:root -i 192.168.100.75
Mysql user name:cloud                                                           [ OK ]
Mysql user password:cloud                                                       [ OK ]
Mysql server ip:localhost                                                       [ OK ]
Mysql server port:3306                                                          [ OK ]
Mysql root user name:root                                                       [ OK ]
Mysql root user password:root                                                   [ OK ]
Using specified cluster management server node IP 192.168.100.75                [ OK ]
Checking Cloud database files ...                                               [ OK ]
Checking local machine hostname ...                                             [ OK ]
Checking SELinux setup ...                                                      [ OK ]
Preparing /etc/cloudstack/management/db.properties                              [ OK ]
Applying /usr/share/cloudstack-management/setup/create-database.sql             [ OK ]
Applying /usr/share/cloudstack-management/setup/create-schema.sql               [ OK ]
Applying /usr/share/cloudstack-management/setup/create-database-premium.sql     [ OK ]
Applying /usr/share/cloudstack-management/setup/create-schema-premium.sql       [ OK ]
Applying /usr/share/cloudstack-management/setup/server-setup.sql                [ OK ]
Applying /usr/share/cloudstack-management/setup/templates.sql                   [ OK ]
Applying /usr/share/cloudstack-bridge/setup/cloudbridge_db.sql                  [ OK ]
Applying /usr/share/cloudstack-bridge/setup/cloudbridge_schema.sql              [ OK ]
Applying /usr/share/cloudstack-bridge/setup/cloudbridge_multipart.sql           [ OK ]
Applying /usr/share/cloudstack-bridge/setup/cloudbridge_index.sql               [ OK ]
Applying /usr/share/cloudstack-bridge/setup/cloudbridge_multipart_alter.sql     [ OK ]
Applying /usr/share/cloudstack-bridge/setup/cloudbridge_bucketpolicy.sql        [ OK ]
Applying /usr/share/cloudstack-bridge/setup/cloudbridge_policy_alter.sql        [ OK ]
Applying /usr/share/cloudstack-bridge/setup/cloudbridge_offering.sql            [ OK ]
Applying /usr/share/cloudstack-bridge/setup/cloudbridge_offering_alter.sql      [ OK ]
Processing encryption ...                                                       [ OK ]
Finalizing setup ...                                                            [ OK ]

CloudStack has successfully initialized database, you can check your database configuration in /etc/cloudstack/management/db.properties
初始化CloudStack
[root@manage ~]# cloudstack-setup-management
Starting to configure CloudStack Management Server:
Configure sudoers ...         [OK]
Configure Firewall ...        [OK]
Configure CloudStack Management Server ...[OK]
CloudStack Management Server setup is Done!
挂载存储
创建挂载点:
[root@manage ~]# mkdir /secondary
挂载:
[root@manage ~]# mount -t nfs 192.168.100.90:/export/secondary /secondary
查看挂载情况:
[root@manage ~]# df -h
Filesystem                        Size  Used Avail Use% Mounted on
/dev/sda3                         5.8G  4.3G  1.3G  78% /
tmpfs                             499M  228K  498M   1% /dev/shm
/dev/sda1                         194M   52M  133M  29% /boot
192.168.100.90:/export/secondary   40G  176M   38G   1% /secondary
导入系统VM模板
[root@manage ~]# /usr/share/cloudstack-common/scripts/storage/secondary/cloud-install-sys-tmplt -m /secondary -u http://d21ifhcun6b1t2.cloudfront.net/templates/4.2/systemvmtemplate-2013-06-12-master-kvm.qcow2.bz2 -h kvm -s -F

If you are using a separate NFS server, perform this step. If you are using the Management Server as the NFS server, you MUST NOT perform this step.
When the script has finished, unmount secondary storage and remove the created directory.

# umount /mnt/secondary
# rmdir /mnt/secondary
也可先下载到本地,然后再导入到二级存储中:
[root@manage ~]# /usr/share/cloudstack-common/scripts/storage/secondary/cloud-install-sys-tmplt -m /usr/share/vm -u http://d21ifhcun6b1t2.cloudfront.net/templates/4.2/systemvmtemplate-2013-06-12-master-kvm.qcow2.bz2 -h kvm -F

[root@manage ~]# mount -t nfs 192.168.100.90:/export/secondary /secondary

[root@manage ~]# /usr/share/cloudstack-common/scripts/storage/secondary/cloud-install-sys-tmplt -m /secondary -f /usr/share/vm/template/tmpl/1/3/69dca355-157c-4693-a8c4-f4c586f946ef.qcow2 -h kvm -F
File /usr/share/cloudstack-common/scripts/storage/secondary/8d616d0d-5e56-402a-85c3-8721ff1a9097.qcow2 does not appear to be compressed
Moving to /secondary/template/tmpl/1/3///8d616d0d-5e56-402a-85c3-8721ff1a9097.qcow2...could take a while
Successfully installed system VM template /usr/share/vm/template/tmpl/1/3/69dca355-157c-4693-a8c4-f4c586f946ef.qcow2 to /secondary/template/tmpl/1/3/

# umount /secondary/
# rmdir /mnt/secondary
计算节点(CentOS)
在两个CentOS节点上均执行
查看CPU是否支持虚拟化技术
[root@kvm-agent1 ~]# egrep '(vmx|svm)' /proc/cpuinfo
flags              : fpu vme de pse tsc msr pae mce cx8 apic mtrr pge mca cmov pat pse36 clflush mmx fxsr sse sse2 syscall nx mmxext fxsr_opt rdtscp lm 3dnowext 3dnow constant_tsc up rep_good tsc_reliable nonstop_tsc aperfmperf unfair_spinlock pni cx16 popcnt hypervisor lahf_lm svm extapic abm sse4a misalignsse 3dnowprefetch osvw npt svm_lock nrip_save
升级系统
[root@kvm-agent1 ~]# yum update
[root@kvm-agent1 ~]# reboot
设置hosts
[root@kvm-agent1 ~]# cat /etc/hosts
127.0.0.1 localhost.localdomain    localhost.localdomain    localhost4       localhost4.localdomain4 localhost  kvm-agent1
#::1  localhost.localdomain    localhost.localdomain    localhost6       localhost6.localdomain6 localhost  kvm-agent1

192.168.100.81  kvm-agent1
设置yum源
[root@kvm-agent1 ~]# cat /etc/yum.repos.d/cloudstack.repo
[cloudstack]
name=cloudstack
baseurl=http://cloudstack.apt-get.eu/rhel/4.2/
enabled=1
gpgcheck=0
安装ntp/cloudstack-agent/kvm
[root@kvm-agent1 ~]# yum install ntp
[root@kvm-agent1 ~]# yum install cloudstack-agent
[root@kvm-agent1 ~]# yum install qemu-kvm
[root@kvm-agent1 ~]# chkconfig ntpd on
检查kvm模块是否正确加载
[root@kvm-agent1 ~]# lsmod | grep kvm
kvm_amd                41551  0
kvm                   314739  1 kvm_amd
配置libvirt
[root@kvm-agent1 ~]# vim /etc/libvirt/libvirtd.conf
# For CloudStack
listen_tls = 0
listen_tcp = 1
tcp_port = "16509"
auth_tcp = "none"
mdns_adv = 0

[root@kvm-agent1 ~]# vim /etc/libvirt/qemu.conf
vnc_listen = "0.0.0.0"

[root@kvm-agent1 ~]# vim /etc/sysconfig/libvirtd
LIBVIRTD_ARGS="--listen"

[root@kvm-agent1 ~]# service libvirtd restart
Stopping libvirtd daemon:                                  [  OK  ]
Starting libvirtd daemon:                                  [  OK  ]
计算节点(XenServer)
安装两台XenServer,注意主机名、hosts以及IP地址的设置。
创建环境
首次登录,首先跳过向导设置“全局设置”:
1 设置secstorage.allowed.internal.sites为二级存储所在网段,如192.168.100.0/24
2 若要使用本地存储则将system.vm.use.local.storage设为true
……
修改后重启cloudstack:
[root@manage ~]# service cloudstack-management restart
向导设置
http://192.168.100.75:8080/client/

用户名:admin
密码:password

点击“继续执行基本安装”

重置密码

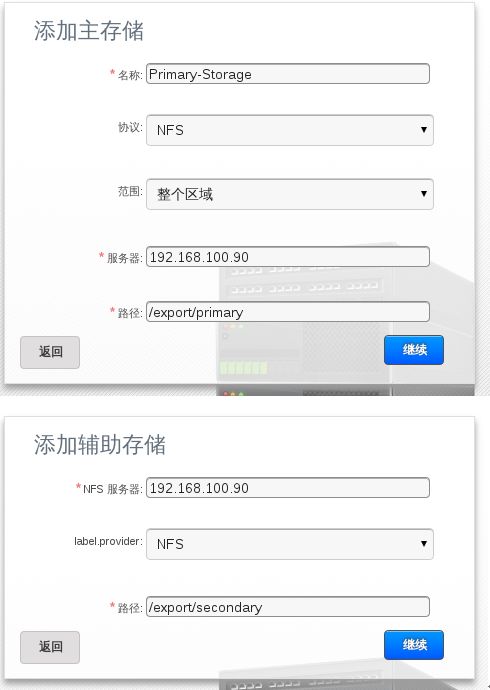
添加区域
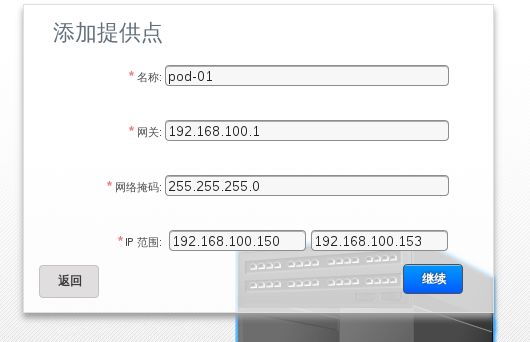
在区域内添加一个提供点,IP范围用于系统VM


添加剩余节点
上传ISO
在manage节点上直接通过httpd搭建一个网络共享存储
[root@manage ~]# vim /etc/mime.types
添加一条内容
none/none                                       iso
重启httpd:
[root@manage ~]# service httpd restart
将iso放入/var/www/html下并赋权:
# chown apache CentOS-6.4-x86_64-bin-DVD1.iso
通过浏览器尝试下载:
http://192.168.100.75/CentOS-6.4-x86_64-bin-DVD1.iso
问题
Q1
[root@kvm-agent1 ~]# modprobe kvm-amd
FATAL: Error inserting kvm_amd (/lib/modules/2.6.32-431.5.1.el6.x86_64/kernel/arch/x86/kvm/kvm-amd.ko): Operation not supported
[root@kvm-agent1 ~]# egrep '(vmx|svm)' /proc/cpuinfo
未有输出,说明当前系统cpu不支持虚拟化
Q2
[root@manage ~]# /usr/share/cloudstack-common/scripts/storage/secondary/cloud-install-sys-tmplt -m /secondary -u http://d21ifhcun6b1t2.cloudfront.net/templates/4.2/systemvmtemplate-2013-06-12-master-kvm.qcow2.bz2 -h kvm -s -F
Insufficient free disk space for local temporary folder /usr/share/cloudstack-common/scripts/storage/secondary: avail=1258700k req=5120000k
磁盘空间不足