dsoframer.ocx 实现在线的word编辑
关于 dsoframer.ocx 的资料和API 我这里就不多说了。。百度 google 有很多
但是都是简单的介绍api 对于刚刚接触的人还是很难入手的。
所以我这里主要讲下如何来具体的使用,分享给大家,希望对大家帮助啊:
经过几天的研究,嘎嘎。。战果如下:
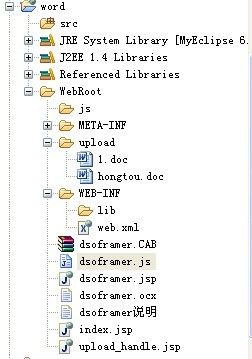
这里说明下 各个文件
dsoframer.ocx
大家都认识吧,微软提供的
dsoframer.js
封装了对 dsoframer.ocx 的操作
dsoframer.jsp
显示word的业务界面
dsoframer.CAB
这个是重头戏啊,引用这个文件,
可以在让 dsoframer.ocx 在浏览器中自动下载并注册 当初可弄了老半天的)
至于如何签名自己的 ocx,使其下载并注册,网页也有很多资料。
我这里也提供一个:http://blog.csdn.net/xjzdr/article/details/5991585
流程都好看。最要命的是 里面的 inf 安装文件别写错了,否则就安装失败了,所以要千万记着。
这里偷偷的告诉你们一个秘密: 我是把别人公司的 CAB 安装解压,让回一步一步的模仿写出来的。。嘎嘎
具体是哪个公司,嘿嘿,,不好说。。秘密! 你们可以拷贝我的就好了啊。。
还有一点就是要注意 写版本 FileVersion=2,0,0,0 的时候 是逗号而不是点,不然报错!
下面看具体代码
dsoframer.jsp 界面:
<%@ page language="java" pageEncoding="UTF-8" contentType="text/html; charset=UTF-8" %>
<%
String path = request.getContextPath();
String basePath = request.getScheme()+"://"+request.getServerName()+":"+request.getServerPort()+path+"/";
String id = "1";
%>
<html>
	<head>
		<title>调查报告</title>
		<script language="javascript" src="dsoframer.js"></script>
		<script type="text/javascript">
			/*用法说明:
			  1,创建 word对象
			  2,设置文件上传url
			  3,在页面加载时,打开word文档,根据是否传人docUrl参数,决定是本地新建,还是从服务器端获取
			  4,在页面关闭时,执行上传操作。
			*/
             var word = new word();
             //决定路径
		     word.setUploadUrl("http://127.0.0.1:8070/word/upload_handle.jsp");

		     var docurl = "";
		     function load(){
		         //方法:openDoc(docName, docUrl)
		         // docName:必填,本地保存的文件名, 也为上传到服务器上时的文件名
		         // docUrl: 填时,为从服务器端获取doc文档的路径, 不填时,表示本地新建doc文档

		         word.openDoc('1.doc',"http://127.0.0.1:8070/word/upload/1.doc");

		         /**
		          //这里实现读取服务器的模板,并保存到服务器的业务路径中
		         $.post("/ZsytpServlet",{type:"ajaxWord",id:<%=id%>},function(result){
		 			  	var dataObj=eval("("+result+")");//转换为json对象

		 			  	docurl = dataObj.docurl;
						if(docurl == ""){
							word.openDoc('<%=id%>.doc',"<%=basePath%>/webapps/zsytp/templ/"+dataObj.fhtk+".doc");

							document.getElementById('oframe').SetFieldValue("f_name",dataObj.f_name,"");
							document.getElementById('oframe').SetFieldValue("m_name",dataObj.m_name,"");
							document.getElementById('oframe').SetFieldValue("town",dataObj.town,"");
							document.getElementById('oframe').SetFieldValue("f_name1",dataObj.f_name,"");
							document.getElementById('oframe').SetFieldValue("m_name1",dataObj.m_name,"");
							document.getElementById('oframe').SetFieldValue("sqsj",dataObj.sqsj,"");
							document.getElementById('oframe').SetFieldValue("f_name2",dataObj.f_name,"");
							document.getElementById('oframe').SetFieldValue("f_birthday",dataObj.f_birthday,"");
							document.getElementById('oframe').SetFieldValue("f_hjdz",dataObj.f_hjdz,"");
							document.getElementById('oframe').SetFieldValue("m_name2",dataObj.m_name,"");
							document.getElementById('oframe').SetFieldValue("m_birthday",dataObj.m_birthday,"");
							document.getElementById('oframe').SetFieldValue("m_hjdz",dataObj.m_hjdz,"");
						}else{
						//实现读取业务路径的内容,并修改
							word.openDoc('<%=id%>.doc',"<%=basePath%>/webapps/zsytp/word/"+docurl);
						}
			 	 });
			 	 **/

		     }

		     //为了简化,我定义关闭窗口的时候,保存到服务器上面,并且删除本地的临时文件
		     function unload(){
		         word.saveDoc();
		         word.close();
		     }

		     //给书签赋值
		     function setFileVal(){
		     	document.getElementById('oframe').SetFieldValue("dm","2006-03-16 22:22:22","");
		     }

		     //插入红头文件

		     //等等。。网上都有 API


		     //真正开发的时候,,需要用到的方法,保存文件到服务器上
		     //可以查看里面的 document.getElementById('oframe').HttpAddPostString("id",id); 等向后台穿参数
		     function uploadFile(){
		     	//word.saveDocAndParm('1',docurl);
		     }
		</script>
	</head>
	<body onload="load();" onunload="unload();">
	   <input  type="button" value="保存文件到服务器" onclick="uploadFile()" >
	   <hr/>
       <!--
       <object classid="clsid:00460182-9E5E-11d5-B7C8-B8269041DD57" codebase="dsoframer.ocx" id="oframe" width="100%" height="100%">
         <param name="BorderStyle" value="1">
         <param name="TitlebarColor" value="52479">
         <param name="TitlebarTextColor" value="0">
       </object>
      -->
      <object classid="clsid:00460182-9E5E-11d5-B7C8-B8269041DD57" codebase="dsoframer.CAB#Version=2.0.0.0" id="oframe" width="100%" height="100%">
	         <param name="BorderStyle" value="1">
	         <param name="TitlebarColor" value="52479">
	         <param name="TitlebarTextColor" value="0">
       </object>
	</body>
</html>
upload_handle.jsp 上传的业务代码。。可以自己修改吧。。嘎嘎
<%@ page language="java" import="java.util.*" pageEncoding="UTF-8" contentType="text/html; charset=UTF-8"%>
<%@page import="org.apache.commons.fileupload.servlet.ServletFileUpload"%>
<%@page import="org.apache.commons.fileupload.disk.DiskFileItemFactory"%>
<%@page import="java.io.File"%>
<%@page import="org.apache.commons.fileupload.FileItem"%>
<%@page import="java.text.SimpleDateFormat"%>
<%@page import="java.io.BufferedInputStream"%>
<%@page import="java.io.BufferedOutputStream"%>
<%@page import="java.io.FileOutputStream"%>
<%@page import="org.apache.commons.fileupload.util.Streams"%>
<%
	try{
		// 解析 request,判断是否有上传文件
		boolean isMultipart = ServletFileUpload.isMultipartContent(request);
		System.out.println("---------"+isMultipart);
		if (isMultipart) {

			Date date = new Date();//获取当前时间
			SimpleDateFormat sdfFolder = new SimpleDateFormat("yyMM");
			String fileRealPath = "";//文件存放真实地址

			String fileRealResistPath = "";//文件存放真实相对路径
			String id="1";//id
			String docUrl=""; //路径
			String firstFileName="";

			String yyMM = sdfFolder.format(date);

			//上传文件夹绝对路径
			String physicsPath = request.getRealPath("")
					+ "\\upload\\" + yyMM + "\\";

			File file = new File(physicsPath);
			if (!file.isDirectory()) {
				file.mkdir();
			}

			// 创建磁盘工厂,利用构造器实现内存数据储存量和临时储存路径
			DiskFileItemFactory factory = new DiskFileItemFactory();
			// 设置最多只允许在内存中存储的数据,单位:字节
			// factory.setSizeThreshold(4096);
			// 设置文件临时存储路径
			// factory.setRepository(new File("D:\\Temp"));
			// 产生一新的文件上传处理程式
			ServletFileUpload upload = new ServletFileUpload(factory);
			// 设置路径、文件名的字符集
			upload.setHeaderEncoding("UTF-8");
			// 设置允许用户上传文件大小,单位:字节
			upload.setSizeMax(-1);
			//upload.setSizeMax(1024 * 1024);
			// 解析请求,开始读取数据
			// Iterator<FileItem> iter = (Iterator<FileItem>) upload.getItemIterator(request);
			// 得到所有的表单域,它们目前都被当作FileItem
			BufferedInputStream in = null;
			List fileItems = upload.parseRequest(request);
			// 依次处理请求
			Iterator iter = fileItems.iterator();
			while (iter.hasNext()) {
				FileItem item = (FileItem) iter.next();
				if (item.isFormField()) {
					// 如果item是正常的表单域
					String name = item.getFieldName();
					String value = item.getString("UTF-8");
					if(name.equals("id"))
						id=value;//附件标题赋值
					else if(name.equals("docUrl"))
						docUrl=value;//附件ID赋值
				} else {
					// 如果item是文件上传表单域
					// 获得文件名及路径
					String fileName = item.getName();
					if (fileName != null) {
						firstFileName=item.getName().substring(item.getName().lastIndexOf("\\")+1);
						in = new BufferedInputStream(item.getInputStream());// 获得文件输入流
					}
				}
			}
			String formatName = firstFileName.substring(firstFileName.lastIndexOf("."));//获取文件后缀名
			if(docUrl != null && !"".equals(docUrl.trim())){
				fileRealPath = request.getRealPath("") + "\\word\\" + docUrl;//文件存放真实地址
			}else{
				fileRealPath = physicsPath + id+ formatName;//文件存放真实地址
				docUrl = yyMM + "/" + id + formatName;
			}
			BufferedOutputStream outStream = new BufferedOutputStream(new FileOutputStream(new File(fileRealPath)));// 获得文件输出流
			Streams.copy(in, outStream, true);// 开始把文件写到你指定的上传文件夹

			//上传成功,则插入数据库
			if (new File(fileRealPath).exists()) {
				//虚拟路径赋值
				fileRealResistPath=sdfFolder.format(date)+"/"+fileRealPath.substring(fileRealPath.lastIndexOf("\\")+1);
				//DB db=new DB();
				//System.out.println("!!!"+(String) session.getAttribute("fpsssn")+"&&"+v07.can.myname(session));
				//int count = db.executeUpdate("update   zy_zsytp  set  docurl ='"+docUrl+"'  where  id ='"+id+"'");
				//if(count>0){
				//	response.setContentType("text/html;charset=UTF-8");
				//	out.print("<script>alert('上传成功!');</script>");
				//}
				//db.destroy();

				//保存到数据库
			}
		}
	}catch(Exception e){
		e.printStackTrace();
		//response.setContentType("text/html;charset=UTF-8");
		//out.print("<script>window.alert('上传失败!文件大小超过1MB!');</script>");
	}

%>
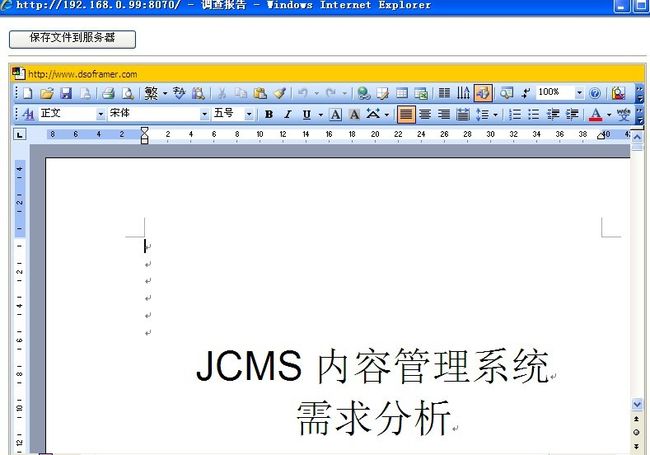
效果图:
哈哈。。下面就是 demo 咯。。。
本人的是 word 2003 。。至于 2007 我没测试过啊。。。你们看着办办。。。。

