使用Github依赖库实现Android5.0新特性——CardView
之前自己使用support-v7下自带的cardview实现了CardView效果。后来在github中发现了有人写好了很好的库支持,完美实现了CardView的向下兼容。不再需要support-v7,实现起来更为方便。参考的Github的主页为:https://github.com/gabrielemariotti/cardslib 。感谢博主。具体实现步骤如下:
(1)在Android Studio中新建一个项目,在build.gradle(Module:app)中加入以下代码,注意是在一个Module的gradle中,而不是上方的Project的gradle中。
dependencies {
    compile fileTree(dir: 'libs', include: ['*.jar'])
    compile 'com.android.support:appcompat-v7:22.2.0'

    //Core card library
    compile 'com.github.gabrielemariotti.cards:cardslib-core:2.1.0'

    //Optional for built-in cards
    compile 'com.github.gabrielemariotti.cards:cardslib-cards:2.1.0'

    //Optional for RecyclerView
    compile 'com.github.gabrielemariotti.cards:cardslib-recyclerview:2.1.0'

    //Optional for staggered grid view support
    compile 'com.github.gabrielemariotti.cards:cardslib-extra-staggeredgrid:2.1.0'

    //Optional for drag and drop support
    compile 'com.github.gabrielemariotti.cards:cardslib-extra-dragdrop:2.1.0'

    //Optional for twowayview support (coming soon)
    //compile 'com.github.gabrielemariotti.cards:cardslib-extra-twoway:2.1.0'


}
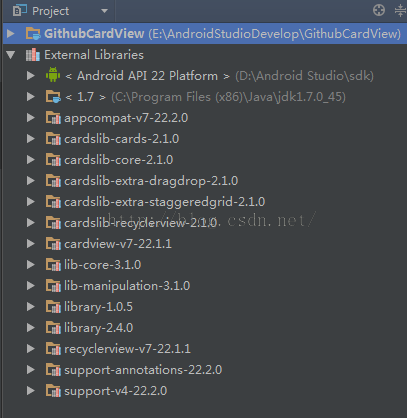
上述代码就是为项目添加库依赖,就如同从support-v7中添加库依赖一样,添加代码后,从Build-->Rebuild project,重建项目,此时就会从Github上下载依赖库,该过程可能会有点慢,耐心等待。之后就会发现在External Libraries中多出很多文件。
(2)编写xml布局文件如下:
<LinearLayout xmlns:android="http://schemas.android.com/apk/res/android"
    android:layout_width="match_parent"
    android:layout_height="match_parent"
    android:orientation="vertical">

    <it.gmariotti.cardslib.library.view.CardViewNative
        android:id="@+id/carddemo"
        android:layout_width="match_parent"
        android:layout_height="wrap_content"
        android:layout_marginLeft="12dp"
        android:layout_marginRight="12dp"
        android:layout_marginTop="12dp">

        <TextView
            android:layout_width="match_parent"
            android:layout_height="wrap_content"
            android:text="这是第一个CardView"
            android:textSize="20sp" />

        <ImageView
            android:layout_width="wrap_content"
            android:layout_height="wrap_content"
            android:layout_gravity="right"
            android:src="@mipmap/image" />

        <EditText
            android:layout_width="match_parent"
            android:layout_height="wrap_content"
            android:layout_gravity="bottom"
            android:hint="输入框:请输入内容" />

        <Button
            android:layout_width="wrap_content"
            android:layout_height="wrap_content"
            android:layout_gravity="bottom|right"
            android:text="这是第一个按钮" />
    </it.gmariotti.cardslib.library.view.CardViewNative>

    <it.gmariotti.cardslib.library.view.CardViewNative
        android:id="@+id/carddemo2"
        android:layout_width="match_parent"
        android:layout_height="wrap_content"
        android:layout_marginLeft="12dp"
        android:layout_marginRight="12dp"
        android:layout_marginTop="12dp">

        <TextView
            android:layout_width="match_parent"
            android:layout_height="wrap_content"
            android:text="这是第二个CardView"
            android:textSize="20sp" />

        <ImageView
            android:layout_width="wrap_content"
            android:layout_height="wrap_content"
            android:layout_gravity="right"
            android:src="@mipmap/image2" />

        <EditText
            android:layout_width="match_parent"
            android:layout_height="wrap_content"
            android:layout_gravity="bottom"
            android:hint="输入框:请输入内容" />

        <Button
            android:layout_width="wrap_content"
            android:layout_height="wrap_content"
            android:layout_gravity="bottom|right"
            android:text="这是第二个按钮" />
    </it.gmariotti.cardslib.library.view.CardViewNative>


</LinearLayout>
(3)编写java代码:
public class MainActivity extends Activity {

    private Context context;//上下文;

    @Override
    protected void onCreate(Bundle savedInstanceState) {
        super.onCreate(savedInstanceState);
        setContentView(R.layout.activity_main);
        this.context = this;

        Card card = new Card(context);//Create a Card,这就是一张卡片,到时候把该卡片放到CardView空间中;
        CardHeader header = new CardHeader(context);//Create a CardHeader;如果不使用Header标题,也可以注释该代码;
        card.addCardHeader(header);//Add Header to card;增加标题,可注释;

        //Set card in the cardView
        CardViewNative cardView = (CardViewNative) findViewById(R.id.carddemo);
        CardViewNative cardView2 = (CardViewNative) findViewById(R.id.carddemo2);
        cardView.setCard(card);//绑定;
        cardView2.setCard(card);

    }

}
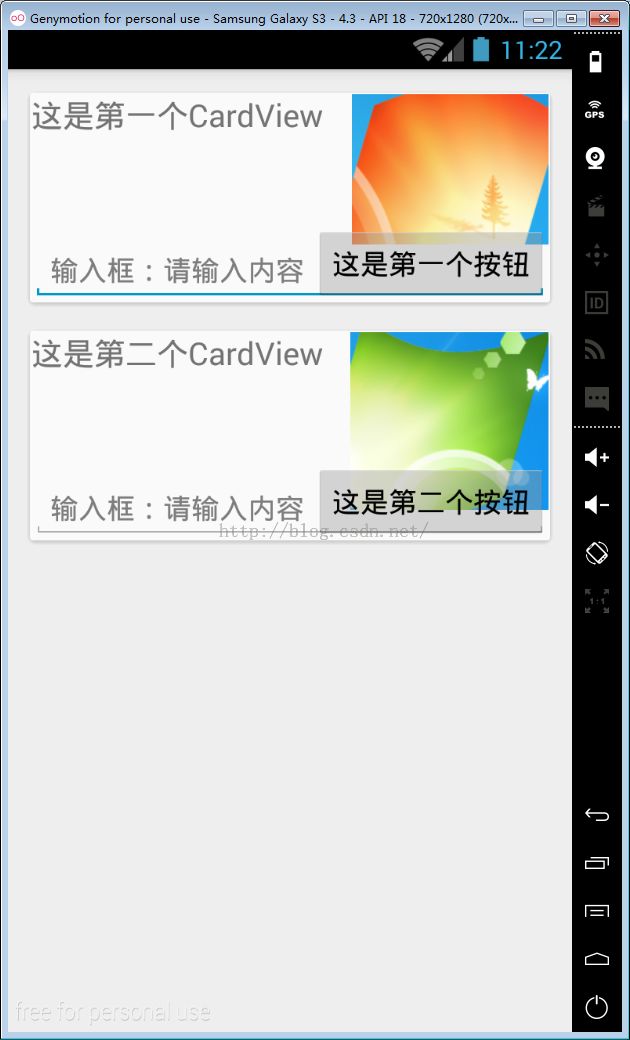
(4)然后运行代码,就可以在界面上实现多个卡片Card的效果。使用非常灵活,可以分别自由进行编辑:
本案例只是做一个演示,整体还是比较简陋的,后期优美的布局都可以通过卡片来实现。再次申明代码很多引用:https://github.com/gabrielemariotti/cardslib 。感谢Gabriele Mariotti.
github主页:https://github.com/chenyufeng1991 。欢迎大家访问!

