玩转OpenStack网络Neutron(1)--热身
欢迎转载,转载请保留原作者信息
欢迎交流学习,共同进步!
作者:颜海峰
个人博客:http://yanheven.github.io
微博:海峰_云计算 http://weibo.com/344736086
OpenStack 网络介绍
随着计算资源从物理机到虚拟机的迁移,相应地,虚拟机的网络也从以前的物理网络迁移到虚拟网络.而在OpenStack这个开源的云计算项目中,负责网络虚拟化的是Neutron(曾用名:Quantum)和Nova-Network, 后者之前是作为Nova的一个服务来看待,而Neutron则是一个完整的子项目,当然,提供的功能也更多,支持更多的网络插件.本系列文章,将主要学习研究Neutron,学习不同插件的配置使用,不同网络类型的使用.由于侧重点为网络的配置使用,所以本文章假定读者已经拥有一个最小的两节点的OpenStack集群(布署可参考官方文档,或者陈沙克的博文:http://www.chenshake.com/install-openstack-openstack-juno-version/).安装如下:
- 控制节点:
keystone, glance, nova, neutron - 计算节点:
nova-compute, neutron agent
在Neutron里面,有几个基本概念,其实跟物理网络一样.
- 网络Network: 一个独立的二层网络,类似物理网络中的一个VLAN
- 子网Subnet:一个IP4 或者IP6网段
- 接口Port:虚拟网络中的接口, 类比物理网络设备上的网线接口.
- 路由器Router: 类比物理网络中的路由器,用于不同三层网络之前通信.
通过 Horizon 创建网络
用有效的用户名密码登陆控制台, 找到”Network”,然后点击此栏目下面的”Networks”处,弹出网络信息页,显示当前项目的网络信息,然后通过点击”Create Network”来创建网络:

随后, 填写网络名称, 然后可以直接不填子网信息, 直接下一步, 创建网络即可.

通过 Horizon 创建子网
在网络信息页,找到刚才创建的网络,点击进去:

填写子网名称, 子网的网络CIDR, 网关不指定, 默认会帮你指定为的我网络的第一个可用IP, 此时是192.1168.1.1, 不禁用网关:

通过 Horizon 查看网络信息
通过进入网络信息页面,可以看到当前项目的所有网络,点击某个网络进去,可以看到这个网络的信息, 这个网络所包含的子网的信息, 以及这个网络里面创建的接口的信息.

点击某个子网或者某个接口,可以进去查看它的详细信息,比如点击子网”yan-in”

通过 Horizon 创建关联某个网络的实例
在”Compute”栏目,打开里面的”Instances”, 点击”Launch Instance”按钮, 即打开的创建实例(虚拟机)的工作流了
填写主机名,选择配置,镜像等

选择主机使用的网络,点击刚才我们创建的网络”yan-test”, 点击后它自动从下的”Available networks”面移动到上面的”Selected Networks”处

忽略其他标签的设置,点击”Launch”, 即可创建使用这个网络的实例了.
若干秒后,可以看到成功创建的实例:
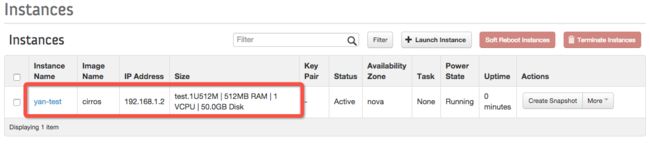
还可以点击实例名称”yan-test”进入查看实例详情:

通过 命令行 创建网络
首先,创建一个网络:
$ neutron net-create yan-net-test01

Created a new network: +---------------------------+--------------------------------------+
| Field | Value | +---------------------------+--------------------------------------+
| admin_state_up            | True                                 |
| id                        | c20a2764-1c1a-4091-ac2a-bb82f7f1d20d |
| name                      | yan-net-test01                       |
| provider:physical_network | | | shared | False | | status | ACTIVE | | subnets | | | tenant_id                 | 0d896fe854f64e90915ce599aa1e1c0b     |
+---------------------------+--------------------------------------+
可以通过命令查看刚才创建的网络详细信息:
$ neutron net-show yan-net-test01 +---------------------------+--------------------------------------+
| Field | Value | +---------------------------+--------------------------------------+
| admin_state_up            | True                                 |
| id                        | c20a2764-1c1a-4091-ac2a-bb82f7f1d20d |
| name                      | yan-net-test01                       |
| provider:physical_network | | | router:external | False | | shared | False | | status | ACTIVE | | subnets | | | tenant_id                 | 0d896fe854f64e90915ce599aa1e1c0b     |
+---------------------------+--------------------------------------+
更多命令可以通过help出来查看:
$ neutron help | grep " net-"
  net-create                     Create a network for a given tenant.
  net-delete                     Delete a given network.
  net-external-list              List external networks that belong to a given tenant.
  net-gateway-connect            Add an internal network interface to a router.
  net-gateway-create             Create a network gateway.
  net-gateway-delete             Delete a given network gateway.
  net-gateway-disconnect         Remove a network from a network gateway.
  net-gateway-list               List network gateways for a given tenant.
  net-gateway-show               Show information of a given network gateway.
  net-gateway-update             Update the name for a network gateway.
  net-list                       List networks that belong to a given tenant.
  net-list-on-dhcp-agent         List the networks on a DHCP agent.
  net-show                       Show information of a given network.
  net-update                     Update network's information.
某个具体命令的用法,也可以通过help来查看使用方法,可以查看命令需要哪些参数,以及它的功能. 比如刚才我们用的show命令:
$ neutron help net-show usage: neutron net-show [-h] [-f {shell,table,value}] [-c COLUMN] [--max-width <integer>] [--prefix PREFIX] [--request-format {json,xml}] [-D] [-F FIELD] NETWORK Show information of a given network. positional arguments: NETWORK ID or name of network to look up. optional arguments: -h, --help show this help message and exit --request-format {json,xml} The XML or JSON request format. -D, --show-details Show detailed information. -F FIELD, --field FIELD Specify the field(s) to be returned by server. You can repeat this option. output formatters: output formatter options -f {shell,table,value}, --format {shell,table,value} the output format, defaults to table -c COLUMN, --column COLUMN specify the column(s) to include, can be repeated table formatter: --max-width <integer> Maximum display width, 0 to disable shell formatter: a format a UNIX shell can parse (variable="value") --prefix PREFIX add a prefix to all variable names 看到可以改变输出的格式,比如让输出为shell格式:
$ neutron  net-show yan-net-test01 -f shell
admin_state_up="True"
id="c20a2764-1c1a-4091-ac2a-bb82f7f1d20d"
name="yan-net-test01"
provider:physical_network=""
router:external="False"
shared="False"
status="ACTIVE"
subnets=""
tenant_id="0d896fe854f64e90915ce599aa1e1c0b"
通过 命令行 创建子网
查看子网,有哪些相关命令:
$ neutron  help | grep subnet
  subnet-create Create a subnet for a given tenant. subnet-delete Delete a given subnet. subnet-list List subnets that belong to a given tenant. subnet-show Show information of a given subnet. subnet-update Update subnet's information.
创建子网,就跟在horizon页面创建类似,指定网络,以及子网的CIDR等这些具体信息:
$ neutron subnet-create yan-net-test01 --name yan-test01-subnet  --gateway 192.168.1.1 192.168.1.0/24

Created a new subnet: +------------------+--------------------------------------------------+
| Field | Value | +------------------+--------------------------------------------------+
| allocation_pools | {"start": "192.168.1.2", "end": "192.168.1.254"} | | cidr | 192.168.1.0/24 | | dns_nameservers  |                                                  |
| enable_dhcp | True | | gateway_ip       | 192.168.1.1                                      |
| host_routes | | | id | ee2c7da4-083b-4510-9fef-21a58dc47b3d | | ip_version       | 4                                                |
| name             | yan-test01-subnet                                |
| network_id | c20a2764-1c1a-4091-ac2a-bb82f7f1d20d | | tenant_id        | 0d896fe854f64e90915ce599aa1e1c0b                 |
+------------------+--------------------------------------------------+
通过 命令行 创建Port
查看port都有哪些相关命令:
$ neutron  help | grep port-
  port-create                    Create a port for a given tenant.
  port-delete                    Delete a given port.
  port-list                      List ports that belong to a given tenant.
  port-show                      Show information of a given port.
  port-update                    Update port's information.
  router-port-list               List ports that belong to a given tenant, with specified router.
创建port:
$ neutron port-create yan-net-test01

Created a new port: +-----------------------+------------------------------------------------------------------------------------+
| Field | Value | +-----------------------+------------------------------------------------------------------------------------+
| admin_state_up        | True                                                                               |
| allowed_address_pairs |                                                                                    |
| binding:host_id | | | binding:profile | {} | | binding:vif_details   | {}                                                                                 |
| binding:vif_type | unbound | | binding:vnic_type     | normal                                                                             |
| device_id | | | device_owner          |                                                                                    |
| fixed_ips | {"subnet_id": "ee2c7da4-083b-4510-9fef-21a58dc47b3d", "ip_address": "192.168.1.2"} | | id | c1e9efdb-aa67-4a77-b80c-dd4321b39f1c | | mac_address           | fa:16:3e:1a:f8:5b                                                                  |
| name                  |                                                                                    |
| network_id | c20a2764-1c1a-4091-ac2a-bb82f7f1d20d | | security_groups       | 5e179e17-f641-429b-a876-1361e9b4792a                                               |
| status                | DOWN                                                                               |
| tenant_id | 0d896fe854f64e90915ce599aa1e1c0b | +-----------------------+------------------------------------------------------------------------------------+
其实创建接口,我们还可以指定很多信息,比如接口的名称,接口的IP地址, 绑定的安全组信息等, 详细可以help一下:
$ neutron  help port-create
usage: neutron port-create [-h] [-f {shell,table,value}] [-c COLUMN]
                           [--max-width <integer>] [--prefix PREFIX]
                           [--request-format {json,xml}]
                           [--tenant-id TENANT_ID] [--name NAME]
                           [--fixed-ip subnet_id=SUBNET,ip_address=IP_ADDR]
                           [--device-id DEVICE_ID]
                           [--device-owner DEVICE_OWNER] [--admin-state-down]
                           [--mac-address MAC_ADDRESS]
                           [--security-group SECURITY_GROUP | --no-security-groups]
                           [--extra-dhcp-opt EXTRA_DHCP_OPTS]
                           NETWORK

Create a port for a given tenant.

positional arguments:
  NETWORK               Network ID or name this port belongs to.

optional arguments:
  -h, --help show this help message and exit
  --request-format {json,xml}
                        The XML or JSON request format.
  --tenant-id TENANT_ID
                        The owner tenant ID.
  --name NAME Name of this port.
  --fixed-ip subnet_id=SUBNET,ip_address=IP_ADDR
                        Desired IP and/or subnet for this port:
                        subnet_id=<name_or_id>,ip_address=<ip>. You can repeat
                        this option.
  --device-id DEVICE_ID
                        Device ID of this port.
  --device-owner DEVICE_OWNER
                        Device owner of this port.
  --admin-state-down Set admin state up to false.
  --mac-address MAC_ADDRESS
                        MAC address of this port.
  --security-group SECURITY_GROUP
                        Security group associated with the port. You can
                        repeat this option.
  --no-security-groups Associate no security groups with the port.
  --extra-dhcp-opt EXTRA_DHCP_OPTS
                        Extra dhcp options to be assigned to this port: opt_na
                        me=<dhcp_option_name>,opt_value=<value>,ip_version={4,
                        6}. You can repeat this option.

output formatters:
  output formatter options

  -f {shell,table,value}, --format {shell,table,value}
                        the output format, defaults to table
  -c COLUMN, --column COLUMN
                        specify the column(s) to include, can be repeated

table formatter:
  --max-width <integer>
                        Maximum display width, 0 to disable

shell formatter:
  a format a UNIX shell can parse (variable="value")

  --prefix PREFIX add a prefix to all variable names
通过 命令行 创建指定Port的实例
首先要确定创建实例的配置大小,镜像,然后指定使用刚才创建的接口Port来创建实例:
$ nova boot yan-instance01 --flavor m1.small --image Ubuntu-14.04-Server-amd64 --nic port-id=c1e9efdb-aa67-4a77-b80c-dd4321b39f1c

+--------------------------------------+-------------------------------------------------------------------------------------------------------------------------------------------------------------------------------------------------------------------------------------------------------------------------------------------------------------------------------------------------------------------------------------------------------------------------------------------------------------------------------------------------------------------------------------------------------------------------------------------------------------------------------------------------------------------------------------------------------------------------------------------------------------------------------------------------------------+
| Property | Value |
+--------------------------------------+-------------------------------------------------------------------------------------------------------------------------------------------------------------------------------------------------------------------------------------------------------------------------------------------------------------------------------------------------------------------------------------------------------------------------------------------------------------------------------------------------------------------------------------------------------------------------------------------------------------------------------------------------------------------------------------------------------------------------------------------------------------------------------------------------------------+
| OS-DCF:diskConfig | MANUAL |
| OS-EXT-AZ:availability_zone | nova |
| OS-EXT-STS:power_state | 0 |
| OS-EXT-STS:task_state | - |
| OS-EXT-STS:vm_state | building |
| OS-SRV-USG:launched_at | - |
| OS-SRV-USG:terminated_at | - |
| accessIPv4 | |
| accessIPv6 | |
| config_drive | |
| created | 2015-04-11T08:44:30Z |
| default_ephemeral_device | |
| default_swap_device | |
| flavor | m1.small (2) |
| hostId | |
| id | 01a2a55e-f1d4-4b4b-a81d-e6aaf8ee4693 |
| image | Ubuntu-14.04-Server-amd64 (7991bbbd-ab70-4b66-93fe-5813aac5c6c5) |
| key_name | - |
| metadata | {} |
| name | yan-instance01 |
| os-extended-volumes:volumes_attached | [] |
| progress | 0 |
| root_device_name | |
| security_groups | default |
| status | BUILD |
| tenant_id | 0d896fe854f64e90915ce599aa1e1c0b |
| updated | 2015-04-11T08:44:30Z |
| user_id | dd446a6b042c4ecab7175dc07f91fef2 |
+--------------------------------------+-------------------------------------------------------------------------------------------------------------------------------------------------------------------------------------------------------------------------------------------------------------------------------------------------------------------------------------------------------------------------------------------------------------------------------------------------------------------------------------------------------------------------------------------------------------------------------------------------------------------------------------------------------------------------------------------------------------------------------------------------------------------------------------------------------------+
当然,创建实例时,关于网络的选择,除了可以指定port外,你还可以指定创建实例的IP地址,如果只指定网络,其实OPENSTACK的创建流程,也会先帮你创建这个网络的一个port,只不过这个步骤没暴露出来而已.
扩展网络地址范围
之前创建网络时只创建了一个子网,而子网的网络号(CIDR)信息是不能修改的.这里我们想要增加这个网络的地址范围,就只能在这个网络下创建多个子网,而且创建的子网不能有地址重叠,否则会报错,创建失败.
创建流程与创建第一个子网时一样.

当然,扩展网络地址范围还有种情况,就是我们创建子网时指定的地址池”Allocation Pools”,则可以通过命令行下子网修改命令来进行这个地址池的扩展,但无论怎样,地址范围都限定在创建时指定的CIDR范围里.
$ neutron help subnet-updateusage: neutron subnet-update [-h] [--request-format {json,xml}] [--name NAME] [--gateway GATEWAY_IP] [--no-gateway] [--allocation-pool start=IP_ADDR,end=IP_ADDR] [--host-route destination=CIDR,nexthop=IP_ADDR] [--dns-nameserver DNS_NAMESERVER] [--disable-dhcp] [--enable-dhcp] SUBNET