如何制作一个横版格斗过关游戏 Cocos2d-x 2.0.4
本文实践自 Allen Tan 的文章《How To Make A Side-Scrolling Beat ‘Em Up Game Like Scott Pilgrim with Cocos2D – Part 1》,文中使用Cocos2D,我在这里使用Cocos2D-x 2.0.4进行学习和移植。在这篇文章,将会学习到如何制作一个简单的横版格斗过关游戏。在这当中,学习如何跟踪动画状态、碰撞盒、添加方向键、添加简单敌人AI和更多其它的。
步骤如下:
1.新建Cocos2d-win32工程,工程名为"PompaDroid",去除"Box2D"选项,勾选"Simple Audio Engine in Cocos Denshion"选项;
2.添加游戏场景类GameScene,派生自CCScene类。添加GameLayer类和HudLayer类,派生自CCLayer类。删除HelloWorldScene.h和HelloWorldScene.cpp文件。
3.文件GameScene.h代码如下:
|
1
2 3 4 5 6 7 8 9 10 11 12 13 14 15 16 17 |
#pragma once
#include "cocos2d.h" #include "GameLayer.h" #include "HudLayer.h" class GameScene : public cocos2d::CCScene { public: GameScene( void); ~GameScene( void); virtual bool init(); CREATE_FUNC(GameScene); CC_SYNTHESIZE(GameLayer*, _gameLayer, GameLayer); CC_SYNTHESIZE(HudLayer*, _hudLayer, HudLayer); }; |
文件GameScene.cpp代码如下:
|
1
2 3 4 5 6 7 8 9 10 11 12 13 14 15 16 17 18 19 20 21 22 23 24 25 26 27 28 29 30 |
#include
"GameScene.h"
using namespace cocos2d; GameScene::GameScene( void) { _gameLayer = NULL; _hudLayer = NULL; } GameScene::~GameScene( void) { } bool GameScene::init() { bool bRet = false; do { CC_BREAK_IF(!CCScene::init()); _gameLayer = GameLayer::create(); this->addChild(_gameLayer, 0); _hudLayer = HudLayer::create(); this->addChild(_hudLayer, 1); bRet = true; } while ( 0); return bRet; } |
4.HudLayer类增加一个方法:
|
1
|
CREATE_FUNC(HudLayer);
|
|
1
|
CREATE_FUNC(GameLayer);
|
|
1
2 3 4 5 6 7 8 9 10 11 12 13 |
//#include "HelloWorldScene.h" #include "GameScene.h" bool AppDelegate::applicationDidFinishLaunching() { //... // create a scene. it's an autorelease object //CCScene *pScene = HelloWorld::scene(); CCScene *pScene = GameScene::create(); //... } |
6.编译运行,此时只是空空的界面。
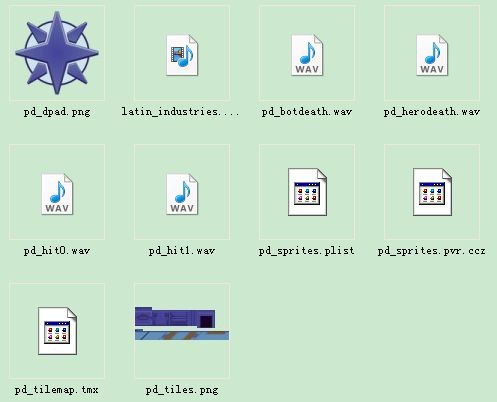
7.下载本游戏所需资源,将资源放置"Resources"目录下;
8.用Tiled工具打开pd_tilemap.tmx,就可以看到游戏的整个地图:
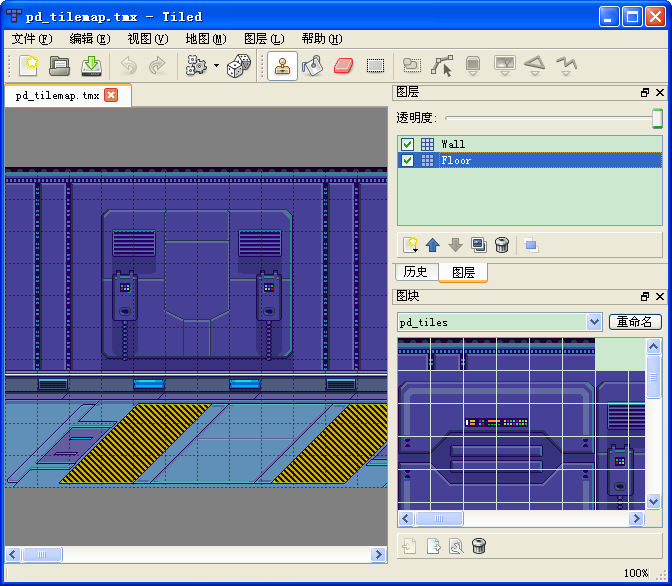
地图上有两个图层:Wall和Floor,即墙和地板。去掉每个图层前的打钩,可以查看层的组成。你会发现下数第四行是由两个图层一起组成的。每个tile都是32x32大小。可行走的地板tile位于下数三行。
9.打开GameLayer.h文件,添加如下代码:
|
1
2 3 4 |
bool init();
void initTileMap(); cocos2d::CCTMXTiledMap *_tileMap; |
打开GameLayer.cpp,在构造函数,添加如下代码:
|
1
|
_tileMap =
NULL;
|
|
1
2 3 4 5 6 7 8 9 10 11 12 13 14 15 16 17 18 19 20 21 22 23 24 25 26 |
bool GameLayer::init()
{ bool bRet = false; do { CC_BREAK_IF(!CCLayer::init()); this->initTileMap(); bRet = true; } while ( 0); return bRet; } void GameLayer::initTileMap() { _tileMap = CCTMXTiledMap::create( "pd_tilemap.tmx"); CCObject *pObject = NULL; CCARRAY_FOREACH(_tileMap->getChildren(), pObject) { CCTMXLayer *child = (CCTMXLayer*)pObject; child->getTexture()->setAliasTexParameters(); } this->addChild(_tileMap, - 6); } |
对所有图层进行setAliasTexParameters设置,该方法是关闭抗锯齿功能,这样就能保持像素风格。
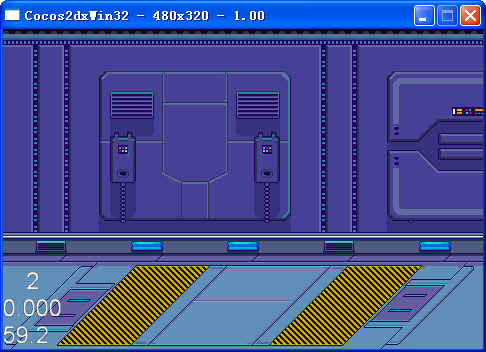
10.编译运行,可以看到地图显示在屏幕上,如下图所示:
11.创建英雄。在大多数2D横版游戏中,角色有不同的动画代表不同类型的动作。我们需要知道什么时候播放哪个动画。这里采用状态机来解决这个问题。状态机就是某种通过切换状态来改变行为的东西。单一状态机在同一时间只能有一个状态,但可以从一种状态过渡到另一种状态。在这个游戏中,角色共有五种状态,空闲、行走、出拳、受伤、死亡,如下图所示:
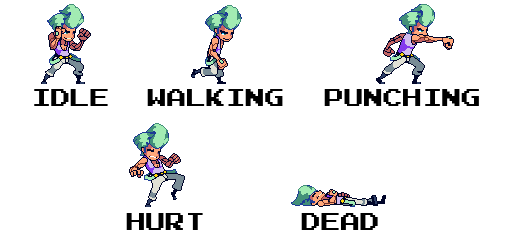
为了有一个完整的状态流,每个状态应该有一个必要条件和结果。例如:行走状态不能突然转变到死亡状态,因为你的英雄在死亡前必须先受伤。
12.添加ActionSprite类,派生自CCSprite类,ActionSprite.h文件代码如下:
|
1
2 3 4 5 6 7 8 9 10 11 12 13 14 15 16 17 18 19 20 21 22 23 24 25 26 27 28 29 30 31 32 33 34 35 36 37 38 39 40 41 42 43 |
#pragma once
#include "cocos2d.h" #include "Defines.h" class ActionSprite : public cocos2d::CCSprite { public: ActionSprite( void); ~ActionSprite( void); //action methods void idle(); void attack(); void hurtWithDamage( float damage); void knockout(); void walkWithDirection(cocos2d::CCPoint direction); //scheduled methods void update( float dt); //actions CC_SYNTHESIZE_RETAIN(cocos2d::CCAction*, _idleAction, IdleAction); CC_SYNTHESIZE_RETAIN(cocos2d::CCAction*, _attackAction, AttackAction); CC_SYNTHESIZE_RETAIN(cocos2d::CCAction*, _walkAction, WalkAction); CC_SYNTHESIZE_RETAIN(cocos2d::CCAction*, _hurtAction, HurtAction); CC_SYNTHESIZE_RETAIN(cocos2d::CCAction*, _knockedOutAction, KnockedOutAction); //states CC_SYNTHESIZE(ActionState, _actionState, ActionState); //attributes CC_SYNTHESIZE( float, _walkSpeed, WalkSpeed); CC_SYNTHESIZE( float, _hitPoints, HitPoints); CC_SYNTHESIZE( float, _damage, Damage); //movement CC_SYNTHESIZE(cocos2d::CCPoint, _velocity, Velocity); CC_SYNTHESIZE(cocos2d::CCPoint, _desiredPosition, DesiredPosition); //measurements CC_SYNTHESIZE( float, _centerToSides, CenterToSides); CC_SYNTHESIZE( float, _centerToBottom, CenterToBottom); }; |
打开ActionSprite.cpp文件,构造函数如下:
|
1
2 3 4 5 6 7 8 |
ActionSprite::ActionSprite(
void)
{ _idleAction = NULL; _attackAction = NULL; _walkAction = NULL; _hurtAction = NULL; _knockedOutAction = NULL; } |
- Actions:这些是每种状态要执行的动作。这些动作是当角色切换状态时,执行精灵动画和其他触发的事件。
States:保存精灵的当前动作/状态,使用ActionState类型,这个类型待会我们将会进行定义。
Attributes:包含精灵行走速度值,受伤时减少生命点值,攻击伤害值。
Movement:用于计算精灵如何沿着地图移动。
Measurements:保存对精灵的实际图像有用的测量值。需要这些值,是因为你将要使用的这些精灵画布大小是远远大于内部包含的图像。
Action methods:不直接调用动作,而是使用这些方法触发每种状态。
Scheduled methods:任何事需要在一定的时间间隔进行运行,比如精灵位置和速度的更新,等等。
新建一个头文件Defines.h,代码如下:
|
1
2 3 4 5 6 7 8 9 10 11 12 13 14 15 16 17 18 19 20 21 22 23 24 25 26 27 28 29 30 31 32 33 |
#pragma once
#include "cocos2d.h" // 1 - convenience measurements #define SCREEN CCDirector::sharedDirector()->getWinSize() #define CENTER ccp(SCREEN.width / 2, SCREEN.height / 2) #define CURTIME do { \ timeval time; \ gettimeofday(&time, NULL); \ unsigned long millisecs = (time.tv_sec * 1000) + (time.tv_usec / 1000); \ return ( float)millisecs; \ } while ( 0) // 2 - convenience functions #define random_range(low, high) (rand() % (high - low + 1)) + low #define frandom ( float)rand() / UINT64_C(0x100000000) #define frandom_range(low, high) ((high - low) * frandom) + low // 3 - enumerations typedef enum _ActionState { kActionStateNone = 0, kActionStateIdle, kActionStateAttack, kActionStateWalk, kActionStateHurt, kActionStateKnockedOut } ActionState; // 4 - structures typedef struct _BoundingBox { cocos2d::CCRect actual; cocos2d::CCRect original; } BoundingBox; |
①.定义了一些便利的宏,如直接使用SCREEN获取屏幕大小;
②.定义了一些便利的函数,随机返回整型或者浮点型;
③.定义ActionState类型,这个是ActionSprite可能处在不同状态的类型枚举;
④.定义BoundingBox结构体,将用于碰撞检测。
打开 GameLayer.h文件,添加如下代码:
|
1
|
cocos2d::CCSpriteBatchNode *_actors;
|
|
1
2 3 4 |
CCSpriteFrameCache::sharedSpriteFrameCache()->addSpriteFramesWithFile(
"pd_sprites.plist");
_actors = CCSpriteBatchNode::create( "pd_sprites.pvr.ccz"); _actors->getTexture()->setAliasTexParameters(); this->addChild(_actors, - 5); |
加载精灵表单,创建一个CCSpriteBatchNode。这个精灵表单包含我们的所有精灵。它的z值高于CCTMXTiledMap对象,这样才能出现在地图前。
添加Hero类,派生自ActionSprite类,添加如下代码:
|
1
2 |
CREATE_FUNC(Hero);
bool init(); |
|
1
2 3 4 5 6 7 8 9 10 11 12 13 14 15 16 17 18 19 20 21 22 23 24 25 26 27 28 29 |
bool Hero::init()
{ bool bRet = false; do { CC_BREAK_IF(!ActionSprite::initWithSpriteFrameName( "hero_idle_00.png")); int i; //idle animation CCArray *idleFrames = CCArray::createWithCapacity( 6); for (i = 0; i < 6; i++) { CCSpriteFrame *frame = CCSpriteFrameCache::sharedSpriteFrameCache()->spriteFrameByName(CCString::createWithFormat( "hero_idle_%02d.png", i)->getCString()); idleFrames->addObject(frame); } CCAnimation *idleAnimation = CCAnimation::createWithSpriteFrames(idleFrames, 1. 0 / 12. 0); this->setIdleAction(CCRepeatForever::create(CCAnimate::create(idleAnimation))); this->setCenterToBottom( 39. 0); this->setCenterToSides( 29. 0); this->setHitPoints( 100. 0); this->setDamage( 20. 0); this->setWalkSpeed( 80. 0); bRet = true; } while ( 0); return bRet; } |
我们用初始空闲精灵帧创建了英雄角色,配备了一个CCArray数组包含所有的属于空闲动画的精灵帧,然后创建一个CCAction动作播放来这个动画。以每秒12帧的速率进行播放。接下去,为英雄设置初始属性,包括精灵中心到边到底部的值。如下图所示:

英雄的每个精灵帧都在280x150像素大小的画布上创建,但实际上英雄精灵只占据这个空间的一部分。所以需要两个测量值,以便更好的设置精灵的位置。需要额外的空间,是因为每个动画精灵绘制的方式是不同的,而有些就需要更多的空间。
打开GameLayer.h文件,添加头文件声明:
|
1
|
#include
"Hero.h"
|
|
1
|
Hero *_hero;
|
|
1
|
_hero =
NULL;
|
|
1
|
this->initHero();
|
|
1
2 3 4 5 6 7 8 |
void GameLayer::initHero()
{ _hero = Hero::create(); _actors->addChild(_hero); _hero->setPosition(ccp(_hero->getCenterToSides(), 80)); _hero->setDesiredPosition(_hero->getPosition()); _hero->idle(); } |
|
1
2 3 4 5 6 7 8 9 10 |
void ActionSprite::idle()
{ if (_actionState != kActionStateIdle) { this->stopAllActions(); this->runAction(_idleAction); _actionState = kActionStateIdle; _velocity = CCPointZero; } } |
13.编译运行,可以看到英雄处于空闲状态。如下图所示:
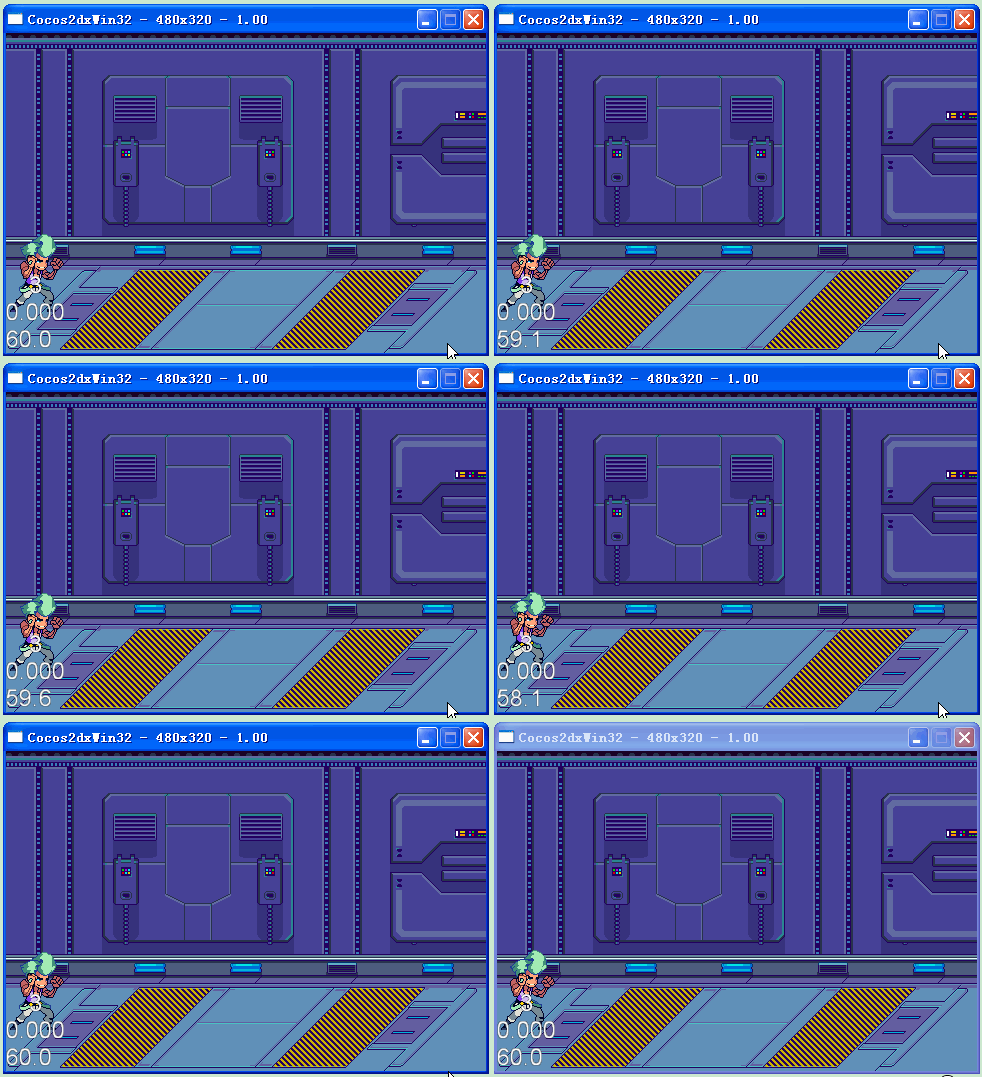
14.出拳动作。打开 Hero.cpp文件,在 init函数idle animation后面,添加如下代码:
|
1
2 3 4 5 6 7 8 9 |
//attack animation CCArray *attackFrames = CCArray::createWithCapacity( 3); for (i = 0; i < 3; i++) { CCSpriteFrame *frame = CCSpriteFrameCache::sharedSpriteFrameCache()->spriteFrameByName(CCString::createWithFormat( "hero_attack_00_%02d.png", i)->getCString()); attackFrames->addObject(frame); } CCAnimation *attackAnimation = CCAnimation::createWithSpriteFrames(attackFrames, 1. 0 / 24. 0); this->setAttackAction(CCSequence::create(CCAnimate::create(attackAnimation), CCCallFunc::create( this, callfunc_selector(Hero::idle)), NULL)); |
|
1
2 3 4 5 6 7 8 9 |
void ActionSprite::attack()
{ if (_actionState == kActionStateIdle || _actionState == kActionStateAttack || _actionState == kActionStateWalk) { this->stopAllActions(); this->runAction(_attackAction); _actionState = kActionStateAttack; } } |
|
1
|
this->setTouchEnabled(
true);
|
|
1
2 3 4 |
void GameLayer::ccTouchesBegan(CCSet *pTouches, CCEvent *pEvent)
{ _hero->attack(); } |
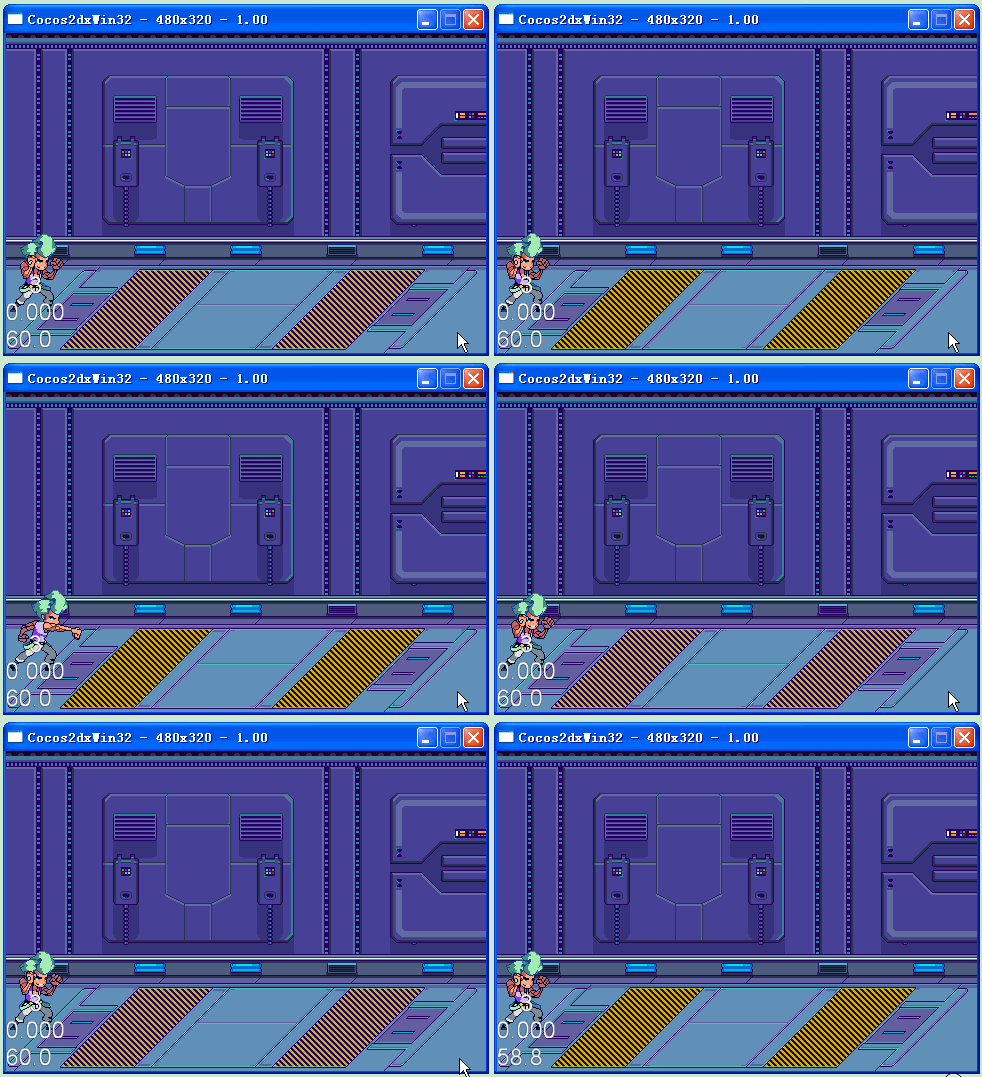
16.创建8个方向的方向键。我们需要创建虚拟的8个方向的方向键来让英雄在地图上进行移动。添加 SimpleDPad类,派生自 CCSprite类, SimpleDPad.h文件代码如下:
|
1
2 3 4 5 6 7 8 9 10 11 12 13 14 15 16 17 18 19 20 21 22 23 24 25 26 27 28 29 30 31 32 33 34 35 36 37 38 39 |
#pragma once
#include "cocos2d.h" class SimpleDPad; class SimpleDPadDelegate { public: virtual void didChangeDirectionTo(SimpleDPad *simpleDPad, cocos2d::CCPoint direction) = 0; virtual void isHoldingDirection(SimpleDPad *simpleDPad, cocos2d::CCPoint direction) = 0; virtual void simpleDPadTouchEnded(SimpleDPad *simpleDPad) = 0; }; class SimpleDPad : public cocos2d::CCSprite, public cocos2d::CCTargetedTouchDelegate { public: SimpleDPad( void); ~SimpleDPad( void); static SimpleDPad* dPadWithFile(cocos2d::CCString *fileName, float radius); bool initWithFile(cocos2d::CCString *filename, float radius); void onEnterTransitionDidFinish(); void onExit(); void update( float dt); virtual bool ccTouchBegan(cocos2d::CCTouch *pTouch, cocos2d::CCEvent *pEvent); virtual void ccTouchMoved(cocos2d::CCTouch *pTouch, cocos2d::CCEvent *pEvent); virtual void ccTouchEnded(cocos2d::CCTouch *pTouch, cocos2d::CCEvent *pEvent); void updateDirectionForTouchLocation(cocos2d::CCPoint location); CC_SYNTHESIZE(SimpleDPadDelegate*, _delegate, Delegate); CC_SYNTHESIZE( bool, _isHeld, IsHeld); protected: float _radius; cocos2d::CCPoint _direction; }; |
对以上的一些声明,解释如下:
- radius:圆形方向键的半径。
direction:当前所按下的方向。这是一个矢量,(-1.0, -1.0)是左下方向,(1.0, 1.0)是右上方向。
delegate:方向键的委托,后续进行介绍。
isHeld:布尔值表示玩家触摸着方向键。
对于SimpleDPad类,使用了委托模式。意味着一个委托类(并非SimpleDPad),将会处理由被委托类(SimpleDPad)启动的任务。在某些你指定的点上,主要是当涉及到处理任何游戏相关的东西,SimpleDPad将会将职责传递给委托类。这使得SimpleDPad无需知道任何游戏逻辑,从而允许你在开发任何其他游戏时,可以进行重用。如下图所示:
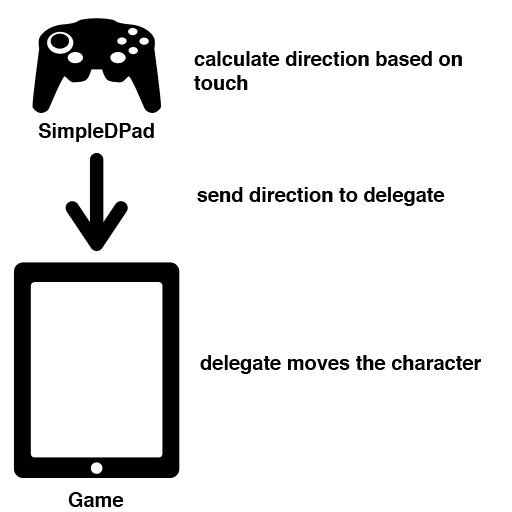
当SimpleDPad检测到在方向键内的触摸,它会计算触摸的方向,然后发送消息到委托类指明方向。在这之后的任何事情都不是SimpleDPad所关心的了。为了实施这个模式,SimpleDPad需要至少了解其委托的有关信息,特别是将触摸方向传递给委托的方法。这是另一种设计模式:协议。可以看到SimpleDPad的委托定义了所需的方法,在这种方式中,SimpleDPad强制其委托有三个指定的方法,以便确保每当它想传递东西放到委托中时,它能调用这些方法中的任何一种。事实上,SimpleDPad也遵循一种协议,即CCTargetedTouchDelegate。当SimpleDPad被触摸时,进行处理触摸事件,而GameLayer将不会得到触摸。否则的话,在触摸方向键的时候,英雄就会出拳攻击,显然,这不是希望看到的。打开SimpleDPad.cpp文件,添加如下代码:
|
1
2 3 4 5 6 7 8 9 10 11 12 13 14 15 16 17 18 19 20 21 22 23 24 25 26 27 28 29 30 31 32 33 34 35 36 37 38 39 40 41 42 43 44 45 46 47 48 49 50 51 52 53 54 55 56 57 58 59 60 61 62 63 64 65 66 67 68 69 70 71 72 73 74 75 76 77 78 79 80 81 82 83 84 85 86 87 88 89 90 91 92 93 94 95 96 97 98 99 100 101 102 103 104 105 106 107 108 109 110 111 112 113 114 115 116 117 118 119 120 121 122 123 124 125 126 127 128 129 130 131 132 133 134 135 136 137 |
#include
"SimpleDPad.h"
using namespace cocos2d; SimpleDPad::SimpleDPad( void) { _delegate = NULL; } SimpleDPad::~SimpleDPad( void) { } SimpleDPad* SimpleDPad::dPadWithFile(CCString *fileName, float radius) { SimpleDPad *pRet = new SimpleDPad(); if (pRet && pRet->initWithFile(fileName, radius)) { return pRet; } else { delete pRet; pRet = NULL; return NULL; } } bool SimpleDPad::initWithFile(CCString *filename, float radius) { bool bRet = false; do { CC_BREAK_IF(!CCSprite::initWithFile(filename->getCString())); _radius = radius; _direction = CCPointZero; _isHeld = false; this->scheduleUpdate(); bRet = true; } while ( 0); return bRet; } void SimpleDPad::onEnterTransitionDidFinish() { CCDirector::sharedDirector()->getTouchDispatcher()->addTargetedDelegate( this, 1, true); } void SimpleDPad::onExit() { CCDirector::sharedDirector()->getTouchDispatcher()->removeDelegate( this); } void SimpleDPad::update( float dt) { if (_isHeld) { _delegate->isHoldingDirection( this, _direction); } } bool SimpleDPad::ccTouchBegan(CCTouch *pTouch, CCEvent *pEvent) { CCPoint location = pTouch->getLocation(); float distanceSQ = ccpDistanceSQ(location, this->getPosition()); if (distanceSQ <= _radius * _radius) { this->updateDirectionForTouchLocation(location); _isHeld = true; return true; } return false; } void SimpleDPad::ccTouchMoved(CCTouch *pTouch, CCEvent *pEvent) { CCPoint location = pTouch->getLocation(); this->updateDirectionForTouchLocation(location); } void SimpleDPad::ccTouchEnded(CCTouch *pTouch, CCEvent *pEvent) { _direction = CCPointZero; _isHeld = false; _delegate->simpleDPadTouchEnded( this); } void SimpleDPad::updateDirectionForTouchLocation(CCPoint location) { float radians = ccpToAngle(ccpSub(location, this->getPosition())); float degrees = - 1 * CC_RADIANS_TO_DEGREES(radians); if (degrees <= 22. 5 && degrees >= - 22. 5) { //right _direction = ccp( 1. 0, 0. 0); } else if (degrees > 22. 5 && degrees < 67. 5) { //bottomright _direction = ccp( 1. 0, - 1. 0); } else if (degrees >= 67. 5 && degrees <= 112. 5) { //bottom _direction = ccp( 0. 0, - 1. 0); } else if (degrees > 112. 5 && degrees < 157. 5) { //bottomleft _direction = ccp(- 1. 0, - 1. 0); } else if (degrees >= 157. 5 || degrees <= - 157. 5) { //left _direction = ccp(- 1. 0, 0. 0); } else if (degrees < - 22. 5 && degrees > - 67. 5) { //topright _direction = ccp( 1. 0, 1. 0); } else if (degrees <= - 67. 5 && degrees >= - 112. 5) { //top _direction = ccp( 0. 0, 1. 0); } else if (degrees < - 112. 5 && degrees > - 157. 5) { //topleft _direction = ccp(- 1. 0, 1. 0); } _delegate->didChangeDirectionTo( this, _direction); } |
打开HudLayer.h文件,添加头文件声明:
|
1
|
#include
"SimpleDPad.h"
|
|
1
2 |
bool init();
CC_SYNTHESIZE(SimpleDPad*, _dPad, DPad); |
|
1
2 3 4 5 6 7 8 9 10 11 12 13 14 15 16 17 18 19 20 21 22 |
HudLayer::HudLayer(
void)
{ _dPad = NULL; } bool HudLayer::init() { bool bRet = false; do { CC_BREAK_IF(!CCLayer::init()); _dPad = SimpleDPad::dPadWithFile(CCString::create( "pd_dpad.png"), 64); _dPad->setPosition(ccp( 64. 0, 64. 0)); _dPad->setOpacity( 100); this->addChild(_dPad); bRet = true; } while ( 0); return bRet; } |
以上代码实例化SimpleDPad,并且添加到HudLayer上。现在GameScene同时控制GameLayer和HudLayer,但有时候想直接通过HudLayer访问GameLayer。打开GameLayer.h文件,添加头文件声明:
|
1
2 |
#include
"SimpleDPad.h"
#include "HudLayer.h" |
|
1
|
class GameLayer :
public cocos2d::CCLayer,
public SimpleDPadDelegate
|
|
1
2 3 4 5 |
virtual
void didChangeDirectionTo(SimpleDPad *simpleDPad, cocos2d::CCPoint direction);
virtual void isHoldingDirection(SimpleDPad *simpleDPad, cocos2d::CCPoint direction); virtual void simpleDPadTouchEnded(SimpleDPad *simpleDPad); CC_SYNTHESIZE(HudLayer*, _hud, Hud); |
以上方法的实现暂时为空。这样我们就在GameLayer中添加了HudLayer的引用,同时还让GameLayer遵循SimpleDPad所创建的协议。打开GameScene.cpp文件,在init函数this->addChild(_hudLayer, 1);后面,添加如下代码:
|
1
2 |
_hudLayer->getDPad()->setDelegate(_gameLayer);
_gameLayer->setHud(_hudLayer); |
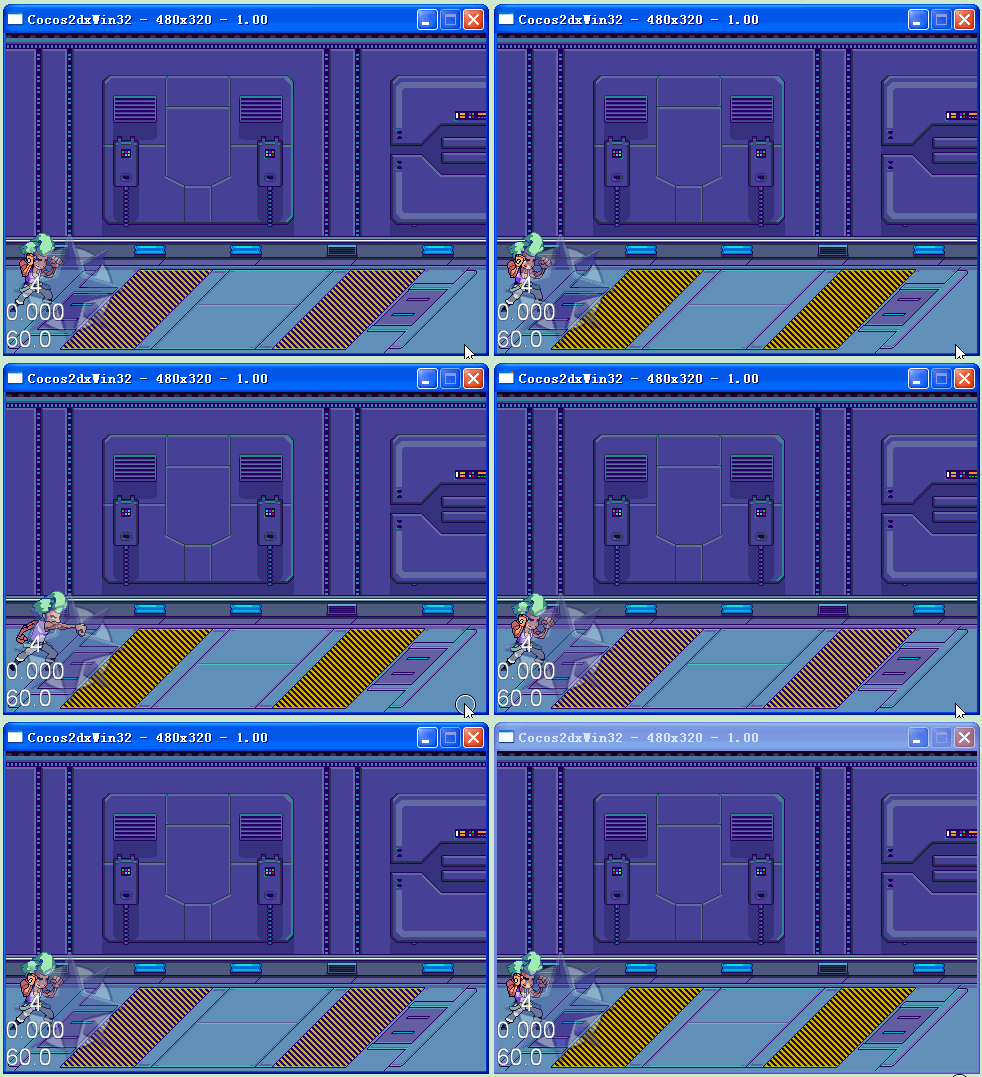
别试着压下方向键,英雄不会有任何反应,因为还未实现协议方法,这在 第二部分将完成。
参考资料:
1.How To Make A Side-Scrolling Beat ‘Em Up Game Like Scott Pilgrim with Cocos2D – Part 1http://www.raywenderlich.com/24155/how-to-make-a-side-scrolling
2.如何使用cocos2d制作类似Scott Pilgrim的2D横版格斗过关游戏part1(翻译) http://blog.sina.com.cn/s/blog_4b55f6860101a9b7.html
3.如何使用Cocos2d-x做一DNF类的游戏-part1 http://blog.csdn.net/jyzgo/article/details/8471306
非常感谢以上资料,本例子源代码附加资源下载地址:http://download.csdn.net/detail/akof1314/5038013
如文章存在错误之处,欢迎指出,以便改正。