Apache Karaf集群(Cellar)安装和配置
系统环境
apache-karaf-4.0.2
JDK: 1.8.0_60 x64
目前弄了2个节点,
本机IP : 192.168.100.95 win7 x64
虚拟机:192.168.200.132 Ubuntu 15.04 x64
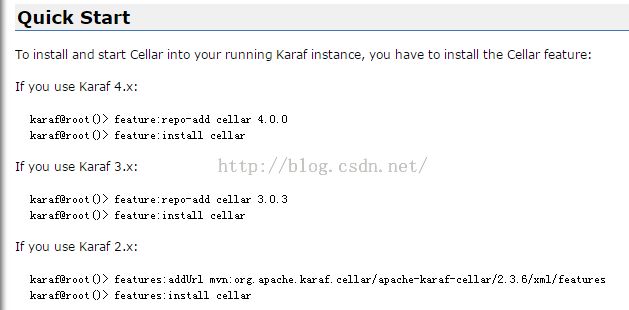
一:安装cellar
参考网址:http://karaf.apache.org/index/subprojects/cellar.html
第一次安装有点慢,安装完之后,在控制台执行list,即可看到
karaf@root()> list
START LEVEL 100 , List Threshold: 50
ID | State | Lvl | Version | Name
-----------------------------------------------------------------
52 | Active | 80 | 3.5.2 | hazelcast
53 | Active | 80 | 0.9.2 | minimal-json
54 | Active | 80 | 1.1.1 | geronimo-jta_1.1_spec
55 | Active | 80 | 4.0.0 | Apache Karaf :: Cellar :: Bundle
56 | Active | 80 | 4.0.0 | Apache Karaf :: Cellar :: Config
57 | Active | 80 | 4.0.0 | Apache Karaf :: Cellar :: Core
58 | Active | 80 | 4.0.0 | Apache Karaf :: Cellar :: Features
59 | Active | 80 | 4.0.0 | Apache Karaf :: Cellar :: Hazelcast
60 | Active | 80 | 4.0.0 | Apache Karaf :: Cellar :: Shell
61 | Active | 80 | 4.0.0 | Apache Karaf :: Cellar :: Utils
看到这些输出,就表示安装成功
二:配置hazelcast
Cellar内部使用了hazelcast实现的集群功能
编辑文件 etc/hazelcast.xml 文件
做如下修改
20行的 <multicast enabled="true"> true 改为 false
24行的<tcp-ip enabled="false"> 改为如下
<tcp-ip enabled="true">
<member>192.168.200.132</member>
</tcp-ip>
注意:这里的member是除本机之外的其他安装了karaf的电脑
40行的<interfaces enabled="false"> 改为如下
<interfaces enabled="true">
<interface>192.168.100.*</interface>
</interfaces>
注意:这里的interface是启用本机的哪个网卡
修改完成之后,保存,重启karaf
三:配置其他节点
在其他的节点上,重复执行第一、二步骤
四:使用
Cellar 节点
节点识别
当你安装了Cellar,你的Karaf实例自动成为一个Cellar集群的节点,因此会尝试发现其他Cellar节点。
你可以使用list-nodes命令来列出已知的Cellar节点:
karaf@root()> cluster:node-list
| Id | Host Name | Port
-------------------------------------------------
| 192.168.200.132:5701 | 192.168.200.132 | 5701
x | 192.168.100.95:5701 | 192.168.100.95 | 5701
karaf@root()>
Cellar 组
你可以在Cellar中定义组。组使你可以定义需要在一起运行的特殊节点和资源。 这样可以使某些节点(不在组内的)不需要与组内节点的变化进行同步。
默认情况下,Cellar节点属于default组:
karaf@root()> cluster:group-list
| Group | Members
----------------------------------------------------------
x | default | 192.168.200.132:5701 192.168.100.95:5701(x)
karaf@root()>
你可以用group-create命令来创建一个新的组:
karaf@root()> cluster:group-create my
新建的my组中还没有任何节点:
karaf@root()> cluster:group-list
| Group | Members
----------------------------------------------------------
| my |
x | default | 192.168.200.132:5701 192.168.100.95:5701(x)
karaf@root()>
使用cluster:group-join可以往组里面增加node
安装bundle
在cellar里面安装bundle,只需要在任意一台node中安装就可以了,cellar会自动同步
karaf@root()> cluster:bundle-install default mvn:com.google.code.gson/gson/2.4
这样就安装好了gson 了,去其他node上看,发现也成功安装好了
注意:如果直接使用普通的安装方式,则不会安装到其他的节点上
卸载bundle: cluster:bundle-uninstall default 66
安装feature
和bundle一样,feature安装之后,会启动同步到其他的node中去
安装:karaf@root()> cluster:feature-install default cellar-webconsole
list之后,就发现已经安装好了,而且已经同步到其他node
120 | Active | 80 | 4.0.0 | Apache Karaf :: Cellar :: Webconsole
卸载:karaf@root()> cluster:feature-uninstall default 120
当然,还有其他很多cluster的命令
karaf@root()> cluster
cluster cluster:bundle-block cluster:bundle-install cluster:bundle-list cluster:bundle-start
cluster:bundle-stop cluster:bundle-uninstall cluster:config-block cluster:config-delete cluster:config-list
cluster:config-property-append cluster:config-property-delete cluster:config-property-excluded cluster:config-property-list cluster:config-property-set
cluster:consumer-start cluster:consumer-status cluster:consumer-stop cluster:feature-block cluster:feature-install
cluster:feature-list cluster:feature-repo-add cluster:feature-repo-list cluster:feature-repo-remove cluster:feature-uninstall
cluster:group-create cluster:group-delete cluster:group-join cluster:group-list cluster:group-pick
cluster:group-quit cluster:group-set cluster:handler-start cluster:handler-status cluster:handler-stop
cluster:node-list cluster:node-ping cluster:producer-start cluster:producer-status cluster:producer-stop
cluster:sync
大家可以试试
