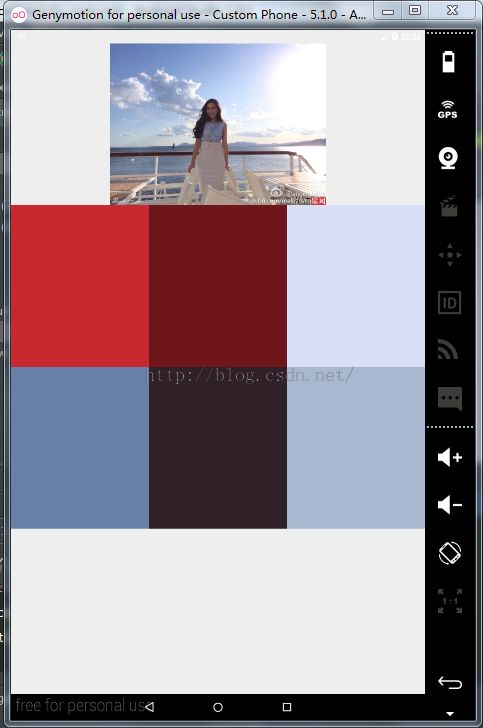
安卓5.x的Palette详解和使用
Palette的使用确实让app的色调变的更加和谐,Palette的本意就是调色板,然后一般也没有注意,但是既然是安卓5.x的新东西所以有必要去学习学习。
或许你已经看到了Palette从图像中提取突出的颜色,这样可以把色值赋给ActionBar、或者其他,可以让界面整个色调统一。你现在去看5.x的界面觉得色调和谐不会觉得刺眼,然后呢,UI的开发是app的重点,一般一个app很酷炫不一定让大家都接受,相反一些清新简约的反受人喜欢,那么我们就来看看Palette。
看下源码:
* A number of colors with different profiles are extracted from the image://从图片中提取不同的配置 * <ul> * <li>Vibrant</li>/ * <li>Vibrant Dark</li> * <li>Vibrant Light</li> * <li>Muted</li> * <li>Muted Dark</li> * <li>Muted Light</li> * </ul>从上面的可以看出Android内置了6种提取色调的种类:
Vibrant (有活力)
Vibrant dark(有活力 暗色)
Vibrant light(有活力 亮色)
Muted (柔和)
Muted dark(柔和 暗色)
Muted light(柔和 亮色)
* // Synchronous * Palette p = Palette.from(bitmap).generate(); * * // Asynchronous * Palette.from(bitmap).generate(new PaletteAsyncListener() { * public void onGenerated(Palette p) { * // Use generated instance * } * });从上面的可以看出Palette有两种初始化方法,也就是同步和异步方法。再去寻找你会发现同步和异步都有2个方法来初始化:
两种同步方法:
|
1
2
3
4
5
|
// 最好在加载图片线程中使用
// 默认调色板大小(16).private static final int DEFAULT_CALCULATE_NUMBER_COLORS = 16;
Palette p = Palette.generate(bitmap);
//设置调色板大小numcolor
Palette p = Palette.generate(bitmap, numcolor
);
|
两种异步方法:
|
1
2
3
4
5
6
7
8
9
10
11
12
13
14
15
16
|
// 简单快速的实现方法,内部使用AsyncTask
// 但是可能不是最优的方法(因为有线程的切换)
// 默认调色板大小(16).
Palette.generateAsync(bitmap,
new
Palette.PaletteAsyncListener() {
@Override
public void onGenerated(Palette palette) {
// palette为生成的调色板
}
});
// 设置调色板大小
Palette.generateAsync(bitmap, numcolor,
new
Palette.PaletteAsyncListener() {
@Override
public void onGenerated(Palette palette) {
// palette为生成的调色板
}
});
|
public interface PaletteAsyncListener {
    /**  * Called when the {@link Palette} has been generated.  */  void onGenerated(Palette palette);
}
当被generated时候触发这个回调接口:接着我们来到generate方法,你会发现他是一个AsyncTask: 接下来我们再去看
generateAsync()这个方法,它也是一个AsyncTask(),它同样是会去调用generate()。
然后在里面他会去执行:
第一步:scaleBitmapDown()
从方法很简单的知道,通过传入目标bitmap和最大目标大小,如果目标图片的尺寸不大于最大目标尺寸就不做处理,否则就压缩图片。将图片缩小,在整个过程中,可以降低计算量和减少内存的使用,跟不缩小也能达到一样的效果。private static Bitmap scaleBitmapDown(Bitmap bitmap, final int targetMaxDimension) { final int maxDimension = Math.max(bitmap.getWidth(), bitmap.getHeight()); if (maxDimension <= targetMaxDimension) { return bitmap; } final float scaleRatio = targetMaxDimension / (float) maxDimension; return Bitmap.createScaledBitmap(bitmap, Math.round(bitmap.getWidth() * scaleRatio), Math.round(bitmap.getHeight() * scaleRatio), false); }
第二步:getPixelsFromBitmap()
从方法名很显然看出是从压缩bitmap里面获取一个图片的像素整形数组。
private int[] getPixelsFromBitmap(Bitmap bitmap) {
    final int bitmapWidth = bitmap.getWidth();
    final int bitmapHeight = bitmap.getHeight();
    final int[] pixels = new int[bitmapWidth * bitmapHeight];
      .....
}
第三步:ColorCutQuantizer
final ColorCutQuantizer quantizer = new ColorCutQuantizer(
        getPixelsFromBitmap(bitmap),
        mMaxColors,
        mFilters.isEmpty() ? null : mFilters.toArray(new Filter[mFilters.size()]));
// If created a new bitmap, recycle it if (bitmap != mBitmap) {
    bitmap.recycle();
}
swatches = quantizer.getQuantizedColors();
if (logger != null) {
    logger.addSplit("Color quantization completed");
}
ColorCutQuantizer(final int[] pixels, final int maxColors, final Palette.Filter[] filters) {
    mTimingLogger = LOG_TIMINGS ? new TimingLogger(LOG_TAG, "Creation") : null;
    mFilters = filters;

    final int[] hist = mHistogram = new int[1 << (QUANTIZE_WORD_WIDTH * 3)];
    for (int i = 0; i < pixels.length; i++) {
        final int quantizedColor = quantizeFromRgb888(pixels[i]);
        // Now update the pixel value to the quantized value  pixels[i] = quantizedColor;
        // And update the histogram  hist[quantizedColor]++;
    }
   ......
}
将各种颜色,根据RGB转HSL算法,得出对应的HSL(H: Hue 色相,S:Saturation 饱和度L Lightness 明度),根据特定的条件,比如是明度L是否接近白色,黑色,根据条件,过滤掉这些颜色,什么是HSL和RGB转HSL算法可以查看下百科,比较有详细说明
算了,看的眼睛痛,也懒得去找了,我们来代码实现Palette:
一.首先需要添加Palette的依赖
在build.gralde的dependencies添加appcomat v7和palette-v7依赖
dependencies {
    compile fileTree(include: ['*.jar'], dir: 'libs')
    compile 'com.android.support:appcompat-v7:23.1.0'  compile 'com.android.support:design:23.1.0'  compile 'com.android.support:palette-v7:23.1.0' }
二 .准备图像源
Bitmap bitmap = BitmapFactory.decodeResource(getResources(), R.drawable.test);
Bitmap bitmap = BitmapFactory.decodeResource(getResources(), R.drawable.test);
三.创建Palette实例
有四种创建实例的方法:(用的时候可以任选一种)
// Synchronous methods. Palette p = Palette.generate(bitmap);
// Allows you to specify the maximum palette size, in this case 24. Palette p = Palette.generate(bitmap, 24);
// Asynchronous methods Palette.generateAsync(bitmap, new Palette.PaletteAsyncListener() {
@Override
public void onGenerated(Palette palette) {
        // Here's your generated palette  }
        });
// Allows you to specify the maximum palette size, in this case 24.  Palette.generateAsync(bitmap, 24, new Palette.PaletteAsyncListener() {
@Override
public void onGenerated(Palette palette) {
        // Here's your generated palette  }
        });
调色板的大小值越大,生成的调色板的时间越长,数值越小,得到的颜色信息也越少,调色板的大小最好根据图片类型来决定,比如:
-
联系人头像:最优值24~32
-
风景图:8-16
当然默认是16,大多数情况下都可以取得很好的效果。
四.使用Palette对象(用的时候可以任选一种)
Palette.Swatch s1 = Palette.getVibrantSwatch(); //充满活力的色板 Palette.Swatch s2 = Palette.getDarkVibrantSwatch(); //充满活力的暗色类型色板 Palette.Swatch s3 = Palette.getLightVibrantSwatch(); //充满活力的亮色类型色板 Palette.Swatch s4 = Palette.getMutedSwatch(); //黯淡的色板 Palette.Swatch s5 = Palette.getDarkMutedSwatch(); //黯淡的暗色类型色板 Palette.Swatch s6 = Palette.getLightMutedSwatch(); //黯淡的亮色类型色板
五.根据需求自由选择色板类型
Swatch色板中提供了五种颜色信息,分别如下:
swatch.getPopulation(): the number of pixels represented by this swatch
    swatch.getRgb(): the RGB value of this color.
    swatch.getHsl(): the HSL value of this color.
    swatch.getBodyTextColor(): the RGB value of a text color which can be displayed on top of this color.
    swatch.getTitleTextColor(): the RGB value of a text color which can be displayed on top of this color.
示例代码如下:
|
1
2
3
4
5
|
Palette.Swatch swatch = palette.getVibrantSwatch();
TextView titleView = ...;
if
(swatch !=
null
) {
titleView.setBackgroundColor(swatch.getRgb());
titleView.setTextColor(swatch.getTitleTextColor());
//设置文本颜色
|
请注意必须对swatch进行是否为null判断,因为如果面板无法找到相匹配的标准色,那么然后将返回null,不进行判断将会出现空指针异常
<?xml version="1.0" encoding="utf-8"?>
<LinearLayout
    xmlns:android="http://schemas.android.com/apk/res/android"
    xmlns:tools="http://schemas.android.com/tools"
    android:layout_width="match_parent"
    android:layout_height="match_parent"
    android:orientation="vertical"
    tools:context=".MainActivity">
   <ImageView
       android:id="@+id/image_src"
       android:layout_width="fill_parent"
       android:layout_height="300dp"
       android:padding="0dp"
       android:src="@drawable/bayby"/>
    <LinearLayout
        android:layout_width="fill_parent"
        android:layout_height="wrap_content"
        android:orientation="horizontal"
        android:weightSum="3">
        <ImageView
            android:id="@+id/image_1"
            android:layout_width="fill_parent"
            android:layout_height="300dp"
            android:layout_weight="1"
            android:padding="0dp"
           />
        <ImageView
            android:id="@+id/image_2"
            android:layout_width="fill_parent"
            android:layout_height="300dp"
            android:layout_weight="1"
            android:padding="0dp"
            />
        <ImageView
            android:id="@+id/image_3"
            android:layout_width="fill_parent"
            android:layout_height="300dp"
            android:layout_weight="1"
            android:padding="0dp"
            />
    </LinearLayout>
    <LinearLayout
        android:layout_width="fill_parent"
        android:layout_height="wrap_content"
        android:orientation="horizontal"
        android:weightSum="3">
        <ImageView
            android:id="@+id/image_4"
            android:layout_width="fill_parent"
            android:layout_height="300dp"
            android:layout_weight="1"
            android:padding="0dp"
            />
        <ImageView
            android:id="@+id/image_5"
            android:layout_width="fill_parent"
            android:layout_height="300dp"
            android:layout_weight="1"
            android:padding="0dp"
            />
        <ImageView
            android:id="@+id/image_6"
            android:layout_width="fill_parent"
            android:layout_height="300dp"
            android:layout_weight="1"
            android:padding="0dp"
            />
    </LinearLayout>
</LinearLayout>
代码:
import android.graphics.Bitmap;
import android.graphics.BitmapFactory;
import android.os.Bundle;
import android.support.v7.app.AppCompatActivity;
import android.support.v7.graphics.Palette;
import android.widget.ImageView;

public class MainActivity extends AppCompatActivity {
    private ImageView image1;
    private ImageView image2;
    private ImageView image3;
    private ImageView image4;
    private ImageView image5;
    private ImageView image6;
    private Palette.Swatch s1,s2,s3,s4,s5,s6;
    @Override
    protected void onCreate(Bundle savedInstanceState) {
        super.onCreate(savedInstanceState);
        setContentView(R.layout.activity_main);
        getView();
        init();


    }
    private void getView() {
        image1 = (ImageView) findViewById(R.id.image_1);
        image2 = (ImageView) findViewById(R.id.image_2);
        image3 = (ImageView) findViewById(R.id.image_3);
        image4 = (ImageView) findViewById(R.id.image_4);
        image5 = (ImageView) findViewById(R.id.image_5);
        image6 = (ImageView) findViewById(R.id.image_6);
    }
    private void init() {
        Bitmap bitmap= BitmapFactory.decodeResource(getResources(),R.drawable.bayby);
        //使用默认的调色板大小(16)
        Palette.generateAsync(bitmap, new Palette.PaletteAsyncListener() {
            @Override
            public void onGenerated(Palette palette) {
                s1 = palette.getVibrantSwatch();
                s2 = palette.getDarkVibrantSwatch();
                s3 = palette.getLightVibrantSwatch();
                s4 = palette.getMutedSwatch();
                s5 = palette.getDarkMutedSwatch();
                s6 = palette.getLightMutedSwatch();
                if (s1 != null) {
                    image1.setBackgroundColor(s1.getRgb());
                    s1.getPopulation();
                }
                if (s2 != null) {
                    image2.setBackgroundColor(s2.getRgb());
                }
                if (s3 != null) {
                    image3.setBackgroundColor(s3.getRgb());
                }
                if (s4 != null) {
                    image4.setBackgroundColor(s4.getRgb());
                }
                if (s5 != null) {
                    image5.setBackgroundColor(s5.getRgb());
                }
                if (s6 != null) {
                    image6.setBackgroundColor(s6.getRgb());
                }
            }
        });
    }
}
一张图片就去取出了6种颜色,还是比较奇妙吧。。。
