第二章、小实例,画字,画线,矩形,画图,动画(iOS学习笔记,从零开始。)
源代码再此下载: http://download.csdn.net/detail/hherima/5108428
本博文主要讲如何绘制文字,绘制一条直线,绘制图片,给图片添加动画。
首先,创建一个Single View Application的工程。
起名字showApp.这是一个空的工程。源文件里只有下图1中的几个源文件。
(上图1)
我们发现ViewController这个类继承自UIViewController。是MVC模式中的C,即控制类。
其次,我们添加一个V类,Myview
继承自UIView用于绘制。按照如下几个图的步骤。添加Myview类。
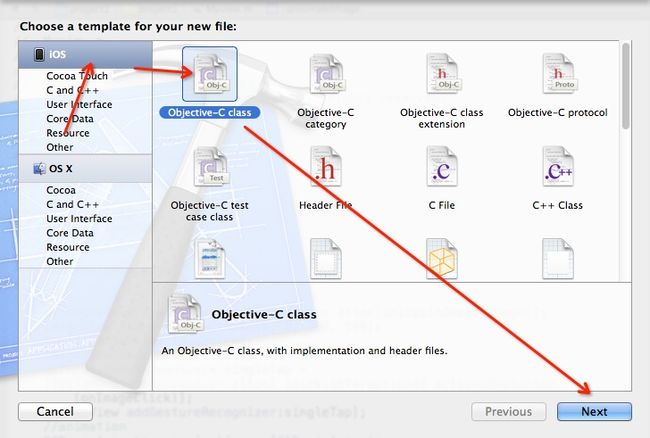
在ShowApp工程上右键,选择New file...,弹出下面对话框图2
(上图2)
下一步键入添加类的名字Myview图3,注意选择继承自UIView
(上图3)
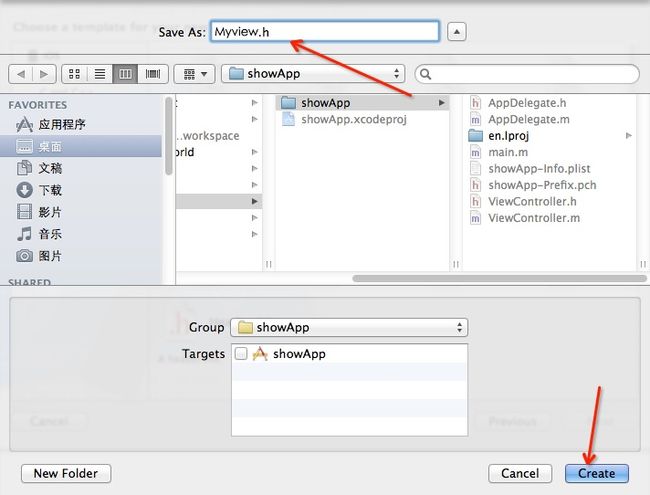
下一步保存到showapp工程里如图4
(上图4)
好了,Myview已经添加到showapp工程里了。(如果Myview.h和Myview.m不在showApp文件夹下,可以拖拽到showApp文件夹下)
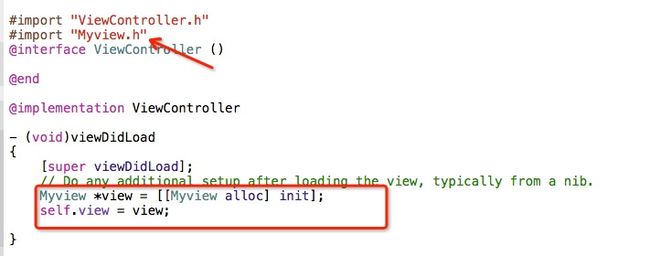
第三,在ViewController中初始化Myview
在ViewController.m中的viewDidLoad中添加两行代码,出事后Myview。注意在头文件处,引入#import "Myview.h",如图5.
(上图5)
第四,添加绘制文本的代码。
在Myview.m中的drawRect函数中,添加代码如下:
/*
// Only override drawRect: if you perform custom drawing.
// An empty implementation adversely affects performance during animation.
*/
- (void)drawRect:(CGRect)rect
{
UIColor *magentaColor =
[UIColorcolorWithRed:0.5f
green:0.0f
blue:0.5f
alpha:1.0f];
/* Set the color in the graphical context */
[magentaColorset];
/* Load the font */
UIFont *helveticaBold = [UIFontfontWithName:@"HelveticaNeue-Bold"size:30.0f];
/* Our string to be drawn */
NSString *myString =@"Hellow world";
/* Draw the string using the font. The color has
already been set */
[myStringdrawAtPoint:CGPointMake(25,190)withFont:helveticaBold];
}
运行工程,模拟器就会显示Hello world了。
第五,绘制一条直线。
这里,我把绘制文本的代码放到drawMyText函数里,绘制直线的代码放到drawMyLine函数。如下所示:
*注意在头文件中声明drawMyText 和 drawMyLine两个函数。
- (void)drawMyText;
- (void)drawMyLine;
下面是源文件代码。
- (void)drawRect:(CGRect)rect
{
[selfdrawMyText];
[selfdrawMyLine];
}
- (void)drawMyText
{
UIColor *magentaColor =
[UIColorcolorWithRed:0.5f
green:0.0f
blue:0.5f
alpha:1.0f];
/* Set the color in the graphical context */
[magentaColorset];
/* Load the font */
UIFont *helveticaBold = [UIFontfontWithName:@"HelveticaNeue-Bold"size:30.0f];
/* Our string to be drawn */
NSString *myString =@"Hellow world";
/* Draw the string using the font. The color has
already been set */
[myStringdrawAtPoint:CGPointMake(25,190)withFont:helveticaBold];
}
- (void)drawMyLine
{
//draw line
CGContextRef context =UIGraphicsGetCurrentContext();//获取画布
CGContextSetStrokeColorWithColor(context, [UIColorredColor].CGColor);//线条颜色
CGContextSetShouldAntialias(context,NO);//设置线条平滑,不需要两边像素宽
CGContextSetLineWidth(context,1.0f);//设置线条宽度
CGContextMoveToPoint(context,153,6); //线条起始点
CGContextAddLineToPoint(context,153,145);//线条结束点
CGContextStrokePath(context);//结束,也就是开始画
}
一条竖直的直线已经显示到模拟器上了。
第六、绘制矩形
首先,获取上下文
CGContextRef context = UIGraphicsGetCurrentContext();
画无框矩形
- //设置矩形填充颜色:红色
- CGContextSetRGBFillColor(context, 1.0, 0.0, 0.0, 1.0);
- //填充矩形
- CGContextFillRect(context, rect);
- //执行绘画
- CGContextStrokePath(context);
画有框矩形
- //设置矩形填充颜色:红色
- CGContextSetRGBFillColor(context, 1.0, 0.0, 0.0, 1.0);
- //填充矩形
- CGContextFillRect(context, rect);
- //设置画笔颜色:黑色
- CGContextSetRGBStrokeColor(context, 0, 0, 0, 1);
- //设置画笔线条粗细
- CGContextSetLineWidth(context, 1.0);
- //画矩形边框
- CGContextAddRect(context,rect);
- //执行绘画
- CGContextStrokePath(context);
第七、绘制图片(注意图片可能颠倒)
事先准备一个图片,例如我准备了一个图片叫1.png,放到Support Files文件夹下:
在Myview.h里添加属性。
@interface Myview : UIView
{
UIImage* image1;
}
@property (nonatomic,retain)UIImage* image1;
- (void)drawMyImage;
在Myview.m文件里,添加@synthesize image1;
- (void)drawRect:(CGRect)rect
{
[self drawMyText];
[self drawMyLine];
[selfdrawMyImage];
}
- (void)drawMyImage
{
//draw image
CGContextRef context =UIGraphicsGetCurrentContext();//获取画布
//CGContextDrawImage(context,CGRectMake(160,0,160, 150), [image1CGImage]);
//上面这种方式,绘制出来的图片是翻转的,开始不知道。因为测试的图片都比较对称。后发发现是上下颠倒了
//下面才是正确的方法。
UIGraphicsPushContext( context );
[imagedrawInRect:imageRect];
UIGraphicsPopContext();
}
使用CGContextDrawImage绘制图片上下颠倒的原因:
在iOS的不同framework中使用着不同的坐标系 :
UIKit - y轴向下
Core Graphics(Quartz) - y轴向上
OpenGL ES - y轴向上
UIKit是iPhone SDK的Cocoa Touch层的核心framework,是iPhone应用程序图形界面和事件驱动的基础,它和传统的windows桌面一样,坐标系是y轴向下的;
Core Graphics(Quartz)一个基于2D的图形绘制引擎,它的坐标系则是y轴向上的;
OpenGL ES是iPhone SDK的2D和3D绘制引擎,它使用左手坐标系,它的坐标系也是y轴向上的,如果不考虑z轴,在二维下它的坐标系和Quartz是一样的。
所以,当通过CGContextDrawImage绘制图片到一个context中时,如果传入的是UIImage的CGImageRef,因为UIKit和CG坐标系y轴相反,所以图片绘制将会上下颠倒。
在initWithFrame里对image1进行初始化,为1.png
- (id)initWithFrame:(CGRect)frame
{
self = [super initWithFrame:frame];
if (self) {
// Initialization code
image1 = [UIImageimageNamed:@"1.png"];
}
return self;
}
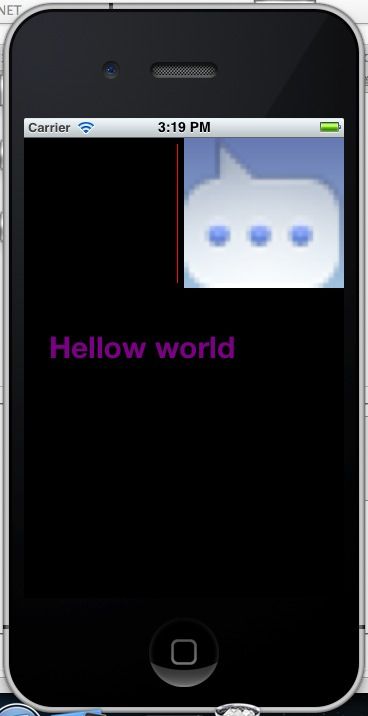
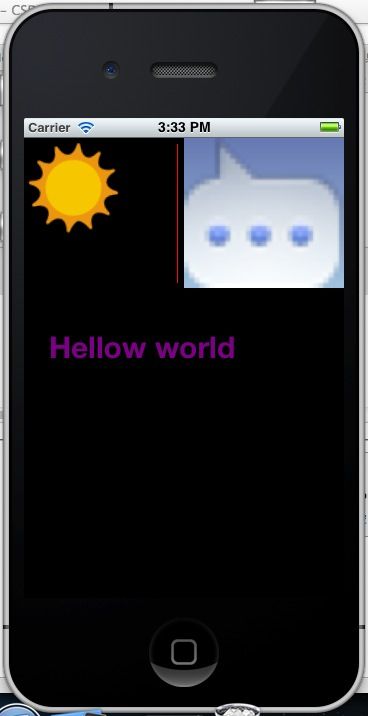
运行工程,就能显示图片了,如图6
第八、给图片添加动画
上面的图片显示方式直接绘制图片,下面的方式为控件方式绘制。当然,图片控件的话,就不需要我们自己绘制了,iOS的UI库已经帮助我们绘制了。代码如下:彩色部分需要添加。
头文件部分。
@interface Myview : UIView
{
UIImage* image1;
UIImage* image2;
}
@property (nonatomic,retain) UIImage* image1;
@property (nonatomic,retain)UIImage* image2;
- (void)drawRect:(CGRect)rect;
- (void)drawMyText;
- (void)drawMyLine;
- (void)drawMyImage;
- (void)annimateImage;
@end
源文件部分
#import "Myview.h"
#import <QuartzCore/QuartzCore.h>
@implementation Myview
@synthesize image1;
@synthesize image2;
- (id)initWithFrame:(CGRect)frame
{
self = [super initWithFrame:frame];
if (self) {
// Initialization code
image1 = [UIImage imageNamed:@"1.png"];
image2 = [UIImageimageNamed:@"2.png"];
[selfannimateImage];
}
return self;
}
- (void)annimateImage
{
UIImageView* imageView = [[UIImageViewalloc]initWithImage:image2];
imageView.frame =CGRectMake(0,0,100,100);
[selfaddSubview:imageView];
imageView.userInteractionEnabled =YES;
UITapGestureRecognizer* singleTap =
[[UITapGestureRecognizeralloc]initWithTarget:selfaction:@selector(onImageClick)];
[imageViewaddGestureRecognizer:singleTap];
//animation
CABasicAnimation *animation = [CABasicAnimationanimationWithKeyPath:@"transform"];
animation.delegate =self;
animation.toValue = [NSValuevalueWithCATransform3D:CATransform3DMakeRotation(M_PI ,0, 0,1.0)];
animation.duration =1;
animation.cumulative =YES;
animation.repeatCount =INT_MAX;
[imageView.layeraddAnimation:animationforKey:@"animation"];
}
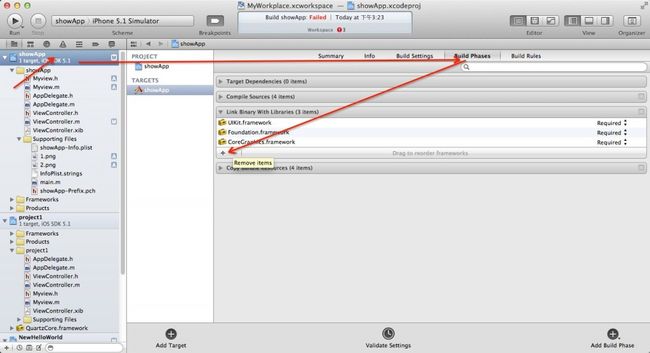
代码已经添加完毕,但是我们不能编译过去,因为我们使用了QuartzCore的头文件,却没有引入它的库。怎么引入,如图7所示:点击工程:
(上图7)
点击“+”号,将QuartzCore的库引入。再次编译工程成功运行。如图8
(上图8)
上图中的太阳一直在转动,这就是我们加的动画。
源代码再此下载:http://download.csdn.net/detail/hherima/5108428

