CUDA从入门到精通(十):性能剖析和Visual Profiler
入门后的进一步学习的内容,就是如何优化自己的代码。我们前面的例子没有考虑任何性能方面优化,是为了更好地学习基本知识点,而不是其他细节问题。从本节开始,我们要从性能出发考虑问题,不断优化代码,使执行速度提高是并行处理的唯一目的。
测试代码运行速度有很多方法,C语言里提供了类似于SystemTime()这样的API获得系统时间,然后计算两个事件之间的时长从而完成计时功能。在CUDA中,我们有专门测量设备运行时间的API,下面一一介绍。
翻开编程手册《CUDA_Toolkit_Reference_Manual》,随时准备查询不懂得API。我们在运行核函数前后,做如下操作:
cudaEvent_t start,stop;//事件对象
cudaEventCreate(&start);//创建事件
cudaEventCreate(&stop);//创建事件
cudaEventRecord(start,stream);//记录开始
myKernel<<<dimg,dimb,size_smem,stream>>>(parameter list);//执行核函数

cudaEventRecord(stop,stream);//记录结束事件
cudaEventSynchronize(stop);//事件同步,等待结束事件之前的设备操作均已完成
float elapsedTime;
cudaEventElapsedTime(&elapsedTime,start,stop);//计算两个事件之间时长(单位为ms)
核函数执行时间将被保存在变量elapsedTime中。通过这个值我们可以评估算法的性能。下面给一个例子,来看怎么使用计时功能。
前面的例子规模很小,只有5个元素,处理量太小不足以计时,下面将规模扩大为1024,此外将反复运行1000次计算总时间,这样估计不容易受随机扰动影响。我们通过这个例子对比线程并行和块并行的性能如何。代码如下:
#include "cuda_runtime.h"
#include "device_launch_parameters.h"
#include <stdio.h>
cudaError_t addWithCuda(int *c, const int *a, const int *b, size_t size);
__global__ void addKernel_blk(int *c, const int *a, const int *b)
{
    int i = blockIdx.x;
    c[i] = a[i]+ b[i];
}
__global__ void addKernel_thd(int *c, const int *a, const int *b)
{
    int i = threadIdx.x;
    c[i] = a[i]+ b[i];
}
int main()
{
    const int arraySize = 1024;
    int a[arraySize] = {0};
    int b[arraySize] = {0};
	for(int i = 0;i<arraySize;i++)
	{
		a[i] = i;
		b[i] = arraySize-i;
	}
    int c[arraySize] = {0};
    // Add vectors in parallel.
    cudaError_t cudaStatus;
	int num = 0;
	cudaDeviceProp prop;
	cudaStatus = cudaGetDeviceCount(&num);
	for(int i = 0;i<num;i++)
	{
		cudaGetDeviceProperties(&prop,i);
	}
	cudaStatus = addWithCuda(c, a, b, arraySize);
    if (cudaStatus != cudaSuccess)
	{
        fprintf(stderr, "addWithCuda failed!");
        return 1;
    }

    // cudaThreadExit must be called before exiting in order for profiling and
    // tracing tools such as Nsight and Visual Profiler to show complete traces.
    cudaStatus = cudaThreadExit();
    if (cudaStatus != cudaSuccess)
	{
        fprintf(stderr, "cudaThreadExit failed!");
        return 1;
    }
    for(int i = 0;i<arraySize;i++)
	{
		if(c[i] != (a[i]+b[i]))
		{
			printf("Error in %d\n",i);
		}
	}
    return 0;
}
// Helper function for using CUDA to add vectors in parallel.
cudaError_t addWithCuda(int *c, const int *a, const int *b, size_t size)
{
    int *dev_a = 0;
    int *dev_b = 0;
    int *dev_c = 0;
    cudaError_t cudaStatus;

    // Choose which GPU to run on, change this on a multi-GPU system.
    cudaStatus = cudaSetDevice(0);
    if (cudaStatus != cudaSuccess)
	{
        fprintf(stderr, "cudaSetDevice failed!  Do you have a CUDA-capable GPU installed?");
        goto Error;
    }
    // Allocate GPU buffers for three vectors (two input, one output)    .
    cudaStatus = cudaMalloc((void**)&dev_c, size * sizeof(int));
    if (cudaStatus != cudaSuccess)
	{
        fprintf(stderr, "cudaMalloc failed!");
        goto Error;
    }
    cudaStatus = cudaMalloc((void**)&dev_a, size * sizeof(int));
    if (cudaStatus != cudaSuccess)
	{
        fprintf(stderr, "cudaMalloc failed!");
        goto Error;
    }
    cudaStatus = cudaMalloc((void**)&dev_b, size * sizeof(int));
    if (cudaStatus != cudaSuccess)
	{
        fprintf(stderr, "cudaMalloc failed!");
        goto Error;
    }
    // Copy input vectors from host memory to GPU buffers.
    cudaStatus = cudaMemcpy(dev_a, a, size * sizeof(int), cudaMemcpyHostToDevice);
    if (cudaStatus != cudaSuccess)
	{
        fprintf(stderr, "cudaMemcpy failed!");
        goto Error;
    }
    cudaStatus = cudaMemcpy(dev_b, b, size * sizeof(int), cudaMemcpyHostToDevice);
    if (cudaStatus != cudaSuccess)
	{
        fprintf(stderr, "cudaMemcpy failed!");
        goto Error;
    }
	cudaEvent_t start,stop;
	cudaEventCreate(&start);
	cudaEventCreate(&stop);
	cudaEventRecord(start,0);
	for(int i = 0;i<1000;i++)
	{
//		addKernel_blk<<<size,1>>>(dev_c, dev_a, dev_b);
		addKernel_thd<<<1,size>>>(dev_c, dev_a, dev_b);
	}
	cudaEventRecord(stop,0);
	cudaEventSynchronize(stop);
	float tm;
	cudaEventElapsedTime(&tm,start,stop);
	printf("GPU Elapsed time:%.6f ms.\n",tm);
    // cudaThreadSynchronize waits for the kernel to finish, and returns
    // any errors encountered during the launch.
    cudaStatus = cudaThreadSynchronize();
    if (cudaStatus != cudaSuccess)
	{
        fprintf(stderr, "cudaThreadSynchronize returned error code %d after launching addKernel!\n", cudaStatus);
        goto Error;
    }
    // Copy output vector from GPU buffer to host memory.
    cudaStatus = cudaMemcpy(c, dev_c, size * sizeof(int), cudaMemcpyDeviceToHost);
    if (cudaStatus != cudaSuccess)
	{
        fprintf(stderr, "cudaMemcpy failed!");
        goto Error;
    }
Error:
    cudaFree(dev_c);
    cudaFree(dev_a);
    cudaFree(dev_b);
    return cudaStatus;
}
addKernel_blk是采用块并行实现的向量相加操作,而addKernel_thd是采用线程并行实现的向量相加操作。分别运行,得到的结果如下图所示:
线程并行:
块并行:
可见性能竟然相差近16倍!因此选择并行处理方法时,如果问题规模不是很大,那么采用线程并行是比较合适的,而大问题分多个线程块处理时,每个块内线程数不要太少,像本文中的只有1个线程,这是对硬件资源的极大浪费。一个理想的方案是,分N个线程块,每个线程块包含512个线程,将问题分解处理,效率往往比单一的线程并行处理或单一块并行处理高很多。这也是CUDA编程的精髓。
上面这种分析程序性能的方式比较粗糙,只知道大概运行时间长度,对于设备程序各部分代码执行时间没有一个深入的认识,这样我们就有个问题,如果对代码进行优化,那么优化哪一部分呢?是将线程数调节呢,还是改用共享内存?这个问题最好的解决方案就是利用Visual Profiler。下面内容摘自《CUDA_Profiler_Users_Guide》
“Visual Profiler是一个图形化的剖析工具,可以显示你的应用程序中CPU和GPU的活动情况,利用分析引擎帮助你寻找优化的机会。”
其实除了可视化的界面,NVIDIA提供了命令行方式的剖析命令:nvprof。对于初学者,使用图形化的方式比较容易上手,所以本节使用Visual Profiler。
打开Visual Profiler,可以从CUDA Toolkit安装菜单处找到。主界面如下:
我们点击File->New Session,弹出新建会话对话框,如下图所示:
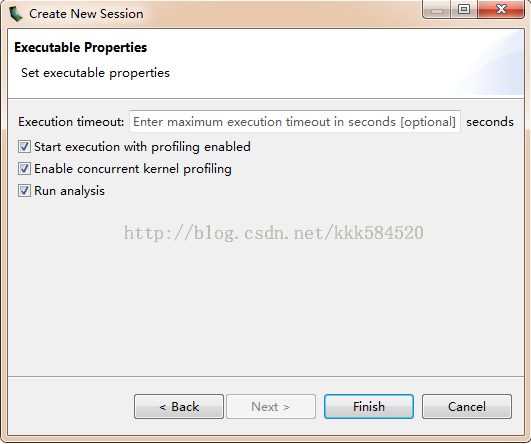
其中File一栏填入我们需要进行剖析的应用程序exe文件,后面可以都不填(如果需要命令行参数,可以在第三行填入),直接Next,见下图:
第一行为应用程序执行超时时间设定,可不填;后面三个单选框都勾上,这样我们分别使能了剖析,使能了并发核函数剖析,然后运行分析器。
点Finish,开始运行我们的应用程序并进行剖析、分析性能。
上图中,CPU和GPU部分显示了硬件和执行内容信息,点某一项则将时间条对应的部分高亮,便于观察,同时右边详细信息会显示运行时间信息。从时间条上看出,cudaMalloc占用了很大一部分时间。下面分析器给出了一些性能提升的关键点,包括:低计算利用率(计算时间只占总时间的1.8%,也难怪,加法计算复杂度本来就很低呀!);低内存拷贝/计算交叠率(一点都没有交叠,完全是拷贝——计算——拷贝);低存储拷贝尺寸(输入数据量太小了,相当于你淘宝买了个日记本,运费比实物价格还高!);低存储拷贝吞吐率(只有1.55GB/s)。这些对我们进一步优化程序是非常有帮助的。
我们点一下Details,就在Analysis窗口旁边。得到结果如下所示:
通过这个窗口可以看到每个核函数执行时间,以及线程格、线程块尺寸,占用寄存器个数,静态共享内存、动态共享内存大小等参数,以及内存拷贝函数的执行情况。这个提供了比前面cudaEvent函数测时间更精确的方式,直接看到每一步的执行时间,精确到ns。
在Details后面还有一个Console,点一下看看。
这个其实就是命令行窗口,显示运行输出。看到加入了Profiler信息后,总执行时间变长了(原来线程并行版本的程序运行时间只需4ms左右)。这也是“测不准定理”决定的,如果我们希望测量更细微的时间,那么总时间肯定是不准的;如果我们希望测量总时间,那么细微的时间就被忽略掉了。
后面Settings就是我们建立会话时的参数配置,不再详述。
通过本节,我们应该能对CUDA性能提升有了一些想法,好,下一节我们将讨论如何优化CUDA程序。


