RecyclerView 列表控件中简单实现时间线
时间
时间,时间,时间啊;走慢一点吧~
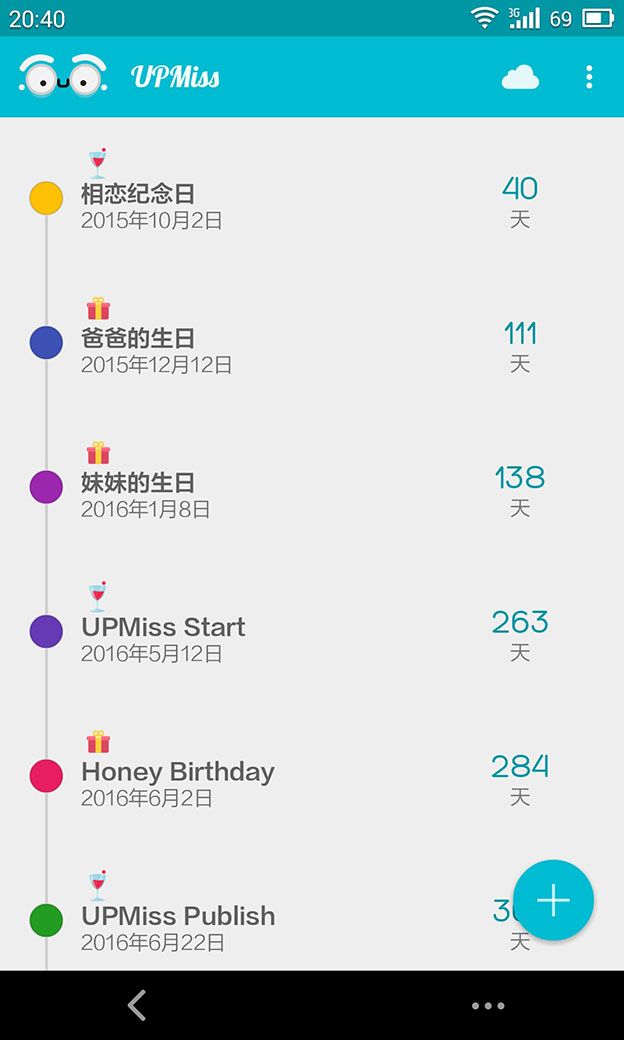
看见很多软件中都有时间线的东西,貌似天气啊,旅游啊什么的最多了;具体实现方式很多,在本篇文章中讲解一种自定义View封装的方式。
效果
分析
软件中,可以看见前面的时间线也就是线条加上圆圈组成;当然这里的圆圈与线条也都是可以随意换成其他的,比如图片等等。
当然这里最简单的来说,是上面一个线条,然后一个圆圈,然后下面一个线条;上线条在第一条数据时不做显示,下线条在最后一条数据时不做显示。
这里自定义布局部分也就是把旁边的线条与圆圈封装到一起,并使用简单的方法来控制是否显示。
当封装好了后,与旁边的文字部分也就是水瓶方向的线性布局了,然后设置为每一个的RecyclerView 的Item的布局也就完成了。
控件
控件很简单,首先我们继承View,取名为 TimeLineMarker 就OK。
Attrs 属性
开始控件之前先准备好需要的属性。
<?xml version="1.0" encoding="utf-8"?>
<resources>
    <declare-styleable name="TimeLineMarker">
        <attr name="markerSize" format="dimension" />
        <attr name="marker" format="color|reference" />
        <attr name="beginLine" format="color|reference" />
        <attr name="endLine" format="color|reference" />
        <attr name="lineSize" format="dimension" />
    </declare-styleable>
</resources>
在这里也就准备了线条的大小、开始线条、结束线条、中间标示部分及大小。
属性与现实
    private int mMarkerSize = 24;
    private int mLineSize = 12;
    private Drawable mBeginLine;
    private Drawable mEndLine;
    private Drawable mMarkerDrawable;

    @Override
    protected void onDraw(Canvas canvas) {
        if (mBeginLine != null) {
            mBeginLine.draw(canvas);
        }

        if (mEndLine != null) {
            mEndLine.draw(canvas);
        }

        if (mMarkerDrawable != null) {
            mMarkerDrawable.draw(canvas);
        }

        super.onDraw(canvas);
    }
两个大小属性,3个具体的Drawable,然后在onDraw方法中进行具体的显示也就OK。
构造与属性初始化
在上面我们定义了属性,在这里我们在构造函数中获取XML所设置的属性。
    public TimeLineMarker(Context context) {
        this(context, null);
    }

    public TimeLineMarker(Context context, AttributeSet attrs) {
        this(context, attrs, 0);
    }

    public TimeLineMarker(Context context, AttributeSet attrs, int defStyle) {
        super(context, attrs, defStyle);
        init(attrs);
    }

    private void init(AttributeSet attrs) {
        // Load attributes
        final TypedArray a = getContext().obtainStyledAttributes(
                attrs, R.styleable.TimeLineMarker, 0, 0);

        mMarkerSize = a.getDimensionPixelSize(
                R.styleable.TimeLineMarker_markerSize,
                mMarkerSize);

        mLineSize = a.getDimensionPixelSize(
                R.styleable.TimeLineMarker_lineSize,
                mLineSize);

        mBeginLine = a.getDrawable(
                R.styleable.TimeLineMarker_beginLine);

        mEndLine = a.getDrawable(
                R.styleable.TimeLineMarker_endLine);

        mMarkerDrawable = a.getDrawable(
                R.styleable.TimeLineMarker_marker);

        a.recycle();

        if (mBeginLine != null)
            mBeginLine.setCallback(this);

        if (mEndLine != null)
            mEndLine.setCallback(this);

        if (mMarkerDrawable != null)
            mMarkerDrawable.setCallback(this);
    }
Drawable 的位置与大小初始化
属性啥的有了,具体的Drawable 也有了,要显示的地方调用也是OK了;但是如果没有进行进行具体的位置调整这一切也都没有意义。
    @Override
    protected void onSizeChanged(int w, int h, int oldw, int oldh) {
        super.onSizeChanged(w, h, oldw, oldh);
        initDrawableSize();
    }

    private void initDrawableSize() {
        int pLeft = getPaddingLeft();
        int pRight = getPaddingRight();
        int pTop = getPaddingTop();
        int pBottom = getPaddingBottom();

        int width = getWidth();
        int height = getHeight();

        int cWidth = width - pLeft - pRight;
        int cHeight = height - pTop - pBottom;

        Rect bounds;

        if (mMarkerDrawable != null) {
            // Size
            int markerSize = Math.min(mMarkerSize, Math.min(cWidth, cHeight));
            mMarkerDrawable.setBounds(pLeft, pTop,
                    pLeft + markerSize, pTop + markerSize);

            bounds = mMarkerDrawable.getBounds();
        } else {
            bounds = new Rect(pLeft, pTop, pLeft + cWidth, pTop + cHeight);
        }


        int halfLineSize = mLineSize >> 1;
        int lineLeft = bounds.centerX() - halfLineSize;

        if (mBeginLine != null) {
            mBeginLine.setBounds(lineLeft, 0, lineLeft + mLineSize, bounds.top);
        }

        if (mEndLine != null) {
            mEndLine.setBounds(lineLeft, bounds.bottom, lineLeft + mLineSize, height);
        }
    }
initDrawableSize 方法进行具体的运算,而运算的时间点就是当控件的大小改变(onSizeChanged)的时候。
在初始化中采用了一定的投机取巧;这里利用了上内边距与下内边距分别作为上线条与下线条的长度;而线条与中间的标识都采用了水平距中。
其他设置方法
    public void setLineSize(int lineSize) {
        if (mLineSize != lineSize) {
            this.mLineSize = lineSize;
            initDrawableSize();
            invalidate();
        }
    }

    public void setMarkerSize(int markerSize) {
        if (this.mMarkerSize != markerSize) {
            mMarkerSize = markerSize;
            initDrawableSize();
            invalidate();
        }
    }

    public void setBeginLine(Drawable beginLine) {
        if (this.mBeginLine != beginLine) {
            this.mBeginLine = beginLine;
            if (mBeginLine != null) {
                mBeginLine.setCallback(this);
            }
            initDrawableSize();
            invalidate();
        }
    }

    public void setEndLine(Drawable endLine) {
        if (this.mEndLine != endLine) {
            this.mEndLine = endLine;
            if (mEndLine != null) {
                mEndLine.setCallback(this);
            }
            initDrawableSize();
            invalidate();
        }
    }

    public void setMarkerDrawable(Drawable markerDrawable) {
        if (this.mMarkerDrawable != markerDrawable) {
            this.mMarkerDrawable = markerDrawable;
            if (mMarkerDrawable != null) {
                mMarkerDrawable.setCallback(this);
            }
            initDrawableSize();
            invalidate();
        }
    }
在设置中,首先判断是否更改,如果更改那么就更新并重新计算位置;随后刷新界面。
到这里,控件差不多准备OK了,其中还有很多可以完善的地方,比如加上快捷设置颜色什么的,也可以加上大小计算的东西。同时还可以加上时间线是水瓶还是垂直等等。在这里就不累赘介绍哪些了。下面来看看如何使用。
使用
XML布局
ITEM布局item_time_line.xml
<?xml version="1.0" encoding="utf-8"?>

<LinearLayout xmlns:android="http://schemas.android.com/apk/res/android"
    xmlns:app="http://schemas.android.com/apk/res-auto"
    xmlns:tools="http://schemas.android.com/tools"
    android:layout_width="match_parent"
    android:layout_height="wrap_content"
    android:orientation="horizontal"
    android:paddingLeft="@dimen/lay_16"
    android:paddingRight="@dimen/lay_16"
    tools:ignore="MissingPrefix">

    <net.qiujuer.example.timeline.widget.TimeLineMarker
        android:id="@+id/item_time_line_mark"
        android:layout_width="wrap_content"
        android:layout_height="match_parent"
        android:paddingBottom="@dimen/lay_16"
        android:paddingLeft="@dimen/lay_4"
        android:paddingRight="@dimen/lay_4"
        android:paddingTop="@dimen/lay_16"
        app:beginLine="@color/black_alpha_32"
        app:endLine="@color/black_alpha_32"
        app:lineSize="2dp"
        app:marker="@drawable/ic_timeline_default_marker"
        app:markerSize="24dp" />

    <TextView
        android:id="@+id/item_time_line_txt"
        android:layout_width="match_parent"
        android:layout_height="wrap_content"
        android:layout_gravity="center"
        android:paddingBottom="@dimen/lay_16"
        android:paddingLeft="@dimen/lay_4"
        android:paddingRight="@dimen/lay_4"
        android:paddingTop="@dimen/lay_16"
        android:textColor="@color/grey_600"
        android:textSize="@dimen/font_16" />

</LinearLayout>
在这里我们之间使用顺序布局,左边是TimelIne控件,右边是一个简单的字体控件,具体使用中可以细化一些。
在TImeLine控件中我们的Mark是使用的drawable/ic_timeline_default_marker;这个就是一个简单的圆圈而已;对于自己美化可以使用一张图片代替或者更加复杂的布局;当然上面的线条就更加简单了,就直接使用颜色代替。
<?xml version="1.0" encoding="utf-8"?>
<shape xmlns:android="http://schemas.android.com/apk/res/android" android:shape="oval">
    <solid android:color="@color/cyan_500" />
    <stroke  android:width="1dp" android:color="@color/black_alpha_32" />
</shape>
主界面XML RecyclerView
<RelativeLayout xmlns:android="http://schemas.android.com/apk/res/android"
    xmlns:tools="http://schemas.android.com/tools"
    android:layout_width="match_parent"
    android:layout_height="match_parent"
    android:paddingBottom="@dimen/activity_vertical_margin"
    android:paddingLeft="@dimen/activity_horizontal_margin"
    android:paddingRight="@dimen/activity_horizontal_margin"
    android:paddingTop="@dimen/activity_vertical_margin"
    tools:context=".MainActivity">

    <android.support.v7.widget.RecyclerView
        android:id="@+id/time_line_recycler"
        android:layout_width="match_parent"
        android:layout_height="match_parent"
        android:clickable="true"
        android:fadeScrollbars="true"
        android:fadingEdge="none"
        android:focusable="true"
        android:focusableInTouchMode="true"
        android:overScrollMode="never"
        android:scrollbarSize="2dp"
        android:scrollbarThumbVertical="@color/cyan_500"
        android:scrollbars="vertical" />

</RelativeLayout>
在这里就是加上了一个RecyclerView 控件在主界面就OK。
Java代码部分
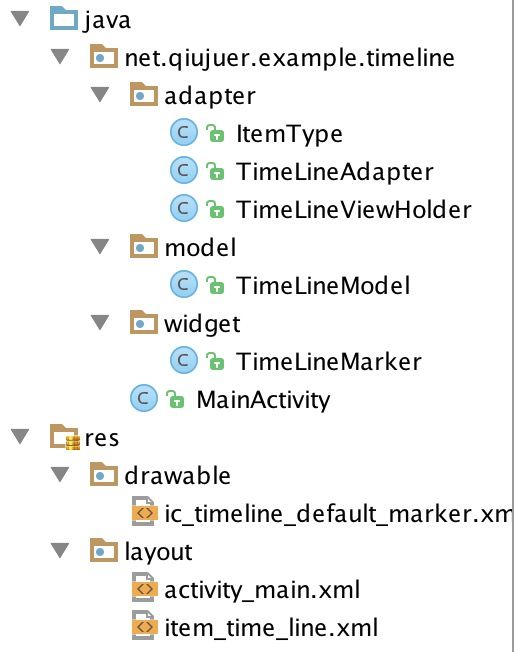
widget中就是具体的自定义控件,model是具体的数据模型,adapter部分,这里有一个Recyclerview的adapter文件,以及一个具体的Item TimeLineViewHolder,当然在这里还定义了一个ItemType类,该类用来标示每个Item的类型,比如头部,第一个,普通,最后一个,底部等等。
TimeLineModel.java
package net.qiujuer.example.timeline.model;

/** * Created by qiujuer * on 15/8/23. */
public class TimeLineModel {
    private String name;
    private int age;

    public TimeLineModel() {

    }

    public TimeLineModel(String name, int age) {
        this.name = name;
        this.age = age;
    }

    public int getAge() {
        return age;
    }

    public String getName() {
        return name;
    }

    public void setAge(int age) {
        this.age = age;
    }

    public void setName(String name) {
        this.name = name;
    }
}
一个名字,一个年龄也就OK。
ItemType.java
package net.qiujuer.example.timeline.adapter;

/** * Created by qiujuer * on 15/8/23. */
public class ItemType {
    public final static int NORMAL = 0;

    public final static int HEADER = 1;
    public final static int FOOTER = 2;

    public final static int START = 4;
    public final static int END = 8;

    public final static int ATOM = 16;
}
分别定义了几个静态值,分别代表普通、头部、底部、开始、结束、原子;当然其中有些可以不用定义。
TimeLineViewHolder.java
package net.qiujuer.example.timeline.adapter;

import android.support.v7.widget.RecyclerView;
import android.view.View;
import android.widget.TextView;

import net.qiujuer.example.timeline.R;
import net.qiujuer.example.timeline.model.TimeLineModel;
import net.qiujuer.example.timeline.widget.TimeLineMarker;

/** * Created by qiujuer * on 15/8/23. */
public class TimeLineViewHolder extends RecyclerView.ViewHolder {
    private TextView mName;

    public TimeLineViewHolder(View itemView, int type) {
        super(itemView);

        mName = (TextView) itemView.findViewById(R.id.item_time_line_txt);

        TimeLineMarker mMarker = (TimeLineMarker) itemView.findViewById(R.id.item_time_line_mark);
        if (type == ItemType.ATOM) {
            mMarker.setBeginLine(null);
            mMarker.setEndLine(null);
        } else if (type == ItemType.START) {
            mMarker.setBeginLine(null);
        } else if (type == ItemType.END) {
            mMarker.setEndLine(null);
        }

    }

    public void setData(TimeLineModel data) {
        mName.setText("Name:" + data.getName() + " Age:" + data.getAge());
    }
}
该文件为RecyclerView 的Adapter中每个Item需要实现的Holder类。
在该类中,我们在构造函数中需要传入一个根View同时传入一个当然item的状态。
随后使用find….找到控件,在这里我们把TextView保存起来,而TimeLineView找到后直接进行初始化设置。
根据传入的ItemType来判断是否是第一个,最后一个,以及原子;然后设置TimeLineView的属性。
在下面的setData方法中我们显示具体的Model数据。
TimeLineAdapter.java
适配器部分,我们需要做的工作是;根据具体的数据渲染上对应的界面就OK。
package net.qiujuer.example.timeline.adapter;

import android.support.v7.widget.RecyclerView;
import android.view.LayoutInflater;
import android.view.View;
import android.view.ViewGroup;

import net.qiujuer.example.timeline.R;
import net.qiujuer.example.timeline.model.TimeLineModel;

import java.util.List;

/** * Created by qiujuer * on 15/8/23. */
public class TimeLineAdapter extends RecyclerView.Adapter<TimeLineViewHolder> {
    private List<TimeLineModel> mDataSet;

    public TimeLineAdapter(List<TimeLineModel> models) {
        mDataSet = models;
    }

    @Override
    public int getItemViewType(int position) {
        final int size = mDataSet.size() - 1;
        if (size == 0)
            return ItemType.ATOM;
        else if (position == 0)
            return ItemType.START;
        else if (position == size)
            return ItemType.END;
        else return ItemType.NORMAL;
    }

    @Override
    public TimeLineViewHolder onCreateViewHolder(ViewGroup viewGroup, int viewType) {
        // Create a new view.
        View v = LayoutInflater.from(viewGroup.getContext())
                .inflate(R.layout.item_time_line, viewGroup, false);
        return new TimeLineViewHolder(v, viewType);
    }

    @Override
    public void onBindViewHolder(TimeLineViewHolder timeLineViewHolder, int i) {
        timeLineViewHolder.setData(mDataSet.get(i));
    }

    @Override
    public int getItemCount() {
        return mDataSet.size();
    }
}
在这里需要着重说一下:我复写了getItemViewType方法;在该方法中我们需要设置对应的Item的类型;在这里传入的是item的坐标,需要返回的是item的具体状态,该状态标示是int类型;在这里我使用的是ItemType的静态属性。
该方法会在调用onCreateViewHolder方法之前调用;而onCreateViewHolder方法中的第二个参数int值也就是从getItemViewType之中来;所以我们可以在这里进行对应的数据状态标示。
而在onCreateViewHolder方法中我们返回一个:TimeLineViewHolder就OK,随后在onBindViewHolder方法中进行数据初始化操作。
MainActivity.java
上面所有都准备好了,下面就进行具体的显示。
在这里就只贴出核心代码了;篇幅也是有些长。
    private RecyclerView mRecycler;

    @Override
    protected void onCreate(Bundle savedInstanceState) {
        super.onCreate(savedInstanceState);
        setContentView(R.layout.activity_main);

        mRecycler = (RecyclerView) findViewById(R.id.time_line_recycler);
        initRecycler();
    }

    private void initRecycler() {
        LinearLayoutManager layoutManager = new LinearLayoutManager(this);
        layoutManager.setOrientation(LinearLayoutManager.VERTICAL);

        TimeLineAdapter adapter = new TimeLineAdapter(getData());

        mRecycler.setLayoutManager(layoutManager);
        mRecycler.setAdapter(adapter);
    }

    private List<TimeLineModel> getData() {
        List<TimeLineModel> models = new ArrayList<TimeLineModel>();

        models.add(new TimeLineModel("XiaoMing", 21));
        models.add(new TimeLineModel("XiaoFang", 20));
        models.add(new TimeLineModel("XiaoHua", 25));
        models.add(new TimeLineModel("XiaoA", 22));
        models.add(new TimeLineModel("XiaoNiu", 23));

        return models;
    }
在这里就是傻瓜的操作了,流程就是准备好对应的数据,装进Adapter,准备好对应的布局方式,然后都设置到RecyclerView中就OK。
效果
效果虽然简单,但是也算是五脏具全;其中无非就是控件的自定义。这个自定义是可以扩展的,大家可以扩展为水平方向试试。
代码
博客代码都开源到项目中了。
地址:https://github.com/qiujuer/BeFoot/tree/master/blog/sample/TimeLine
写在最后
文章的开始截屏来源于:最近没事儿捣鼓了一个APP[UPMiss],一个简单的生日,纪念日提醒软件;欢迎大家尝鲜。
{UPMiss} 思念你的夏天
下载地址:
- 魅族
- 百度 这个审核有问题,明明没有支付的东西,结果说有支付的SDK存在,不得不说百度的自动审核有很大漏洞。
- 豌豆荚 新版2.0还在审核中!
========================================================
作者:qiujuer
博客:blog.csdn.net/qiujuer
网站:www.qiujuer.net
开源库:github.com/qiujuer/Genius-Android
开源库:github.com/qiujuer/Blink
转载请注明出处:http://blog.csdn.net/qiujuer/article/details/47910185
—— 学之开源,用于开源;初学者的心态,与君共勉!
========================================================


