【转】在MAC系统中编译ANDROID源码与模拟器内核GoldFish
转自:http://blog.csdn.net/keenite/article/details/9566777
本文是我在MAC下编译ANDROID源码和模拟器内核GoldFish时的过程与所遇到的问题解决方案,到目前已经编译完成并在模拟器中成功加载自己的内核,同时在系统中加载了一个内核模块进行测试,下面是编译和问题解决过程:
约定:
1. $代表在Mac终端进行命令操作,#代表在Android终端进行操作
Section 1: 环境准备
首先,在MAC中编译源码需要的文件系统格式是case-sensitive的,对所要存储代码的盘查看其信息,可知其是否case-sensitive
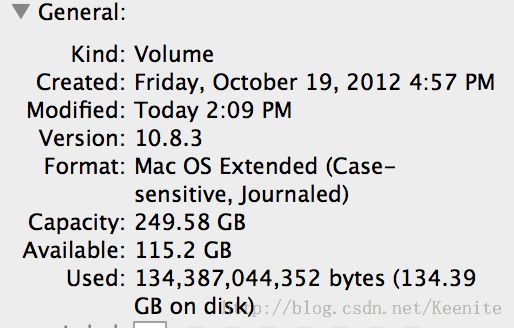
我的操作系统是MAC OS X 10.8.3,原本是非Case-sensitive的,这里是遇到的问题一,要下载源码Android官方已说明需要Case-sensitive,若不是,有两种解决方案
1. 创建一个Case-sensitive的镜相
方法如android官网:http://source.android.com/source/initializing.html 所示
2. 使用ipartition将整个盘转换为case-sensitive
本人采用的是此方法,毕竟不知道最后会用多少硬盘空间来做Android开发,ipartition网址:http://www.coriolis-systems.com/iPartition.php
因为需要从Recovery模式启动,需要用一个U盘作启动盘然后然后此工具进行case-sensitive的转换。
然后是相关软件的一些准备:
1> Xcode4
因为之前做过iOS开发,所以一直就有。XCode是需要在https://developer.apple.com/注册后下载的开发工具。
2>安装MacPorts
因为在Mac上不可能如Linux中用apt-get install等命令解析依赖获得库,需要在http://www.macports.org/install.php 中安装Macports来获取库
并将/opt/local/bin加入环境变量中,写入.bash_profile即可:
export PATH=$PATH:/opt/local/bin
然后用如下命令获取相关库:
$ POSIXLY_CORRECT=1 sudo port install gmake libsdl git-core gnupg
这里有可能出现如下的问题:
Warning:
The Command Line Tools for Xcode don't appear to be installed;most ports will likely fail to build.
解决办法
在Terminal中执行sudo xcode-select -switch /Applications/Xcode.app/Contents/Developer
打开XCODE安装组件 Command line tools :
xcode> preferences >downloads>components然后选择Command line tools下载并安装。
3> JDK6/7
要编译Android还需要有JDK的支持,JDK6可在java.sun.com.下载,下载后将其加入到环境变量中,在此我用的JDK7, 并不是官网上推荐的JDK6
4> Python 2.6--2.7
直接下载即可 python.org. , 不过好像MAC中是自带的
Section 2: Android源码下载与编译
这部分在http://source.android.com/source/downloading.html中有详细说明每步作用
1. 准备源码下载工具repo
建立一个文件夹用于放工具repo,并将其路径写入.bash_profile环境变量
$ mkdir ~/bin $ PATH=~/bin:$PATH
$ curl http://commondatastorage.googleapis.com/git-repo-downloads/repo > ~/bin/repo

$ chmod a+x ~/bin/repo
3. 建立源码文件夹并下载源码目录manifest
建立工作目录
$ mkdir Source
$ cd Source
建立工作目录在工作目录中下载源码目录文件manifest
$ repo init -u https://android.googlesource.com/platform/manifest开始同步代码:
$ repo sync
在这个同步代码过程中,可能会有很多次断线或停滞,关闭终端重新repo sync即可, 在所有同步完成前,此目录都会为空,看不到任何文件,只有用ls -a可以看到一个.git文件夹
4.建立好环境变量并开始编译
$ source build/envsetup.sh
$ lunch full-eng
$ make goldfish_armv7_defconfig -j4
Section 3:下载模拟器源码GoldFish编译并用emulator加载
这个部分主要是参考 http://blog.csdn.net/flydream0/article/details/7070392
1. 下载GoldFish源码于特定文件夹
- $mkdir GoldFish_Source
- $cd GoldFish_Source
- $git clone http://android.googlesource.com/kernel/goldfish.git
2.切换分支并编译内核
下载完成后,会看到有一个goldfish的文件夹,进入文件夹ls看到文件夹内容仍为空,用git branch -a查看当前的分支
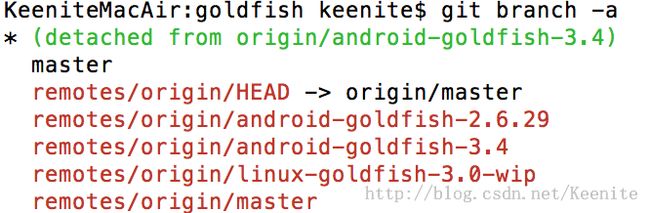
然后使用如下命令切换到goldfish-3.4分支
- $git checkout remotes/origin/android-goldfish-3.4
- export PATH=/Users/keenite/Android/Source/prebuilts/gcc/darwin-x86/arm/arm-eabi-4.6/bin:$PATH
然后修改Kernel的Makefile文件:
# ARCH ?= (SUBARCH)
修改为:
ARCH ?= arm
为了保证环境变量等的正确,用以下命令再配置下环境变量
- $ source build/envsetup.sh
- $ lunch full-eng
这里在编译前要注意一个问题,如果想在Android Emulator里面用insmod安装Linux的内核模块时会出现错误,因为Android SDK的自带kernel中没有把LKM功能打开,所以如果要开发内核模块需要打开内核LKM功能并重新编译,否则会出现以下错误(如果不想用LKM可以跳过此步)
error: variable '__this_module' has initializer but incomplete type
要解决这个问题需要配置内核选项,首先执行
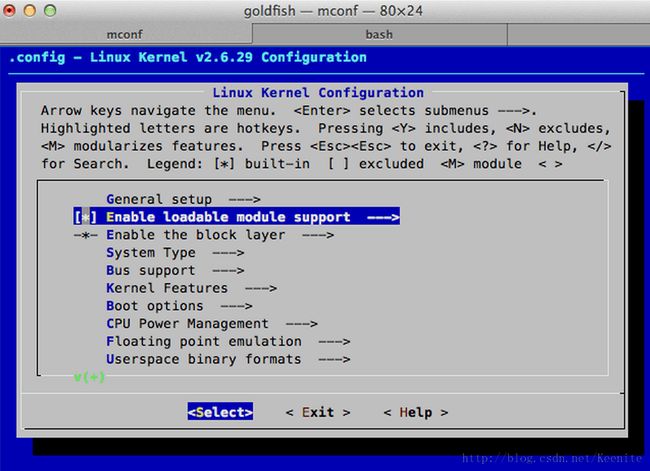
$ make ARCH=arm CROSS_COMPILE=arm-eabi- menuconfig
进入内核配置界面,勾选下列选项
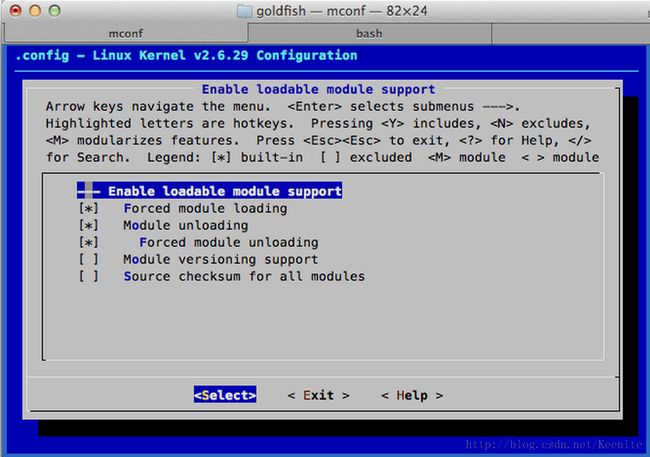
[*] Enable loadable module support ---> (选中这一项,按空格即可)
[*] Forced module loading (选中上述一项,按回车即可看到此项)
[*] Module unloading
[*] Forced module unloading
保存内核配置后就可以用如下命令开始编译
$ make -j4
如果编译成功,最后编译出来的内核会存在内核源下的/arch/arm/boot/中,名为zImage。
这时候就需要先配置一下环境变量来指定源码,否则会出现如下错误:
emulator: ERROR: You did not specify a virtual device name, and the system
directory could not be found.
为了解决这个问题,我们需要配置两个环境变量加入.bash_profile中:
export ANDROID_BUILD_TOP=/Users/keenite/Android/Source
export ANDROID_PRODUCT_OUT=/Users/keenite/Android/Source/out/target/product/generic
然后使用$source ~/.bash_profile来更新环境变量,完成后我们就可以用如下命令来启动模拟器并加载指定内核:
$ emulator -kernel /Users/keenite/Android/GoldFish_Source/goldfish/arch/arm/boot/zImage
启动后可以从About Phone中看到内核信息:

Section4: 加载内核模块
本部分主要参考:http://www.linuxidc.com/Linux/2011-05/35740.htm
注意,为了要加载内核模块,必须要对我们的内核进行Section3中2部分的内核配置,打开LKM
1. 编译内核模块
先建立一个文件夹用于放代码:
$mkdir TestCode
$cd TestCode
然后Makefile与hello.c文件内容分别如下所示:
Makefile
- KERNELDIR:=/Users/keenite/Android/GoldFish_Source/goldfish
- PWD:=$(shell pwd)
- ARCH=arm
- CROSS_COMPILE=/Users/keenite/Android/Source/prebuilts/gcc/darwin-x86/arm/arm-eabi-4.6/bin/arm-eabi-
- CC=$(CROSS_COMPILE)gcc
- LD=$(CROSS_COMPILE)ld
- obj-m:=hello.o
- modules:
- $(MAKE) -C $(KERNELDIR) ARCH=$(ARCH) CROSS_COMPILE=$(CROSS_COMPILE) M=$(PWD) modules
- clean:
- rm *.o *.ko *.mod.c *.markers *.order *.symvers
hello.c
- #include<linux/init.h>
- #include<linux/module.h>
- MODULE_LICENSE("Dual BSD/GPL");
- static int hello_init(void)
- {
- printk(KERN_ALERT "Hello World----------->\n");
- return 0;
- }
- static void hello_exit(void)
- {
- printk(KERN_ALERT "Good bye World.-------<\n");
- }
- module_init(hello_init);
- module_exit(hello_exit);
HOSTCC scripts/mod/mk_elfconfig
scripts/mod/mk_elfconfig.c:4:17: error: elf.h: No such file or directory
因为Mac的include文件少了一个elf.h
从 http://download.csdn.net/detail/keenite/5830705中下载,放在scripts/mod目录中, 然后再进行编译即可。
编译完成后的hello.ko文件便是我们的内核模块文件
2. 将hello.ko放入手机中并加载
使用命令:
$adb push hello.ko /data/
将模块放入手机中的/data/文件夹下,若此时adb警告
failed to copy 'hello.ko' to '/data/hello.ko': Read-only file system
则使用adb remount后再push一次文件即可
这时候使用:
$adb shell
命令进入模拟器控制台,然后使用如下命令加载模块
#cd data
#insmod hello.ko
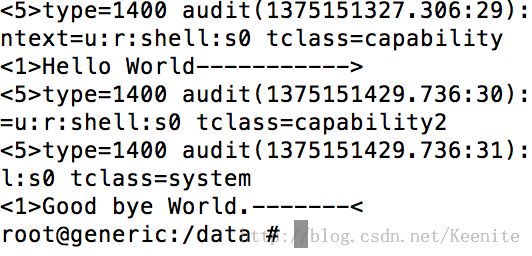
这时候我们可以用dmesg命令来查看当前手机中的内核打印信息,这时候能够看到我们代码中的打印信息

用lsmod命令可以查看当前加载的模块状态,rmmod命令移除模块
当我们用
#rmmod hello
移除模块后,用dmesg命令查看内核信息,可以看到模块的移除信息
In the case of Ubuntu12.04LTS the packages need to be installed are:
$ sudo apt-get install git gnupg flex bison gperf build-essential \ zip curl libc6-dev libncurses5-dev x11proto-core-dev \ libx11-dev:i386 libreadline6-dev:i386 \ libgl1-mesa-dev g++-multilib mingw32 tofrodos \ python-markdown libxml2-utils xsltproc zlib1g-dev:i386Using libgl1-mesa-glx-lts-quantal:i386 in place of libgl1-mesa-glx:i386