5.Swift 跳转和动画
5.Swift 跳转和动画
- Swift 跳转和动画
- ViewController的跳转
- ViewController的返回
- UIView过渡动画
- UIView动画效果
- 自定义动画
ViewController的跳转
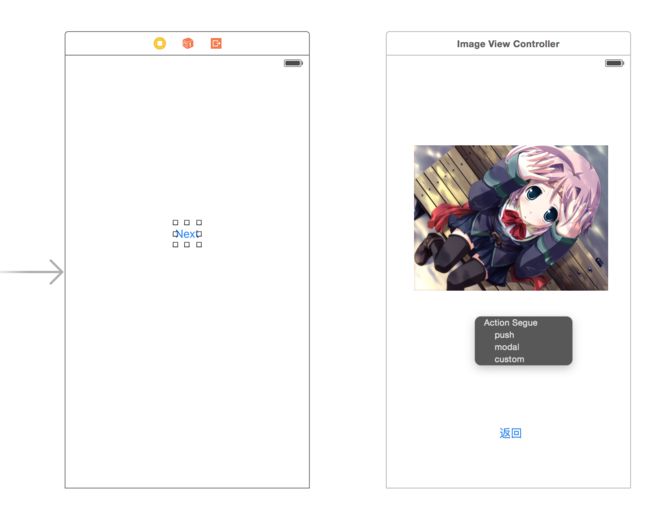
选择一个button或者别的子View,按住control键拖动到目标ViewController,会弹出一个选项框。
这里选择modal。
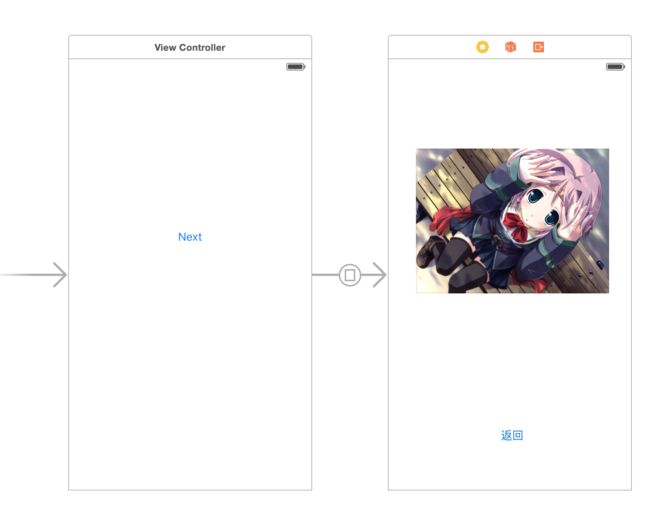
出现了箭头指向目标ViewController,此时已经建立了跳转。
ViewController的返回
ViewController.dismissViewControllerAnimated(flag: Bool, completion: (() -> Void)?)
self.dismissViewControllerAnimated(true, completion: {})UIView过渡动画
UIView.transitionFromView(fromView: UIView, toView: UIView, duration: NSTimeInterval, options: UIViewAnimationOptions, completion: ((Bool) -> Void)?)
这里的例子是:定义了两个UIImageView,点击切换两个UIImageView动态放入ViewController中。
class ViewController: UIViewController {

    @IBOutlet var img1: UIImageView!
    @IBOutlet var img2: UIImageView!
    private var isFirstView = true
    override func viewDidLoad() {
        super.viewDidLoad()
        // Do any additional setup after loading the view, typically from a nib.
        self.view.addSubview(self.img1)
    }

    override func didReceiveMemoryWarning() {
        super.didReceiveMemoryWarning()
        // Dispose of any resources that can be recreated.
    }

    override func touchesBegan(touches: Set<UITouch>, withEvent event: UIEvent?) {
        func completeAnim(v:Bool){
            self.isFirstView = !self.isFirstView
        }

        if(self.isFirstView){
            UIView.transitionFromView(self.img1, toView: self.img2, duration: 1.0, options: UIViewAnimationOptions.TransitionFlipFromLeft, completion: completeAnim)
        }else{
            UIView.transitionFromView(self.img2, toView: self.img1, duration: 1.0, options: UIViewAnimationOptions.TransitionFlipFromLeft, completion: completeAnim)
        }

    }

}
UIView动画效果
开始动画
UIView.beginAnimations(animationID: String?, context: UnsafeMutablePointer<Void>)
设置动画
UIView.setAnimationTransition(transition: UIViewAnimationTransition, forView view: UIView, cache: Bool)
设置持续时间
UIView.setAnimationDuration(duration: NSTimeInterval)
提交动画
UIView.commitAnimations()
class ViewController: UIViewController {

    @IBOutlet var img: UIImageView!
    override func viewDidLoad() {
        super.viewDidLoad()
        // Do any additional setup after loading the view, typically from a nib.
        self.view.addSubview(self.img)
    }

    override func didReceiveMemoryWarning() {
        super.didReceiveMemoryWarning()
        // Dispose of any resources that can be recreated.
    }

    override func touchesBegan(touches: Set<UITouch>, withEvent event: UIEvent?) {
        // 开始动画
        UIView.beginAnimations(nil, context: nil)
        // 设置动画
        UIView.setAnimationTransition(UIViewAnimationTransition.FlipFromLeft, forView: self.img, cache: true)
        // 设置持续时间
        UIView.setAnimationDuration(1.0)
        // 提交动画
        UIView.commitAnimations()
    }

}
自定义动画
所谓动画,就是在开始或者结束阶段,对动画属性的数值的改变。打个比方,渐进动画,就是开始把View的透明度设为稍低,在动画的持续时间内不断增加可见度,直到持续时间结束,才吧View的可见度设为正常或者最大。达到一种视觉的差错的冲击感觉,渐出动画,则反之。
自定义动画,也是如此,手动修改不同的属性值,在持续时间内修改,达到所谓的动画。
以2秒内图片消失动画为例
UIView.transitionWithView(view: UIView, duration: NSTimeInterval, options: UIViewAnimationOptions, animations: (() -> Void)?, completion: ((Bool) -> Void)?)
class ViewController: UIViewController { @IBOutlet var img: UIImageView! override func viewDidLoad() { super.viewDidLoad() // Do any additional setup after loading the view, typically from a nib. self.view.addSubview(self.img) } override func didReceiveMemoryWarning() { super.didReceiveMemoryWarning() // Dispose of any resources that can be recreated. } override func touchesBegan(touches: Set<UITouch>, withEvent event: UIEvent?) { func anim(){ // 手动设置图片透明度 self.img.alpha = 0 } // 动画完成时,回调 func completionCallBack(v:Bool){ } // 当前View自身的过渡动画 UIView.transitionWithView(self.img, duration: 2.0, options: UIViewAnimationOptions.TransitionNone, animations: anim, completion: completionCallBack) } }

