《Mastering opencv....读书笔记》基于标记的虚拟现实
虚拟现实技术一直比较火,应用领域也非常广。本次为大家讲解虚拟现实的一个入门级例子,如果对以下内容感兴趣:
初音:
http://jandan.net/2012/07/09/augmented-reality-girlfriend.html
动画纹身:
http://jandan.net/2011/07/10/animated-tattoo.html
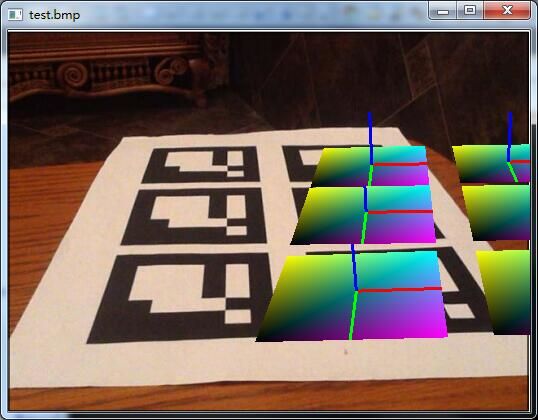
本次讲解将是上述实现的技术基础。老外首先在一张白纸上画有若干标记,然后想要在这张纸所在位置画若干虚拟形状(矩形平面、坐标轴)。Mastering opencv书上是用IOS手机实现的,为了让大家方便理解算法流程,忽略了xcode部分。
另外,这次所有代码在vs2010+opencv2.4.11+opengl的release+多字符集模式下运行OK,vs2008及其他有各种问题。大致分为三步:标记检测、标记识别、画AR图。需要关注的知识点行列式几何意义、海明码编码、三维姿态估计等等。
一、标记检测
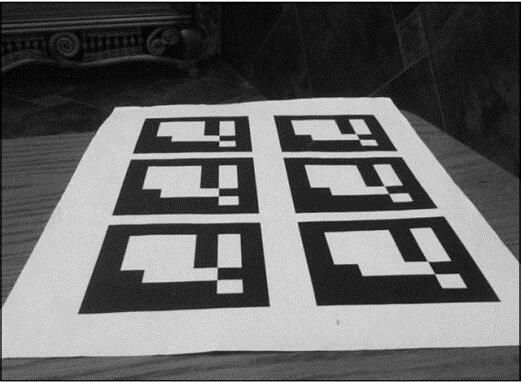
本例中使用的标记有点类似二维码的简化版,最外一圈是轮廓,里面的白色方块包含了数据信息。老外将这个标记在同一张纸上打印6份,然后放在桌上。如下图所示:

为了在上面透视图的标记内画虚拟图形,我们首先要检测到这些标记的位置。具体步骤如下:
1. 将彩色图片转成灰度图
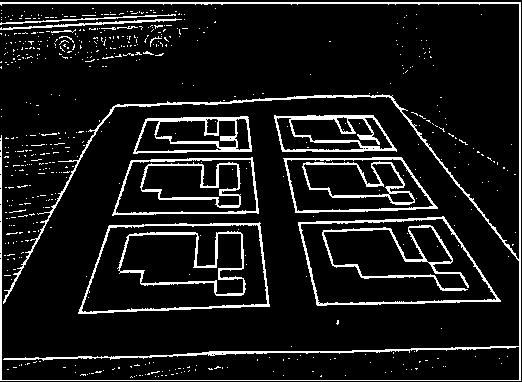
2. 自适应算法将灰度图二值化,即在邻域范围内,与目标像素点比较大小
3. 使用Opencv内置函数,检测轮廓
4. 候选搜索,从轮廓中挑选出矩形区域
具体代码讲解:
1.彩色图片转成灰度图
void prepareImage(const Mat& bgraMat, Mat& grayscale)
{
	// Convert to grayscale
	cvtColor(bgraMat, grayscale, CV_BGRA2GRAY);
}
2.灰度图二值化
void performThreshold(const Mat& grayscale, Mat& thresholdImg)
{
	// Adaptive Threshold,use of all pixels in given radius around the examined pixel
	adaptiveThreshold(grayscale, thresholdImg, 255, ADAPTIVE_THRESH_GAUSSIAN_C,THRESH_BINARY_INV, 7, 7);
}
3.轮廓检测
void findContours(const Mat& thresholdImg, std::vector<std::vector<Point>>& contours, int minContourPointsAllowed)
{
	std::vector< std::vector<Point> > allContours;
	findContours(thresholdImg, allContours, CV_RETR_LIST, CV_CHAIN_APPROX_NONE);
	contours.clear();
	for (size_t i=0; i<allContours.size(); i++)
	{
		int contourSize = allContours[i].size();
		if (contourSize > minContourPointsAllowed)
		{
			contours.push_back(allContours[i]);
		}
	}
}
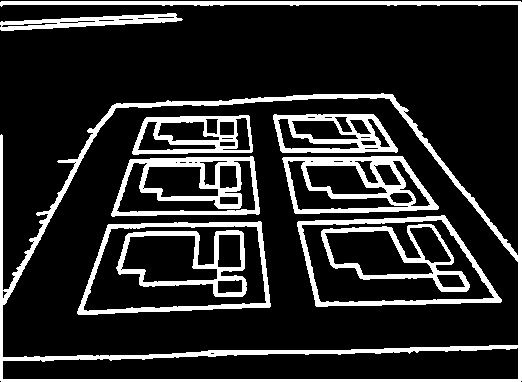
使用opencv的drawContours接口或自己遍历contours二维数组,可以得到如下结果:
4.候选区域检测与搜索
由于我们的标记是四边形,当找到图像所有轮廓细节后,本文用Opencv内置API检测多边形,通过判断多边形定点数量是否为4,四边形各顶点之间相互距离是否满足要求(四边形是否足够大),过滤非候选区域。然后再根据候选区域之间距离进一步筛选,得到最终的候选区域,并使得候选区域的顶点坐标逆时针排列。
a. 四边形顶点之间距离
对每个四边形S,计算其相邻顶点之间的距离:
上式中i,j为相邻的两个顶点,若顶点之间的最小值仍大于阈值,则保留该四边形S进行下一步判断。
b. 四边形之间距离
求四边形S和S’之间的距离,即计算四个顶点之间的平均距离:
若dist小于阈值,则四边形S和S’距离较近,记录到tooNearCandidates向量里。接来下perimeter函数分别求四边形S和S’四个顶点之间的距离和,保留距离较大的,将距离较小的放入removalMask数组中,下式中i,j为四边形内相邻顶点
c. 行列式的几何意义---逆时针排序
行列式是由一些数据排列成的方阵经过规定的计算方法而得到的一个数。那它的几何意义是什么呢?有两种解释:
- 一个是行列式就是行列式中的行或列向量所构成的超平行多面体的有向面积或有向体积;
- 另一个是矩阵A的行列式detA就是线性变化A下的图形面积或体积的伸缩因子;
接下来的代码中,由于在approxPolyDP寻找多边形时,顶点摆放次序有逆时针和顺时针两种,我们希望这些顶点按照逆时针摆放。因此,对于四边形而言,我们只讨论2*2行列式对应的有向面积。
一个2×2矩阵A的行列式,是A的行向量(或列向量)决定的平行四边形的有向面积。用几何观点来看,二阶行列式D是XOY平面上以行向量a=(a1,a2),b=(b1,b2)为邻边的平行
四边形的有向面积。若这个平行四边形是由向量a沿逆时针方向转到b而得到的,面积取正值;若这个平行四边形是由向量a沿顺时针方向转到而得到的,面积取负值。本例中,对于顺时针摆放的顶点0,1,2,3,咱可以通过计算有0-1,0-2构成的向量计算其有向面积。如果是顺时针摆放,那么该有向面积一定是负数,只要交换1,3位置即可。
 // Find closed contours that can be approximated with 4 points
void findMarkerCandidates(const vector<vector<Point>>& contours, vector<Marker>& detectedMarkers)
{
	vector<Point>  approxCurve;	//approxPolyDP返回结果为多边形,用点集表示
	vector<Marker> possibleMarkers;
	float m_minContourLengthAllowed = 100.0;

	// For each contour, analyze if it is a paralelepiped likely to be the marker
	for (size_t i=0; i<contours.size(); i++)
	{
		// Approximate to a poligon, 通过点集近似多边形,第三个参数为epsilon代表近似程度,即原始轮廓及近似多边形之间的距离,第四个参数表示多边形是闭合的
		approxPolyDP(contours[i], approxCurve, double(contours[i].size())*0.05 , true);

		// We interested only in polygons that contains only four vertices
		if (approxCurve.size() != 4)
			continue;

		// And they have to be convex,检验轮廓是否为凸多边形
		if (!isContourConvex(approxCurve))
			continue;

		// Ensure that the distace between consecutive points is large enough
		float minDist = 1e10;
		for (int i=0;i<4;i++)
		{
			//求当前四边形各顶点之间最短距离
			Point vec = approxCurve[i] - approxCurve[(i+1)%4];
			float squaredDistance = vec.dot(vec);
			minDist = min(minDist,squaredDistance);
		}

		// Check that distance is not very small,当四边形大小合适,则将该四边形maker放入possibleMarkers容器内
		if (minDist > m_minContourLengthAllowed)
		{
			Marker m;
			for(int i=0;i<4;i++)
			{
				m.points.push_back( Point2f(approxCurve[i].x,approxCurve[i].y) );
			}
			possibleMarkers.push_back(m);
		}

	}

	//sort the points in anti-clockwise order 逆时针顺序存储这些坐标点
	for (size_t i=0; i<possibleMarkers.size(); i++)
	{
		Marker& marker = possibleMarkers[i];

		//trace a line between the first and second point.
		//if the thrid point is at the right side, then the points are anti-clockwise
		//从代码推测,marker中的点集本来就两种序列:顺时针和逆时针,这里要把顺时针的序列改成逆时针
		Point v1 = marker.points[1] - marker.points[0];
		Point v2 = marker.points[2] - marker.points[0];

		//行列式的几何意义是什么呢?有两个解释:一个解释是行列式就是行列式中的行或列向量所构成的超平行多面体的有向面积或有向体积;另一个解释是矩阵A的行列式detA就是线性变换A下的图形面积或体积的伸缩因子。
		double o = (v1.x * v2.y) - (v1.y * v2.x);
        /*
		以行向量a=(a1,a2),b=(b1,b2)为邻边的平行四边形的有向面积:若这个平行四边形是由向量沿逆时针方向转到b而得到的,面积取正值;若这个平行四边形是由向量a沿顺时针方向转到而得到的,面积取负值;
		以下代码即把这种改成逆时针
		0----1
          \
		   \
		3    2

		*/
		if (o < 0.0)         //if the third point is in the left side, then sort in anti-clockwise order
		{
			swap(marker.points[1],marker.points[3]);
		}
	}

	// remove these elements whose corners are too close to each other first detect candidates
	std::vector< std::pair<int,int> > tooNearCandidates;
	for (size_t i=0;i<possibleMarkers.size();i++)
	{
		const Marker& m1 = possibleMarkers[i];

		//calculate the average distance of each corner to the nearest corner of the other marker candidate
		//计算两个maker四边形之间的距离,四组点之间距离和的平均值,若平均值较小,则认为两个maker很相近

		for (size_t j=i+1;j<possibleMarkers.size();j++)
		{
			const Marker& m2 = possibleMarkers[j];

			float distSquared = 0;

			for(int c=0;c<4;c++)
			{
				Point v = m1.points[c] - m2.points[c];
				distSquared += v.dot(v);
			}

			distSquared /= 4;

			if (distSquared < 100)
			{
				tooNearCandidates.push_back(std::pair<int,int>(i,j));
			}
		}
	}

	//mark for removal the element of  the pair with smaller perimeter
	//计算距离相近的两个marker内部,四个点的距离和,将距离和较小的,在removlaMask内做标记,即不作为最终的detectedMarkers
	std::vector<bool> removalMask (possibleMarkers.size(), false);

	for (size_t i=0;i<tooNearCandidates.size();i++)
	{
		float p1 = perimeter(possibleMarkers[tooNearCandidates[i].first ].points);
		float p2 = perimeter(possibleMarkers[tooNearCandidates[i].second].points);

		size_t removalIndex;
		if (p1 > p2)
			removalIndex = tooNearCandidates[i].second;
		else
			removalIndex = tooNearCandidates[i].first;

		removalMask[removalIndex] = true;
	}

	// Return candidates
	detectedMarkers.clear();
	for (size_t i=0;i<possibleMarkers.size();i++)
	{
		if (!removalMask[i])
			detectedMarkers.push_back(possibleMarkers[i]);
	}
}
到目前位置,我们从一张彩色图片上抠出多个四边形,并且四个顶点按照逆时针排序。
二、标记识别
每个标记可以划分成7*7个方格,黑格子表示0,白格子表示1。这样标记内部将有5个数字,而每个数字由5个bit表示。具体编码方式类似于海明码,3个bit用于校验,2个bit用于存放数据,因此每5个bit可以表达4种数据,而5行这样的编码可以表达4^5=1024个数据。如下图所示:
接下来,咱有必要复习下《计算机组成原理》的海明码,在唐硕飞老师课本的P100页存储器的校验一节有提到。注意:海明码只有一位纠错能力!!
在计算机运行过程中,由于种种原因致使数据在存储过程中可能出现差错。为了能及时发现错误并纠正错误,通常可将原数据配成海明编码。设欲检测的二进制代码为n位,为使其具有纠错能力,需增添k位检测位,组成n+k位的代码。为了能准确对错误定位以及指出代码没错,新增添的检测位数k应满足:
稍稍解释一下,不等式左边代表该类编码允许的出错数量共2k种;不等式右边,若数据位中有一位出错,那就有n种可能,若校验位自身有一位错误,那就有k种可能,若完全没错,那也是一种可能,因此n+k+1。
设n+k位代码自左至右依次编码为第1,2,3,…,n+k位,而将第k位检测位记作Ci,分别安插在n+k位代码编号的第1,2,4,8,…,2k-1位上。这些检测位的位置设置是为了保证它们能分别承担n+k位信息中不同数据位所组成的“小组“的奇偶检测任务,使检测位和它所负责检测的小组中1的个数为奇数或偶数。以下是根据检测特性P101规定死的:
- C1 检测的g1小组包含1,3,5,7,9,11,…位
- C2 检测的g2小组包含2,3,6,7,10,11,14,15…位
- C4 检测的g3小组包含4,5,6,7,12,13,14,15…位
故最终的海明码即为0100101
例2:已知接收到的海明码为0110101按照配偶原则,试问想要传送的信息是啥?
接收到的7位编码,包含了3位校验码分别在第1,2,4位,首先判断收到的信息是否出错,纠错过程如下:

所以,P4P2P1=011,第3位出错,可纠正为0100101,故欲传递的信息为0101.
本书中采用3位校验码2位数据码,则1,2,4位是校验位,3,5是数据位。同时为了防止将全黑色的四边形识别成合法的marker,增强算法鲁棒性,修改了3,5位数据校验的奇偶性。即对于传递数据为00的情形C1C2B2C4B1,要避免00000,本来是这样的:
现在是这样的,10000
在温故海明码后,我们可以识别候选四边形区域内的数据信息,确定该四边形是否为最初定义的Marker。具体步骤如下:
1.去除相机透视投影效果,获取标记的正面图
2.对候选标记区域的灰度图使用大律OSTU算法,求取二值化图。(之前不用OSTU是大范围图片,会影响性能)
3.识别候选区域中的数据,是否合法
1.获取正面标记
给定Marker的理想二维坐标m_markerCorners2d,利用opencv的getPerspectiveTransform函数获取实际图像坐标到理想二维坐标的变换矩阵M。对原始图像进行M变换
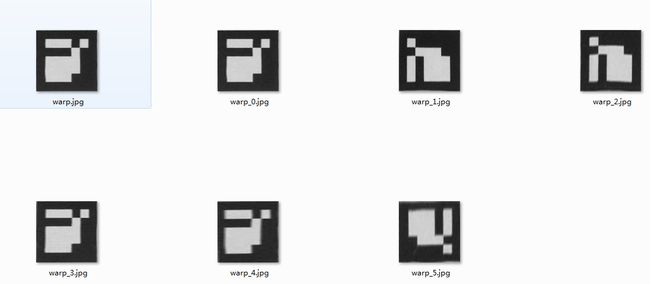
每个矩形大小100*100,代码里写死的。
2.对上述6幅图像二值化

3.识别Marker
首先检查四边形轮廓是否完整,即通过统计方块内非零像素值个数,若大于方块内像素个数的一半,则认为该方块是白色的。按行遍历所有轮廓方格,方格大小为100/7,只要有一个轮廓方格被判定为白色,那么整个轮廓就是不完整的,舍弃该Marker
然后,同理识别5*5编码区域,将0-1编码写入bitMatrix矩阵。由于IPAD拍摄照片存在旋转变化,因此每个矩形方格具有四种旋转状态,即直接从当前矩形区域解码可能是旋转过的图片,不能代表真正的数据。
本文为所有旋转状态下的Marker计算海明距离,选择海明距离最小的作为最终的编码矩阵。海明距离的计算:
hammDistMarker函数中,ids数组的由来。咱采用3位校验2位数据,因此每个stripe的2位数据将产生4种海明编码。也就是说ids数组列举了Marker中每行数据的所有可能取值。
Marker中的一行表示一个数据,我们把bitMatrix的每一行同ids中的一行数据依次比较,总能寻找到ids中最贴近bitMatrix第x行的一行ids。再把bitMatrix对应的ids值求和,即可得到海明距离。
最后,在确定了Marker的旋转状态后,mat2id函数对该Marker进行解码,即遍历各行,或运算、移位运算得到最终的ID
/*detectedMarkers为出参*/
void detectMarkers(const Mat& grayscale, vector<Marker>& detectedMarkers, const vector<Point2f> m_markerCorners2d)
{
	Mat canonicalMarker;
	char name[20]="";

	vector<Marker> goodMarkers;

	// Identify the markers
	for (size_t i=0;i<detectedMarkers.size();i++)
	{
		Marker& marker = detectedMarkers[i];
		// Find the perspective transfomation that brings current marker to rectangular form
		Mat M = getPerspectiveTransform(marker.points, m_markerCorners2d);

		// Transform image to get a canonical marker image
		warpPerspective(grayscale, canonicalMarker,  M, Size(100,100));
		/*sprintf(name,"warp_%d.jpg",i);
		imwrite(name, canonicalMarker);*/

		int nRotations;
		int id = Marker::getMarkerId(canonicalMarker,nRotations);//5*5 mask,3 bits校验,2 bits 数据,每个stripe有4种数据,共有5条stripe,故有4^5个ID,白块为1,黑块为0
		//cout<<"ID:"<<id<<endl;
		if (id !=- 1)
		{
			marker.id = id;
			//sort the points so that they are always in the same order no matter the camera orientation
			//Rotates the order of the elements in the range [first,last), in such a way that the element pointed by middle becomes the new first element.
			rotate(marker.points.begin(), marker.points.begin() + 4 - nRotations, marker.points.end());

			goodMarkers.push_back(marker);
		}
	}

	//refine using subpixel accuracy the corners
	if (goodMarkers.size() > 0)
	{
		std::vector<Point2f> preciseCorners(4 * goodMarkers.size());//每个marker四个点

		for (size_t i=0; i<goodMarkers.size(); i++)
		{
			Marker& marker = goodMarkers[i];

			for (int c=0;c<4;c++)
			{
				preciseCorners[i*4+c] = marker.points[c];	//i表示第几个marker,c表示某个marker的第几个点
			}
		}

		//Refines the corner locations.The function iterates to find the sub-pixel accurate location of corners or radial saddle points
		cv::TermCriteria termCriteria = cv::TermCriteria(cv::TermCriteria::MAX_ITER | cv::TermCriteria::EPS, 30, 0.01);
		cv::cornerSubPix(grayscale, preciseCorners, cvSize(5,5), cvSize(-1,-1), termCriteria);

		//copy back
		for (size_t i=0;i<goodMarkers.size();i++)
		{
			Marker& marker = goodMarkers[i];

			for (int c=0;c<4;c++)
			{
				marker.points[c] = preciseCorners[i*4+c];
				//cout<<"X:"<<marker.points[c].x<<"Y:"<<marker.points[c].y<<endl;
			}
		}
	}

	////画出细化后的矩形图片
	/*cv::Mat markerCornersMat(grayscale.size(), grayscale.type());
	markerCornersMat = cv::Scalar(0);

	for (size_t i=0; i<goodMarkers.size(); i++)
	{
		goodMarkers[i].drawContour(markerCornersMat, cv::Scalar(255));
	}

	imwrite("refine.jpg",markerCornersMat);*/

	detectedMarkers = goodMarkers;
}
int Marker::hammDistMarker(cv::Mat bits)
{
  //该矩阵产生:每条stripe有4种可能的数据
  int ids[4][5]=
  {
    {1,0,0,0,0},
    {1,0,1,1,1},
    {0,1,0,0,1},
    {0,1,1,1,0}
  };

  int dist=0;

  for (int y=0;y<5;y++)
  {
    int minSum=1e5; //hamming distance to each possible word

    for (int p=0;p<4;p++)
    {
      int sum=0;
      //now, count
      for (int x=0;x<5;x++)
      {
        sum += bits.at<uchar>(y,x) == ids[p][x] ? 0 : 1;  //拿bitMatrix中每一行同ids中的行依次比较,寻找ids中最贴近bitMatrix第y行的一行ids
      }

      if (minSum>sum)
        minSum=sum;
    }

    //do the and
    dist += minSum;
  }

  return dist;
}
int Marker::getMarkerId(cv::Mat &markerImage,int &nRotations)
{
  assert(markerImage.rows == markerImage.cols);
  assert(markerImage.type() == CV_8UC1);

  cv::Mat grey = markerImage;
  //threshold image,参数threshold:阈值125 max_value:255,使用 CV_THRESH_BINARY 和 CV_THRESH_BINARY_INV 的最大值
  cv::threshold(grey, grey, 125, 255, cv::THRESH_BINARY | cv::THRESH_OTSU);

  //Markers  are divided in 7x7 regions, of which the inner 5x5 belongs to marker info
  //the external border should be entirely black

  int cellSize = markerImage.rows / 7;

  //检查四周边缘
  for (int y=0;y<7;y++)  //y:row,x:col
  {
    int inc=6;

    if (y==0 || y==6) inc=1; //for first and last row, check the whole border

	//第2,3,4,5,6行,只检查左右两列,第1,7行检查所有列
    for (int x=0;x<7;x+=inc)
    {
      int cellX = x * cellSize;
      int cellY = y * cellSize;
      cv::Mat cell = grey(cv::Rect(cellX,cellY,cellSize,cellSize));

      int nZ = cv::countNonZero(cell);

      if (nZ > (cellSize*cellSize) / 2)
      {
        return -1;//can not be a marker because the border element is not black!
      }
    }
  }

  cv::Mat bitMatrix = cv::Mat::zeros(5,5,CV_8UC1);

  //get information(for each inner square, determine if it is  black or white)
  for (int y=0;y<5;y++)
  {
    for (int x=0;x<5;x++)
    {
      int cellX = (x+1)*cellSize;
      int cellY = (y+1)*cellSize;
      cv::Mat cell = grey(cv::Rect(cellX,cellY,cellSize,cellSize));

      int nZ = cv::countNonZero(cell);
      if (nZ> (cellSize*cellSize) /2)
        bitMatrix.at<uchar>(y,x) = 1;
    }
  }

  //check all possible rotations
  cv::Mat rotations[4];
  int distances[4];

  rotations[0] = bitMatrix;
  distances[0] = hammDistMarker(rotations[0]);

  std::pair<int,int> minDist(distances[0],0);

  for (int i=1; i<4; i++)
  {
    //get the hamming distance to the nearest possible word
    rotations[i] = rotate(rotations[i-1]);
    distances[i] = hammDistMarker(rotations[i]);

    if (distances[i] < minDist.first)
    {
      minDist.first  = distances[i];
      minDist.second = i;
    }
  }

  nRotations = minDist.second;
  if (minDist.first == 0)
  {
    return mat2id(rotations[minDist.second]);
  }

  return -1;
}

确定了Marker的旋转状态后,对四边形顶点按照旋转状态排序,无论相机如何拍摄都使四边形中间的顶点排在第一个。 而后,通过亚像素技术cornerSubPix函数对顶点位置进一步细。所谓亚像素,两个像素之间,还存在像素,它完全由计算得到。

三、三维渲染与标记、相机状态检测
虚拟现实是为了用虚拟场景混淆现实世界中的对象。为了在Marker上放置三维模型,我们需要知道Marker相对于相机的姿态。本文将在笛卡尔坐标系中使用欧氏变化来表达这种姿态。
三维世界中Marker的位置与其对应的二维投影,遵从以下公式:
其中,
M表示三维世界中的点;
[R|T]表示欧氏变换,是一个3*4矩阵
A表示相机参数矩阵,存放相机内部参数
P表示M在二维空间的投影,是一个二维点。
之前我们已经获取了Marker的四个顶点在二维空间中的位置。接下来,谈谈怎么获取相机内部参数和三维坐标点,以及欧氏变换矩阵。
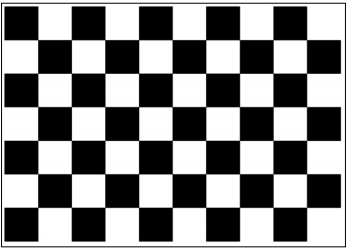
1.相机标定 camera calibration
每款相机镜头都有独特的参数,比如焦距、焦点、失真模型。本文把寻找相机内部参数的过程称为相机标定。为了得到虚拟现实的最佳用户体验,虚拟物体也应该按照相机内部参数进行相同的透视投影。
老外说可以对着靶图拍摄10-15张图片,然后用标定算法寻找最优相机参数和形变向量。但是没有扩展开来讲这个标定算法,大家自己去看opencv的文档:
http://www.packtpub.com/article/opencv-estimatingprojective-relations-images
本例中,老外给出了IOS设备的相机内部参数,涵盖IPAD2、IPAD3、iphone4。
我们在随书代码的VideoSource.mm中的Line 55行可以找到。

2.Marker姿态估计 pose estimation
该步就是寻找相机二维成像和Marker实物三维空间坐标的转换关系,即上文提到的欧氏变化[R|T],此处只考虑旋转和平移关系。

如上图所示,C代表相机中心,P1-P4是现实三维世界中的点,p1-p4是物体在相机图像二维平面上投影的点。咱目标就是找到p1-p4到P1-P4之间的转换关系。现在p1-p4是已知的,P1-P4打算采用如下方案:imagine them…!下图标注了Marker在三维空间的坐标:
上图中,Z轴分量设定成0了,反正是个纸片无所谓的,代码里m_markerCorners3d向量中有写。咱借助opencv的solvePnP函数获取欧氏转换[R|T]。
solvePnP(m_markerCorners3d, m.points, camMatrix, distCoeff,raux,taux);
m_markerCorners3d:Marker在三维空间坐标
m.points:Marker在二维平面坐标
camMatrix:相机内置参数
distCoeff:失真系数,本例全零
raux:旋转矩阵R
taux:平移矩阵T
在求得旋转和平移矩阵后,可以在Marker的位置上画些东西了。我们画一个虚拟平面和一个三维坐标系,然后利用刚才的欧氏变换矩阵按照下式将三维坐标转换成相机二维平面里的坐标,式中v表示三维坐标向量。这里展示图像采用Opengl工具。
说个小插曲,我本来直接使用随书代码提供的相机内置参数,然后悲剧了。有些代码版本还给了两组内置参数,折腾很久死活对不齐。Opengl版本也很多,各种诡异错误。
后来我发现我的图片是从pdf书中直接QQ截取的,图片大小并不是640*480,因此需要修改参数,具体见代码,然后就成功了。

opengl代码:
#include<gl/glut.h>
#include<iostream>
#include<stdlib.h>
#include "GeometryTypes.hpp"
#include "Marker.hpp"
static GLint imagewidth;
static GLint imageheight;
static GLint pixellength;
static GLubyte* pixeldata;
#define GL_BGR_EXT 0x80E0

using namespace std;

Matrix44 projectionMatrix;
vector<Marker> m_detectedMarkers;
GLuint defaultFramebuffer, colorRenderbuffer;


void build_projection(Matrix33 cameraMatrix)
{
	float near = 0.01;  // Near clipping distance
	float far = 100;  // Far clipping distance

	// Camera parameters
	float f_x = cameraMatrix.data[0]; // Focal length in x axis
	float f_y = cameraMatrix.data[4]; // Focal length in y axis (usually the same?)
	float c_x = cameraMatrix.data[2]; // Camera primary point x
	float c_y = cameraMatrix.data[5]; // Camera primary point y

	projectionMatrix.data[0] =  - 2.0 * f_x / imagewidth;
	projectionMatrix.data[1] = 0.0;
	projectionMatrix.data[2] = 0.0;
	projectionMatrix.data[3] = 0.0;

	projectionMatrix.data[4] = 0.0;
	projectionMatrix.data[5] = 2.0 * f_y / imageheight;
	projectionMatrix.data[6] = 0.0;
	projectionMatrix.data[7] = 0.0;

	projectionMatrix.data[8] = 2.0 * c_x / imagewidth - 1.0;
	projectionMatrix.data[9] = 2.0 * c_y / imageheight - 1.0;
	projectionMatrix.data[10] = -( far+near ) / ( far - near );
	projectionMatrix.data[11] = -1.0;

	projectionMatrix.data[12] = 0.0;
	projectionMatrix.data[13] = 0.0;
	projectionMatrix.data[14] = -2.0 * far * near / ( far - near );
	projectionMatrix.data[15] = 0.0;
}

void setMarker(const vector<Marker>& detectedMarkers)
{
	m_detectedMarkers = detectedMarkers;
}

void display(void)
{

	glClear(GL_COLOR_BUFFER_BIT|GL_DEPTH_BUFFER_BIT);
	//绘制图片
	glDrawPixels(imagewidth,imageheight,GL_BGR_EXT,GL_UNSIGNED_BYTE,pixeldata);

	//绘制坐标
	glMatrixMode(GL_PROJECTION);
	glLoadMatrixf(projectionMatrix.data);
	glMatrixMode(GL_MODELVIEW);
	glLoadIdentity();
	glEnableClientState(GL_VERTEX_ARRAY);
	glEnableClientState(GL_NORMAL_ARRAY);

	glPushMatrix();
	glLineWidth(3.0f);

	float lineX[] = {0,0,0,1,0,0};
	float lineY[] = {0,0,0,0,1,0};
	float lineZ[] = {0,0,0,0,0,1};

	const GLfloat squareVertices[] = {
		-0.5f, -0.5f,
		0.5f,  -0.5f,
		-0.5f,  0.5f,
		0.5f,   0.5f,
	};
	const GLubyte squareColors[] = {
		255, 255,   0, 255,
		0,   255, 255, 255,
		0,     0,   0,   0,
		255,   0, 255, 255,
	};

	for (size_t transformationIndex=0; transformationIndex<m_detectedMarkers.size(); transformationIndex++)
	{
		const Transformation& transformation = m_detectedMarkers[transformationIndex].transformation;
		Matrix44 glMatrix = transformation.getMat44();

		glLoadMatrixf(reinterpret_cast<const GLfloat*>(&glMatrix.data[0]));

		glVertexPointer(2, GL_FLOAT, 0, squareVertices);
		glEnableClientState(GL_VERTEX_ARRAY);
		glColorPointer(4, GL_UNSIGNED_BYTE, 0, squareColors);
		glEnableClientState(GL_COLOR_ARRAY);

		glDrawArrays(GL_TRIANGLE_STRIP, 0, 4);
		glDisableClientState(GL_COLOR_ARRAY);

		float scale = 0.5;
		glScalef(scale, scale, scale);

		glColor4f(1.0f, 0.0f, 0.0f, 1.0f);
		glVertexPointer(3, GL_FLOAT, 0, lineX);
		glDrawArrays(GL_LINES, 0, 2);

		glColor4f(0.0f, 1.0f, 0.0f, 1.0f);
		glVertexPointer(3, GL_FLOAT, 0, lineY);
		glDrawArrays(GL_LINES, 0, 2);

		glColor4f(0.0f, 0.0f, 1.0f, 1.0f);
		glVertexPointer(3, GL_FLOAT, 0, lineZ);
		glDrawArrays(GL_LINES, 0, 2);
	}
	glFlush();
	glPopMatrix();

	glDisableClientState(GL_VERTEX_ARRAY);

	glutSwapBuffers();
}

int show(const char* filename,int argc, char** argv,Matrix33 m_intrinsic, vector<Marker>& detectedMarkers)
{
	//打开文件
	FILE* pfile=fopen(filename,"rb");
	if(pfile == 0) exit(0);
	//读取图像大小
	fseek(pfile,0x0012,SEEK_SET);
	fread(&imagewidth,sizeof(imagewidth),1,pfile);
	fread(&imageheight,sizeof(imageheight),1,pfile);
	//计算像素数据长度
	pixellength=imagewidth*3;
	while(pixellength%4 != 0)pixellength++;
	pixellength *= imageheight;
	//读取像素数据
	pixeldata = (GLubyte*)malloc(pixellength);
	if(pixeldata == 0) exit(0);
	fseek(pfile,54,SEEK_SET);
	fread(pixeldata,pixellength,1,pfile);

	//关闭文件
	fclose(pfile);

	build_projection(m_intrinsic);
	setMarker(detectedMarkers);
	//初始化glut运行
	glutInit(&argc,argv);
	glutInitDisplayMode(GLUT_DOUBLE|GLUT_RGBA);
	glutInitWindowPosition(100,100);
	glutInitWindowSize(imagewidth,imageheight);
	glutCreateWindow(filename);
	glutDisplayFunc(&display);
	glutMainLoop();
	//-------------------------------------
	free(pixeldata);
	return 0;
}
主函数:
int main( int argc, char** argv ){
	Mat src,dst,bin;
	vector<vector<Point>> line;
	vector<Marker> markers;
	vector<Point2f> m_markerCorners2d; //标准maker坐标4个点
	Size markerSize(100,100);			   //标准maker大小
	vector<Marker> detectedMarkers;
	vector<Point3f> m_markerCorners3d;		//自定义矩形的3D坐标
	Matrix33 m_intrinsic;					//相机内置参数,焦距焦点
	Vector4  m_distorsion;					//相机内置参数,形变比例

	m_markerCorners3d.push_back(Point3f(-0.5f,-0.5f,0));
	m_markerCorners3d.push_back(Point3f(+0.5f,-0.5f,0));
	m_markerCorners3d.push_back(Point3f(+0.5f,+0.5f,0));
	m_markerCorners3d.push_back(Point3f(-0.5f,+0.5f,0));

	for (int i=0; i<3; i++)
		for (int j=0; j<3; j++)
			m_intrinsic.mat[i][j] = 0;

	//calibratoin data for iPad 2
	m_intrinsic.mat[0][0] = 6.24860291e+02 * (640./352.);
	m_intrinsic.mat[1][1] = 6.24860291e+02 * (480./288.);
	m_intrinsic.mat[0][2] = 522 * 0.5f;	//640
	m_intrinsic.mat[1][2] = 382 * 0.5f; //480,我改的!牛逼不?!

	for (int i=0; i<4; i++)
		m_distorsion.data[i] = 0;

	src = imread("test.jpg");
	Mat contours(src.size().height,src.size().width,CV_8UC3,Scalar(0,0,0));
	m_markerCorners2d.push_back(Point2f(0,0));
	m_markerCorners2d.push_back(Point2f(markerSize.width-1,0));
	m_markerCorners2d.push_back(Point2f(markerSize.width-1,markerSize.height-1));
	m_markerCorners2d.push_back(Point2f(0,markerSize.height-1));

	prepareImage(src,dst);
	//imwrite("grey.jpg",dst);
	performThreshold(dst,bin);
	//imwrite("binary.jpg",bin);
	findContours(bin,line,200);
	//imwrite("contours.jpg",contours);

	// draw all contours
	drawContours(contours, line, -1, Scalar(255,255,255), 2);

	/*for(vector<vector<Point>>::iterator it = line.begin();it != line.end();++it)
	{
	   for(vector<Point>::iterator one = it->begin(); one != it->end(); ++one)
	   {
		 circle(contours,Point(one->x,one->y),4,Scalar(255,255,255), -1, 8);
	   }
	}*/
	//imwrite("result.jpg",contours);
	// Find closed contours that can be approximated with 4 points
	findMarkerCandidates(line, detectedMarkers);

	// Find is them are markers
	detectMarkers(dst, detectedMarkers, m_markerCorners2d);
	estimatePosition(detectedMarkers, m_markerCorners3d, m_intrinsic, m_distorsion);

	imwrite("test.bmp",src);
	show("test.bmp",argc,argv,m_intrinsic, detectedMarkers);
	return 0;
}
好久不写博客了,接下来要开始kinect开发了,Point cloud 拼接,三维重建,期待挑战!

