ICE学习之C# Java之间通讯
进alibaba以来一直听说我们有部分产品之间的通讯是采用ICE架构的,它是一种简洁的分布式网络中间件。但是由于项目紧张一直没有时间研究,这两天终于有时间研究一把(而且据老大说我们今年要对旺旺提供给内部的接口进行测试,该部分的设计又是采用ICE通讯的),所以也是不得已不学习的。为此查了好多资料,包括老唐的博客。http://blog.csdn.net/sfd。
终于也弄明白了是怎么回事,并且实战了一把,也把自己学习的历程总结一下,方便后来者。
首先,必须明白ICE是作为一种中间件语言,那么它必须是标准的,简易的。事实也是如此,如下例子,在ICE文档中只需要申明module名称,接口名称,方法名称。
| 01 #ifndef SIMPLE_ICE 02 #define SIMPLE_ICE 03 04 module Demo { 05 interface Printer 06 { 07 void printString(string s); 08 }; 09 }; 10 #endif |
其次,支持不同语言之间通讯的。也就是说服务器端拿着ICE的文档去编写服务器端的代码,它可能采取c++也可能采用C#也可能采用java来编写服务器端的代码。而客户端用户拿着ICE的文档,去编写客户端的代码。而他们编译出来的代码是可以相互通信的,因为他们采用了同一个桥梁ICE。下面将通过两个个例子说明
l 如何编写一个C#的ICE服务和一个C#的客户端进行通讯
l 如何编写一个C#的ICE服务和一个java的客户端进行通讯。
例子一:快速搭建一个C#的ICE服务和一个C#的客户端代码。
1. 首先需要下载ice的安装包,地址如下:http://www.zeroc.com/download.html
本例采用vs2005,故下载http://www.zeroc.com/download/Ice/3.3/Ice-3.3.0-VC80.msi
2. 在下载安装完之后,设置系统的环境变量,Path = Path+ ;安装目录/bin
3. 仔细阅读安装目录中的readme,其中对于每一种语言如何编写服务器端和客户端代码都有描述。
4. 打开vs2005编辑器,加载C#的demo。目录=安装目录/democs/demo.sln。
5. 在demo的solution中有很多工程,我们选择Printer来进行实验。编译PrinterS,PrinterC。
6. 打开一个cmd窗体,cd到工程目录,运行server.exe.启动ICE服务。
7. 再打开一个cmd窗体,cd到工程目录,允许client.exe,再到server.exe的窗体查阅是否成功调用,如果出现hello world说明通过C#编写的客户端调用C#编写的ICE服务成功。
那么我们回头研究一下,ICE的服务器端和客户端是如何编码的。(我一般喜欢倒推式的学习方式,这样往往效率比较高点)。
首先必须了解服务器端代码是如何生成的。服务器端开发者最早拿到的是一个ice文档,那么就需要把ice文档转换为c#语言能认识的类。命令如下:
| 01 slice2cs.exe Printer.ice |
这条命令会在当前目录下产生Printer.cs文件如下。在下面这段代码中完成代理类的生成,以及ICE自身需要的服务鉴别函数PrinterPrx checkedCast等声明。
| 001 #if __MonoCS__ 002 003 using _System = System; 004 using _Microsoft = Microsoft; 005 #else 006 007 using _System = global::System; 008 using _Microsoft = global::Microsoft; 009 #endif 010 011 namespace Demo 012 { 013 public sealed class PrinterHelper 014 { 015 public PrinterHelper(Ice.InputStream inS__) 016 { 017 _in = inS__; 018 _pp = new IceInternal.ParamPatcher<Demo.Printer>("::Demo::Printer"); 019 } 020 021 public static void write(Ice.OutputStream outS__, Printer v__) 022 { 023 outS__.writeObject(v__); 024 } 025 026 public void read() 027 { 028 _in.readObject(_pp); 029 } 030 031 public Demo.Printer value 032 { 033 get 034 { 035 return (Demo.Printer)_pp.value; 036 } 037 } 038 039 private Ice.InputStream _in; 040 private IceInternal.ParamPatcher<Demo.Printer> _pp; 041 } 042 043 public interface Printer : Ice.Object, PrinterOperations_, PrinterOperationsNC_ 044 { 045 } 046 } 047 048 namespace Demo 049 { 050 public interface PrinterPrx : Ice.ObjectPrx 051 { 052 void printString(string s); 053 void printString(string s, _System.Collections.Generic.Dictionary<string, string> context__); 054 } 055 } 。。。 。。。。 。。。 116 #region Checked and unchecked cast operations 117 118 public static PrinterPrx checkedCast(Ice.ObjectPrx b) 119 { 120 if(b == null) 121 { 122 return null; 123 } 124 PrinterPrx r = b as PrinterPrx; 125 if((r == null) && b.ice_isA("::Demo::Printer")) 126 { 127 PrinterPrxHelper h = new PrinterPrxHelper(); 128 h.copyFrom__(b); 129 r = h; 130 } 131 return r; 132 } 133 134 public static PrinterPrx checkedCast(Ice.ObjectPrx b, _System.Collections.Generic.Dictionary<string, string> ctx) 135 { 136 if(b == null) 137 { 138 return null; 139 } 140 PrinterPrx r = b as PrinterPrx; 141 if((r == null) && b.ice_isA("::Demo::Printer", ctx)) 142 { 143 PrinterPrxHelper h = new PrinterPrxHelper(); 144 h.copyFrom__(b); 145 r = h; 146 } 147 return r; 148 } 。。。。 |
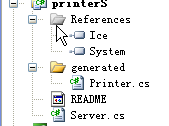
有了printer.cs后,就需要新建一个服务器端的工程了。加入Printer.cs文件,最后建立Server.cs文件。如安装包自带的文件目录如下:
我们再来看看Server.cs的代码。
| 01 using System; 02 using System.Reflection; 03 04 [assembly: CLSCompliant(true)] 05 06 [assembly: AssemblyTitle("IcePrinterServer")] 07 [assembly: AssemblyDescription("Ice printer demo server")] 08 [assembly: AssemblyCompany("ZeroC, Inc.")] 09 10 public class PrinterI : Demo.PrinterDisp_ 11 { 12 public override void printString(string s, Ice.Current current) 13 { 14 Console.WriteLine(s); 15 } 16 } 17 18 public class Server 19 { 20 public static void Main(string[] args) 21 { 22 int status = 0; 23 Ice.Communicator ic = null; 24 try { 25 ic = Ice.Util.initialize(ref args); 26 Ice.ObjectAdapter adapter 27 = ic.createObjectAdapterWithEndpoints( 28 "SimplePrinterAdapter", "default -p 10000"); 29 Ice.Object obj = new PrinterI(); 30 adapter.add( 31 obj, 32 ic.stringToIdentity("SimplePrinter")); 33 adapter.activate(); 34 ic.waitForShutdown(); 35 } catch (Exception e) { 36 Console.Error.WriteLine(e); 37 status = 1; 38 } 39 if (ic != null) 40 { 41 // Clean up 42 // 43 try { 44 ic.destroy(); 45 } catch (Exception e) { 46 Console.Error.WriteLine(e); 47 status = 1; 48 } 49 } 50 if(status != 0) 51 { 52 System.Environment.Exit(status); 53 } 54 } 55 } |
代码26到38为关键功能,主要完成以下任务。
* 创建一个对象适配器(ObjectAdapter)对象IOAdapter,并初始化之。
* 参数" SimplePrinterAdapter ":表示适配器的名字。
* 参数"default -p 10000":表示适配器使用缺省协议(TCP/IP)在端口10000处监听到来的请求。
* 服务器配置完成.
* 为PrinterI接口创建一个servant.
* 将新的servant添加到适配器,
* 并将这个新的servant命名为" SimplePrinter "
* 激活适配器,以使服务器开始处理来自客户的请求
* 挂起发出调用的线程,直到服务器实现终止为止.
* 或者是通过发出一个调用关闭运行时(run time)的指令来使服务器终止.
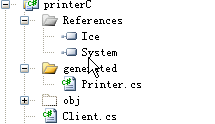
在完成C#服务器端代码之后,我们需要完成C#客户端的代码,同样需要引入代理类。程序目录如下图:
客户端程序如下:
| 01 using Demo; 02 using System; 03 using System.Reflection; 04 05 [assembly: CLSCompliant(true)] 06 07 [assembly: AssemblyTitle("IcePrinterClient")] 08 [assembly: AssemblyDescription("Ice printer demo client")] 09 [assembly: AssemblyCompany("ZeroC, Inc.")] 10 11 public class Client 12 { 13 public static void Main(string[] args) 14 { 15 int status = 0; 16 Ice.Communicator ic = null; 17 try { 18 ic = Ice.Util.initialize(ref args); 19 Ice.ObjectPrx obj = ic.stringToProxy( 20 "SimplePrinter:default -p 10000"); 21 PrinterPrx printer = PrinterPrxHelper.checkedCast(obj); 22 if (printer == null) 23 throw new ApplicationException("Invalid proxy"); 24 25 printer.printString("Hello World!"); 26 } catch (Exception e) { 27 Console.Error.WriteLine(e); 28 status = 1; 29 } 30 if (ic != null) { 31 // Clean up 32 // 33 try { 34 ic.destroy(); 35 } catch (Exception e) { 36 Console.Error.WriteLine(e); 37 status = 1; 38 } 39 } 40 if(status != 0) 41 { 42 System.Environment.Exit(status); 43 } 44 } 45 } |
上述代码主要完成如下功能
* 获取远程对象的代理
* 创建一个代理对象,并用通信器的stringToProxy()方法初始化之。
* 参数:" SimplePrinter:default -p 10000"
* 测试向下转换是否成功。如果不成功抛出异常信息"Invalid proxy".
* 如果成功调用远程方法printer.printString("Hello World!");
因此在之前做第一个实验的时候,在服务器端会打印出Hello world。至此我们就知道了如何使用C#进行ICE的服务调用。
下面我们将做第二个例子,通过java的客户端来调用C#的服务器端。服务器端的搭建和例子一一样,这里就不再赘述。这里主要讲述客户端代码如何实现。
首先必须和C#一样有ICE文件生成代理类,命令如下:
| slice2java Printer.ice |
上述命令会生成一个含java代理类的文件夹Demo,目录结构如下图:
新建java工程,引入安装包中的jar包,jar包目录=ice安装目录/lib/*.jar
引入demo的文件夹到工程中。
新增测试类,TestPrinter代码如下:
| 01 package Demo; 02 03 public class TestPrinter { 04 public static void main(String[] args) { 05 int status = 0; 06 Ice.Communicator ic = null; 07 try { 08 ic = Ice.Util.initialize(args); 09 // Ice.ObjectPrx base = ic 10 // .stringToProxy("SimplePrinter:tcp -h 172.17.12.101 -p 10000"); 11 Ice.ObjectPrx base = ic 12 .stringToProxy("SimplePrinter:default -p 10000"); 13 14 PrinterPrx test = PrinterPrxHelper.checkedCast(base); 15 if (test == null) 16 throw new Error("Invalid proxy"); 17 System.out.println("go"); 18 test.printString("My first Ice "); 19 //System.out.println("ok"); 20 } catch (Ice.LocalException e) { 21 e.printStackTrace(); 22 status = 1; 23 } catch (Exception e) { 24 System.err.println(e.getMessage()); 25 status = 1; 26 } 27 if (ic != null) { 28 // Clean up 29 // 30 try { 31 ic.destroy(); 32 } catch (Exception e) { 33 System.err.println(e.getMessage()); 34 status = 1; 35 } 36 } 37 System.exit(status); 38 } 39 40 } |
从C#和java的客户端代码比较看,实质上两者是一样的。运行java的代码再服务器端会显示My first Ice。


