Activiti入门教程三(详解流程引擎配置)
在先前的博客中提到了有关ProcessEngineConfiguration创建,但并没有详细的解释,主要创建的几个方法,那么这篇博客就来谈一谈有关ProcessEngineConfiguration一些创建操作。
ProcessEngineConfiguration类
该类代表一个Activiti流程引擎的配置,提供了一系列静态方法,用来读取和解析相应的配置文件,并返回ProcessEngineConfiguration的实例。下面来介绍一下有关创建实例的方法。
public static ProcessEngineConfiguration createProcessEngineConfigurationFromResourceDefault() {
return createProcessEngineConfigurationFromResource("activiti.cfg.xml", "processEngineConfiguration");
}
正如源码所示,该方法默认读取classpath下面的activiti.cfg.xml配置文件,启动并获取名称为processEngineConfiguration的bean的实例,然后解析XML后就由spring来实例完成。
public static ProcessEngineConfiguration createProcessEngineConfigurationFromResource(String resource) {
return createProcessEngineConfigurationFromResource(resource, "processEngineConfiguration");
}
正如源码所示,该方法默认读取classpath下面指定名称的XML配置文件,关键在于传入的String类型的resource参数,跟上面类似,指定的bean的id名称为processEngineConfiguration
public static ProcessEngineConfiguration createProcessEngineConfigurationFromResource(String resource, String beanName) {
return BeansConfigurationHelper.parseProcessEngineConfigurationFromResource(resource, beanName);
}
正如源码所示,读取我们自己命名的XML文件,并且bean的名称也可以由我们自己指定。例如我创建一个名称为my-activiti2.xml,里面的内容如下
<span style="font-family:Comic Sans MS;font-size:18px;"><?xml version="1.0" encoding="UTF-8"?>

<beans xmlns="http://www.springframework.org/schema/beans"
	xmlns:xsi="http://www.w3.org/2001/XMLSchema-instance"
	xsi:schemaLocation="http://www.springframework.org/schema/beans   http://www.springframework.org/schema/beans/spring-beans.xsd">

	<!-- 配置自定义属性 -->
	<bean id="processEngineConfiguration" class="org.crazyit.activiti.MyConfiguration">
		<property name="jdbcUrl" value="jdbc:mysql://localhost:3306/activiti" />
		<property name="jdbcDriver" value="com.mysql.jdbc.Driver" />
		<property name="jdbcUsername" value="root" />
		<property name="jdbcPassword" value="" />
		<property name="databaseSchemaUpdate" value="drop-create"></property>
		<property name="userName" value="crazyit"></property>
	</bean>

</beans>
</span>
public static ProcessEngineConfiguration createProcessEngineConfigurationFromInputStream(InputStream inputStream, String beanName) {
return BeansConfigurationHelper.parseProcessEngineConfigurationFromInputStream(inputStream, beanName);
}
正如源码所示,xml文件以一种输入流的形式进行输入,后面的参数就不再讲解了,不同点就是xml的读取方式变为了输入流的形式,如下
<span style="font-family:Comic Sans MS;font-size:18px;">package org.crazyit.activiti;

import java.io.File;
import java.io.FileInputStream;
import java.io.InputStream;
import java.util.Map;

import org.activiti.engine.ProcessEngine;
import org.activiti.engine.ProcessEngineConfiguration;
import org.activiti.engine.ProcessEngines;


public class CreateInputStream {

	public static void main(String[] args) throws Exception {
		File file = new File("resource/input-stream.xml");
		// 得到文件输入流
		InputStream fis = new FileInputStream(file);
		// 使用createProcessEngineConfigurationFromInputStream方法创建ProcessEngineConfiguration
		ProcessEngineConfiguration config = ProcessEngineConfiguration
				.createProcessEngineConfigurationFromInputStream(fis);
	}

}</span>
public static ProcessEngineConfiguration createStandaloneProcessEngineConfiguration() {
return new StandaloneProcessEngineConfiguration();
}
正如源码所示,这个方法过于简单,就是直接通过new来创建对象,关于数据库的一系列操作,还得通过代码手动来赋值,如下所示
<span style="font-family:Comic Sans MS;font-size:18px;">@Test
	public void createTable(){

		ProcessEngineConfiguration configuration = ProcessEngineConfiguration.createStandaloneProcessEngineConfiguration();
		//定义连接mysql数据库
		configuration.setJdbcDriver("com.mysql.jdbc.Driver");
		configuration.setJdbcUrl("jdbc:mysql://localhost:3306/activiti?createDatabaseIfNotExist=true&useUnicode=true&characterEncoding=utf8");
		configuration.setJdbcUsername("root");
		configuration.setJdbcPassword("");
		/**
		 * 	  public static final String DB_SCHEMA_UPDATE_FALSE = "false";操作activiti23张表的时候,如果表不存在,就抛出异常,不能自动创建23张表

			  public static final String DB_SCHEMA_UPDATE_CREATE_DROP = "create-drop";每次操作,都会先删除表,再创建表

			  public static final String DB_SCHEMA_UPDATE_TRUE = "true";如果表不存在,就创建表,如果表存在,就直接操作
		 */
		configuration.setDatabaseSchemaUpdate(ProcessEngineConfiguration.DB_SCHEMA_UPDATE_TRUE);
		//activiti核心对象(流程引擎)
		ProcessEngine processEngine = configuration.buildProcessEngine();
		System.out.println("processEngine:"+processEngine);
	}</span>
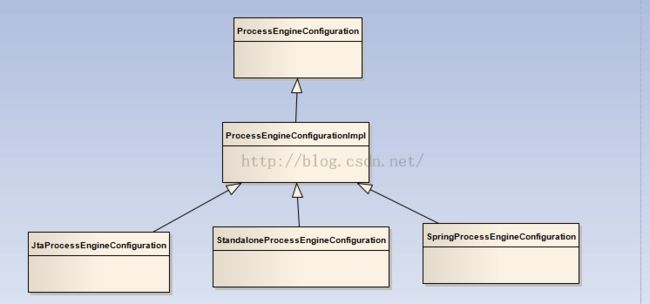
ProcessEngineConfiguration类的结构图
正如上图所示,ProcessEngineConfiguration是全部配置类的父类,有一个ProcessEngineConfigurationImpl子类,ProcessEngineConfigurationImpl下面有三个直接的子类,其中ProcessEngineConfiguration和ProcessEngineConfigurationImpl都是抽象类
了解了ProcessEngineConfiguration类的结构后,我们也可以自定义属于我们自己的引擎配置,只要继承抽象类ProcessEngineConfigurationImpl即可,如下所示
<span style="font-family:Comic Sans MS;font-size:18px;">package org.crazyit.activiti;

import java.util.ArrayList;
import java.util.Collection;
import java.util.List;

import org.activiti.engine.impl.cfg.ProcessEngineConfigurationImpl;
import org.activiti.engine.impl.interceptor.CommandContextInterceptor;
import org.activiti.engine.impl.interceptor.CommandInterceptor;


public class MyConfiguration extends ProcessEngineConfigurationImpl {

	public MyConfiguration() {
		// 做自定义设置
	}

	//测试属性,需要在processEngineConfiguration注入
	private String userName;

	public void setUserName(String userName) {
		this.userName = userName;
	}
	public String getUserName() {
		return this.userName;
	}

	//返回命令拦截器集合
	protected Collection<? extends CommandInterceptor> getDefaultCommandInterceptorsTxRequired() {
	    List<CommandInterceptor> defaultCommandInterceptorsTxRequired = new ArrayList<CommandInterceptor>();
	  //定义一个拦截器,该拦截器为系统内置拦截器,用于执行SQL脚本
	    defaultCommandInterceptorsTxRequired.add(new CommandContextInterceptor(commandContextFactory, this));
	    return defaultCommandInterceptorsTxRequired;
	}

	//返回命令拦截器集合
	protected Collection<? extends CommandInterceptor> getDefaultCommandInterceptorsTxRequiresNew() {
		return super.commandInterceptorsTxRequired;
	}

}
</span>
