MPL和wxPython的结合完美
以前也写过如何在wxPython中使用matplotlib,也就是讲matplotlib嵌入到wxPython的GUI中.但不是很完美,主要是没有给出鼠标的动态显示.我们知道在MatPlotLib中鼠标可以动态地显示坐标位置的,那如何实现呢?还是看一个完整的例子吧:
# -*- coding: utf-8 -*-
######################################################
###wxMPL.py
###Author::Wu Xuping
###[email protected]
###Last modified::2012-04-23
###note::Save this file as uft-8
#####################################################
import wx
import numpy as np
import matplotlib

# matplotlib采用WXAgg为后台,将matplotlib嵌入wxPython中
matplotlib.use("WXAgg")

from matplotlib.backends.backend_wxagg import FigureCanvasWxAgg as FigureCanvas
from matplotlib.backends.backend_wxagg import NavigationToolbar2WxAgg as NavigationToolbar
from matplotlib.ticker import MultipleLocator, FuncFormatter

import pylab
from matplotlib import pyplot


######################################################################################
class MPL_Panel_base(wx.Panel):
    ''' #MPL_Panel_base面板,可以继承或者创建实例'''
    def __init__(self,parent):
        wx.Panel.__init__(self,parent=parent, id=-1)

        self.Figure = matplotlib.figure.Figure(figsize=(4,3))
        self.axes = self.Figure.add_axes([0.1,0.1,0.8,0.8])
        self.FigureCanvas = FigureCanvas(self,-1,self.Figure)

        #继承鼠标移动显示鼠标处坐标的事件
        self.FigureCanvas.mpl_connect('motion_notify_event',self.MPLOnMouseMove)

        self.NavigationToolbar = NavigationToolbar(self.FigureCanvas)

        self.StaticText = wx.StaticText(self,-1,label='Show Help String')

        self.SubBoxSizer = wx.BoxSizer(wx.HORIZONTAL)
        self.SubBoxSizer.Add(self.NavigationToolbar,proportion =0, border = 2,flag = wx.ALL | wx.EXPAND)
        self.SubBoxSizer.Add(self.StaticText,proportion =-1, border = 2,flag = wx.ALL | wx.EXPAND)

        self.TopBoxSizer = wx.BoxSizer(wx.VERTICAL)
        self.TopBoxSizer.Add(self.SubBoxSizer,proportion =-1, border = 2,flag = wx.ALL | wx.EXPAND)
        self.TopBoxSizer.Add(self.FigureCanvas,proportion =-10, border = 2,flag = wx.ALL | wx.EXPAND)

        self.SetSizer(self.TopBoxSizer)


    def MPLOnMouseMove(self,event):

        ex=event.xdata#这个数据类型是numpy.float64
        ey=event.ydata#这个数据类型是numpy.float64
        if ex  and ey :
            #可以将numpy.float64类型转化为float类型,否则格式字符串可能会出错
            self.StaticText.SetLabel('%10.5f,%10.5f' % (float(ex),float(ey)))
            #也可以这样
            #self.StaticText.SetLabel('%s,%s' % (ex,ey))


    def UpdatePlot(self):
        '''#修改图形的任何属性后都必须使用self.UpdatePlot()更新GUI界面 '''
        self.FigureCanvas.draw()


    def plot(self,*args,**kwargs):
        '''#最常用的绘图命令plot '''
        self.axes.plot(*args,**kwargs)
        self.UpdatePlot()


    def semilogx(self,*args,**kwargs):
        ''' #对数坐标绘图命令 '''
        self.axes.semilogx(*args,**kwargs)
        self.UpdatePlot()

    def semilogy(self,*args,**kwargs):
        ''' #对数坐标绘图命令 '''
        self.axes.semilogy(*args,**kwargs)
        self.UpdatePlot()

    def loglog(self,*args,**kwargs):
        ''' #对数坐标绘图命令 '''
        self.axes.loglog(*args,**kwargs)
        self.UpdatePlot()


    def grid(self,flag=True):
        ''' ##显示网格  '''
        if flag:
            self.axes.grid()
        else:
            self.axes.grid(False)


    def title_MPL(self,TitleString="wxMPL Example"):
        ''' # 给图像添加一个标题   '''
        self.axes.set_title(TitleString)


    def xlabel(self,XabelString="X"):
        ''' # Add xlabel to the plotting    '''
        self.axes.set_xlabel(XabelString)


    def ylabel(self,YabelString="Y"):
        ''' # Add ylabel to the plotting '''
        self.axes.set_ylabel(YabelString)


    def xticker(self,major_ticker=1.0,minor_ticker=0.1):
        ''' # 设置X轴的刻度大小 '''
        self.axes.xaxis.set_major_locator( MultipleLocator(major_ticker) )
        self.axes.xaxis.set_minor_locator( MultipleLocator(minor_ticker) )


    def yticker(self,major_ticker=1.0,minor_ticker=0.1):
        ''' # 设置Y轴的刻度大小 '''
        self.axes.yaxis.set_major_locator( MultipleLocator(major_ticker) )
        self.axes.yaxis.set_minor_locator( MultipleLocator(minor_ticker) )


    def legend(self,*args,**kwargs):
        ''' #图例legend for the plotting  '''
        self.axes.legend(*args,**kwargs)


    def xlim(self,x_min,x_max):
        ''' # 设置x轴的显示范围  '''
        self.axes.set_xlim(x_min,x_max)


    def ylim(self,y_min,y_max):
        ''' # 设置y轴的显示范围   '''
        self.axes.set_ylim(y_min,y_max)


    def savefig(self,*args,**kwargs):
        ''' #保存图形到文件 '''
        self.Figure.savefig(*args,**kwargs)


    def cla(self):
        ''' # 再次画图前,必须调用该命令清空原来的图形  '''
        self.axes.clear()
        self.Figure.set_canvas(self.FigureCanvas)
        self.UpdatePlot()


################################################################

class MPL_Panel(MPL_Panel_base):
    ''' #MPL_Panel重要面板,可以继承或者创建实例 '''
    def __init__(self,parent):
        MPL_Panel_base.__init__(self,parent=parent)

        #测试一下
        self.FirstPlot()


    #仅仅用于测试和初始化,意义不大
    def FirstPlot(self):
        #self.rc('lines',lw=5,c='r')
        self.cla()
        x = np.arange(-5,5,0.25)
        y = np.sin(x)
        self.yticker(0.5,0.1)
        self.xticker(1.0,0.2)
        self.xlabel('X')
        self.ylabel('Y')
        self.title_MPL("MPL_Panel Example")
        self.grid()
        self.plot(x,y,'--^g')


###############################################################################
#  MPL_Frame添加了MPL_Panel的1个实例
###############################################################################
class MPL_Frame(wx.Frame):
    """MPL_Frame可以继承,并可修改,或者直接使用"""
    def __init__(self,title="MPL_Frame Example",size=(800,500)):
        wx.Frame.__init__(self,parent=None,title = title,size=size)

        self.MPL = MPL_Panel_base(self)

        #创建FlexGridSizer
        self.FlexGridSizer=wx.FlexGridSizer( rows=9, cols=1, vgap=5,hgap=5)
        self.FlexGridSizer.SetFlexibleDirection(wx.BOTH)

        self.RightPanel = wx.Panel(self,-1)

        #测试按钮1
        self.Button1 = wx.Button(self.RightPanel,-1,"TestButton",size=(100,40),pos=(10,10))
        self.Button1.Bind(wx.EVT_BUTTON,self.Button1Event)

        #测试按钮2
        self.Button2 = wx.Button(self.RightPanel,-1,"AboutButton",size=(100,40),pos=(10,10))
        self.Button2.Bind(wx.EVT_BUTTON,self.Button2Event)

        #加入Sizer中
        self.FlexGridSizer.Add(self.Button1,proportion =0, border = 5,flag = wx.ALL | wx.EXPAND)
        self.FlexGridSizer.Add(self.Button2,proportion =0, border = 5,flag = wx.ALL | wx.EXPAND)

        self.RightPanel.SetSizer(self.FlexGridSizer)

        self.BoxSizer=wx.BoxSizer(wx.HORIZONTAL)
        self.BoxSizer.Add(self.MPL,proportion =-10, border = 2,flag = wx.ALL | wx.EXPAND)
        self.BoxSizer.Add(self.RightPanel,proportion =0, border = 2,flag = wx.ALL | wx.EXPAND)

        self.SetSizer(self.BoxSizer)

        #状态栏
        self.StatusBar()

        #MPL_Frame界面居中显示
        self.Centre(wx.BOTH)


    #按钮事件,用于测试
    def Button1Event(self,event):
        self.MPL.cla()#必须清理图形,才能显示下一幅图
        x=np.arange(-10,10,0.25)
        y=np.cos(x)
        self.MPL.plot(x,y,'--*g')
        self.MPL.xticker(2.0,0.5)
        self.MPL.yticker(0.5,0.1)
        self.MPL.title_MPL("MPL1")
        self.MPL.grid()
        self.MPL.UpdatePlot()#必须刷新才能显示

    def Button2Event(self,event):
        self.AboutDialog()


    #打开文件,用于测试
    def DoOpenFile(self):
        wildcard = r"Data files (*.dat)|*.dat|Text files (*.txt)|*.txt|ALL Files (*.*)|*.*"
        open_dlg = wx.FileDialog(self,message='Choose a file',wildcard = wildcard, style=wx.OPEN|wx.CHANGE_DIR)
        if open_dlg.ShowModal() == wx.ID_OK:
            path=open_dlg.GetPath()
            try:
                file = open(path, 'r')
                text = file.read()
                file.close()
            except IOError, error:
                dlg = wx.MessageDialog(self, 'Error opening file\n' + str(error))
                dlg.ShowModal()

        open_dlg.Destroy()


    #自动创建状态栏
    def StatusBar(self):
        self.statusbar = self.CreateStatusBar()
        self.statusbar.SetFieldsCount(3)
        self.statusbar.SetStatusWidths([-2, -2, -1])


    #About对话框
    def AboutDialog(self):
        dlg = wx.MessageDialog(self, '\twxMatPlotLib\t\nMPL_Panel_base,MPL_Panel,MPL_Frame and MPL2_Frame \n Created by Wu Xuping\n Version 1.0.0 \n 2012-04-23',
                                'About MPL_Frame and MPL_Panel', wx.OK | wx.ICON_INFORMATION)
        dlg.ShowModal()
        dlg.Destroy()

###############################################################################
###  MPL2_Frame添加了MPL_Panel的两个实例
###############################################################################
class MPL2_Frame(wx.Frame):
    """MPL2_Frame可以继承,并可修改,或者直接使用"""
    def __init__(self,title="MPL2_Frame Example",size=(850,500)):
        wx.Frame.__init__(self,parent=None,title = title,size=size)

        self.BoxSizer=wx.BoxSizer(wx.HORIZONTAL)

        self.MPL1 = MPL_Panel_base(self)
        self.BoxSizer.Add(self.MPL1,proportion =-1, border = 2,flag = wx.ALL | wx.EXPAND)

        self.MPL2 = MPL_Panel_base(self)
        self.BoxSizer.Add(self.MPL2,proportion =-1, border = 2,flag = wx.ALL | wx.EXPAND)

        self.RightPanel = wx.Panel(self,-1)
        self.BoxSizer.Add(self.RightPanel,proportion =0, border = 2,flag = wx.ALL | wx.EXPAND)

        self.SetSizer(self.BoxSizer)

        #创建FlexGridSizer
        self.FlexGridSizer=wx.FlexGridSizer( rows=9, cols=1, vgap=5,hgap=5)
        self.FlexGridSizer.SetFlexibleDirection(wx.BOTH)

        #测试按钮1
        self.Button1 = wx.Button(self.RightPanel,-1,"TestButton",size=(100,40),pos=(10,10))
        self.Button1.Bind(wx.EVT_BUTTON,self.Button1Event)

        #测试按钮2
        self.Button2 = wx.Button(self.RightPanel,-1,"AboutButton",size=(100,40),pos=(10,10))
        self.Button2.Bind(wx.EVT_BUTTON,self.Button2Event)

        #加入Sizer中
        self.FlexGridSizer.Add(self.Button1,proportion =0, border = 5,flag = wx.ALL | wx.EXPAND)
        self.FlexGridSizer.Add(self.Button2,proportion =0, border = 5,flag = wx.ALL | wx.EXPAND)

        self.RightPanel.SetSizer(self.FlexGridSizer)

        #状态栏
        self.StatusBar()


        #MPL2_Frame界面居中显示
        self.Centre(wx.BOTH)


    #按钮事件,用于测试
    def Button1Event(self,event):
        self.MPL1.cla()#必须清理图形,才能显示下一幅图
        x=np.arange(-5,5,0.2)
        y=np.cos(x)
        self.MPL1.plot(x,y,'--*g')
        self.MPL1.xticker(2.0,1.0)
        self.MPL1.yticker(0.5,0.1)
        self.MPL1.title_MPL("MPL1")
        self.MPL1.grid()
        self.MPL1.UpdatePlot()#必须刷新才能显示

        self.MPL2.cla()
        self.MPL2.plot(x,np.sin(x),':^b')
        self.MPL2.xticker(1.0,0.5)
        self.MPL2.yticker(0.2,0.1)
        self.MPL2.title_MPL("MPL2")
        self.MPL2.grid()
        self.MPL2.UpdatePlot()

    def Button2Event(self,event):
        self.AboutDialog()


    #自动创建状态栏
    def StatusBar(self):
        self.statusbar = self.CreateStatusBar()
        self.statusbar.SetFieldsCount(3)
        self.statusbar.SetStatusWidths([-2, -2, -1])


    #About对话框
    def AboutDialog(self):
        dlg = wx.MessageDialog(self, '\twxMatPlotLib\t\nMPL_Panel_base,MPL_Panel,MPL_Frame and MPL2_Frame \n Created by Wu Xuping\n Version 1.0.0 \n 2012-02-01',
                                'About MPL_Frame and MPL_Panel', wx.OK | wx.ICON_INFORMATION)
        dlg.ShowModal()
        dlg.Destroy()


########################################################################

#主程序测试
if __name__ == '__main__':
    app = wx.PySimpleApp()
    frame = MPL2_Frame()
    #frame =MPL_Frame()
    frame.Center()
    frame.Show()
    app.MainLoop()
例子里面的代码比较简单,如果想知道详细情况,可以看看我的其它文章,里面有详细介绍得.下面给出两个截图给大家看看吧................................................................
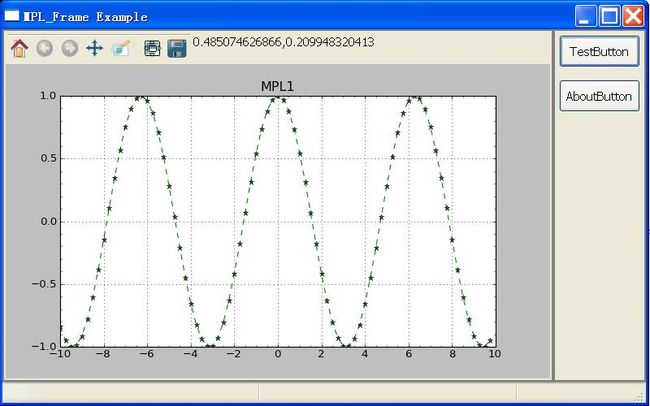
上面这个图只嵌入一个Matplotlib,
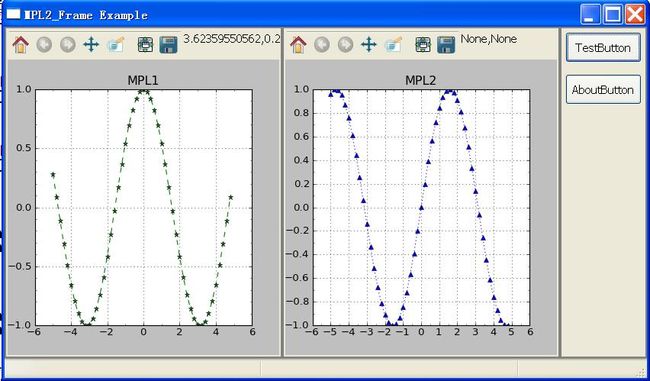
下面嵌入两个Matplotlib
注意鼠标能正常显示坐标了吗?上面的代码不难,自己修改一下就可以用的.

