Gamebryo完整实现HDR及分析
今天要用GameBryo实现HDR,大家一起研究学习
由于公司的万恶网络不能上传图片,就忍了:
首先介绍的HDR实现中需要封装一个AuxBuffer,其继承于NiRenderClick,对于HDR过程的一个步骤(Click),里面
能获得以下几个东西:
(1) NiRenderedTexturePtr m_spTex; 渲染目标,一张纹理,其可以作为下一个步骤的输入。
(2) NiMeshScreenElementsPtr m_spGeom; 屏幕元素,当前步骤面对的目标屏幕,
上面可以使用上层纹理和相应的材质,shader.
了解这个之后,就开始了HDR的流程了。

1、构建整个流程重要的渲染纹理。
m_kHDRScene --->场景正常渲染,保持整个场景的FP Texture格式是D3DFMT_A16B16G16R16F这样保存的颜色值就
可以突破0-1的限制。
m_kHDRSceneScaled-->缩小后的纹理,缩小为原来的1/4,作为一阶段的纹理来源。
m_akToneMaps[4]-->计算场景的亮度值用的系列贴图,大小为(1x1, 4x4, 16x16, 64x64)。
m_pkAdaptedLumCur,m_pkAdaptedLumLast-->光适应值,过渡贴图,比如从比较亮的地方突然过渡到比较暗的地方,必须
做出光的适应。
m_kBrightPass-->保存了m_kHDRScene通过Bright-Pass Filter后的,只剩下了亮度高的部分。
m_kBloomSource,m_akBlooms-->光晕效果贴图。
m_kStarSource-->星光效果贴图。
m_kOutputBuffer-->最后混合后的输出。
这里我们封装了CreateAuxBuffer函数,其承担了各个click的创建工作。这里有必要解释下GB的RenderClick:
A render click represents a single rendering operation to a single render target group. Multiple render clicks can happen in sequence to produce a single rendering effect.
一个Click关联一个渲染目标,多个渲染目标作为一个序列构成一个效果,其实GB里面的RenderStep管理Click。
void HDRScene::CreateAuxBuffer(unsigned int uiWidth, unsigned int uiHeight, NiTexture::FormatPrefs& kPrefs, AuxBuffer& kBuffer) { NIASSERT(m_pkRenderer); kBuffer.m_spTex = NiRenderedTexture::Create(uiWidth, uiHeight, m_pkRenderer, kPrefs); NIASSERT(kBuffer.m_spTex); // if needed, create the depth stencil buffer to share it across all // subsequent render targets -- the first render target should be // maximally sized for the ones used in this application, in order for // its depth surface to be useable for each subsequent render target if (!m_pkDepthStencil) { m_pkDepthStencil = m_pkRenderer->GetDefaultRenderTargetGroup()-> GetDepthStencilBuffer(); NIASSERT(m_pkDepthStencil); } kBuffer.SetRenderTargetGroup(NiRenderTargetGroup::Create( kBuffer.m_spTex->GetBuffer(), m_pkRenderer, true, true)); NIASSERT(kBuffer.GetRenderTargetGroup()); // Test to be sure that the shared depth buffer is compatible bool bValidRTG = m_pkRenderer-> ValidateRenderTargetGroup(kBuffer.GetRenderTargetGroup()); if (!bValidRTG) { m_pkDepthStencil = NiDepthStencilBuffer::CreateCompatible( kBuffer.m_spTex->GetBuffer(), m_pkRenderer); NIASSERT(m_pkDepthStencil); kBuffer.GetRenderTargetGroup()->AttachDepthStencilBuffer( m_pkDepthStencil); } }
构建好RenderTextures后,下面就根据需求构造相应的RenderClick.HDR都是把前一个步骤处理的结果作为后一个后一个步骤的来源:
m_kHDRScene结果---->m_kHDRSceneScaled结果---->m_akToneMaps结果--->m_pkAdaptedLumLast/m_pkAdaptedLumCur
m_kHDRSceneScaled结果--->m_kBrightPass结果---->m_kStarSource结果---->m_kBloomSource结果
我们提供通用函数来构建CreateAuxBufferGeom,其把来源纹理的纹理作为本次处理Click屏幕的一层ShaderMap,并加入相关联的材质
void HDRScene::CreateAuxBufferGeom(const AuxBuffer& kSrcBuffer, bool bSrcBorder, AuxBuffer& kDestBuffer, bool bDestBorder, NiMaterial* pkMaterial, NiTexture* pkShaderMap0, NiTexture* pkShaderMap1) { // Get the correct texture coordinates to apply to the rendered quad // in order to sample from the source rectangle and render into // the destination rectangle. Start with a default mapping of the // complete source surface to complete destination surface NiRect<float> kCoords(0.0f, 1.0f, 0.0f, 1.0f); if (bSrcBorder) { // These delta values are the distance between source texel // centers in texture address space float tU = 1.0f / kSrcBuffer.m_spTex->GetWidth(); float tV = 1.0f / kSrcBuffer.m_spTex->GetHeight(); kCoords.m_left += tU; kCoords.m_top += tV; kCoords.m_right -= tU; kCoords.m_bottom -= tV; } unsigned int uiDestWidth = kDestBuffer.GetRenderTargetGroup()->GetWidth(0); unsigned int uiDestHeight = kDestBuffer.GetRenderTargetGroup() ->GetHeight(0); kDestBuffer.m_pkRectDest = NULL; if (bDestBorder) { // These delta values are the distance between dest texel // centers in texture address space float tU = 1.0f / uiDestWidth; float tV = 1.0f / uiDestHeight; kCoords.m_left -= tU; kCoords.m_top -= tV; kCoords.m_right += tU; kCoords.m_bottom += tV; kDestBuffer.m_pkRectDest = NiNew NiRect<int>; kDestBuffer.m_pkRectDest->m_left = 1; kDestBuffer.m_pkRectDest->m_top = 1; kDestBuffer.m_pkRectDest->m_right = uiDestWidth - 1; kDestBuffer.m_pkRectDest->m_bottom = uiDestHeight - 1; } // Add screen space debug geometry using new NiMeshScreenElements NiMeshScreenElementsPtr spGeom = NiNew NiMeshScreenElements( false, false, 1); NIASSERT(spGeom); int iQuadHandle = spGeom->Insert(4); spGeom->SetRectangle(iQuadHandle, 0, 0, 1.0f, 1.0f); spGeom->UpdateBound(); spGeom->SetTextures(iQuadHandle, 0, kCoords.m_left, kCoords.m_top, kCoords.m_right, kCoords.m_bottom); NiTexturingPropertyPtr spPSVSQuadTex = NiNew NiTexturingProperty; NIASSERT(spPSVSQuadTex); spPSVSQuadTex->SetApplyMode(NiTexturingProperty::APPLY_REPLACE); spGeom->AttachProperty(spPSVSQuadTex); spPSVSQuadTex->SetBaseTexture(kSrcBuffer.m_spTex); if (pkShaderMap0) { NiTexturingProperty::ShaderMap* pkPSVSShaderMap0 = NiNew NiTexturingProperty::ShaderMap( pkShaderMap0, 0, NiTexturingProperty::CLAMP_S_CLAMP_T, NiTexturingProperty::FILTER_NEAREST, 0); NIASSERT(pkPSVSShaderMap0); spPSVSQuadTex->SetShaderMap(0, pkPSVSShaderMap0); } if (pkShaderMap1) { NiTexturingProperty::ShaderMap* pkPSVSShaderMap1 = NiNew NiTexturingProperty::ShaderMap( pkShaderMap1, 0, NiTexturingProperty::CLAMP_S_CLAMP_T, NiTexturingProperty::FILTER_NEAREST, 1); NIASSERT(pkPSVSShaderMap1); spPSVSQuadTex->SetShaderMap(1, pkPSVSShaderMap1); } kDestBuffer.m_spGeom = spGeom; if (pkMaterial) spGeom->ApplyAndSetActiveMaterial(pkMaterial); spGeom->Update(0.0f); spGeom->UpdateEffects(); spGeom->UpdateProperties(); }
此过程调用代码:
void HDRScene::CreateAuxBuffers() { m_pkAdaptedLumCur = NiNew AuxBuffer; m_pkAdaptedLumLast = NiNew AuxBuffer; CreateRenderedTextures(); NIASSERT(m_pkRenderer->GetDefaultRenderTargetGroup()->GetWidth(0) == m_uiHDRSceneWidth); NIASSERT(m_pkRenderer->GetDefaultRenderTargetGroup()->GetHeight(0) == m_uiHDRSceneHeight); // Manually load materials // This "pass" creates a scaled-down version of the render target from // the previous pass. The only object that is rendered is a 2D // screen-size. Output is a 1/4 frame-buffer sized 16-bit float // per-channel rendered texture. // Create a 1/4 x 1/4 scale copy of the HDR texture. // Since bloom textures are 1/8 x 1/8 scale, border texels of // the HDR texture will be discarded // Should be no need to do any offsets - we are mapping from the // entire buffer to the entire render target NiMaterial* spDownScale4x4Material = NiSingleShaderMaterial::Create("HDRScene_DownScale4x4"); NIASSERT(spDownScale4x4Material); CreateAuxBufferGeom(m_kHDRScene, false, m_kHDRSceneScaled, false, spDownScale4x4Material); // Setup texture from last "pass" (SceneScaled) that will be used // for sampling in the pixel shader for this draw and generate // the scaled texture. After this pass, the // g_apTexToneMap[NUM_TONEMAP_TEXTURES-1] texture will contain // a scaled, grayscale copy of the HDR scene. Individual texels // contain the log of average luminance values for points sampled // on the HDR texture. unsigned int uiCurrTexture = NUM_TONEMAP_TEXTURES - 1; NiMaterialPtr spSampleAvgLumMaterial = NiSingleShaderMaterial::Create("HDRScene_SampleAvgLum"); NIASSERT(spSampleAvgLumMaterial); CreateAuxBufferGeom(m_kHDRSceneScaled, false, m_akToneMaps[uiCurrTexture], false, spSampleAvgLumMaterial); uiCurrTexture--; NiMaterialPtr spResampleAvgLumMaterial = NiSingleShaderMaterial::Create("HDRScene_ResampleAvgLum"); NIASSERT(spResampleAvgLumMaterial); NiMaterialPtr spGaussBlur5x5Material = NiSingleShaderMaterial::Create("HDRScene_GaussBlur5x5"); NIASSERT(spGaussBlur5x5Material); // Initialize the sample offsets for the iterative luminance passes // lumanance of the scene. while (uiCurrTexture > 1) { // Draw quad to create each next scaled tone map CreateAuxBufferGeom(m_akToneMaps[uiCurrTexture+1], false, m_akToneMaps[uiCurrTexture], false, spResampleAvgLumMaterial); uiCurrTexture--; } CreateAuxBufferGeom(m_akToneMaps[uiCurrTexture+1], false, m_akToneMaps[uiCurrTexture], false, spGaussBlur5x5Material); uiCurrTexture--; #else while (uiCurrTexture > 0) { // Draw quad to create each next scaled tone map CreateAuxBufferGeom(m_akToneMaps[uiCurrTexture+1], false, m_akToneMaps[uiCurrTexture], false, spResampleAvgLumMaterial); uiCurrTexture--; } #endif // Perform the final pass of the average luminance calculation. // This pass scales the 4x4 log of average luminance texture from // above and performs an exp() operation to return a single texel // cooresponding to the average luminance of the scene in // g_apTexToneMap[0]. // Draw quad to create final luminance tone map NiMaterialPtr spResampleAvgLumExpMaterial = NiSingleShaderMaterial::Create("HDRScene_ResampleAvgLumExp"); NIASSERT(spResampleAvgLumExpMaterial); CreateAuxBufferGeom(m_akToneMaps[1], false, m_akToneMaps[0], false, spResampleAvgLumExpMaterial); // This simulates the light adaptation that occurs when moving from a // dark area to a bright area, or vice versa. The g_pTexAdaptedLum // texture stores a single texel cooresponding to the user's adapted // level. // Draw quad to create final luminance tone map // We'll be swapping these back and forth, so we make them point to each // other CreateAuxBufferGeom(*m_pkAdaptedLumCur, false, *m_pkAdaptedLumLast, false, m_spCalculateAdaptedLumMaterial, m_akToneMaps[0].m_spTex); CreateAuxBufferGeom(*m_pkAdaptedLumLast, false, *m_pkAdaptedLumCur, false, m_spCalculateAdaptedLumMaterial, m_akToneMaps[0].m_spTex); // Run the bright-pass filter on Scene Scaled texture and // place the result in BrightPass // The bright-pass filter removes everything from the scene except // lights and bright reflections NiMaterialPtr spBrightPassFilterMaterial = NiSingleShaderMaterial::Create("HDRScene_BrightPassFilter"); NIASSERT(spBrightPassFilterMaterial); CreateAuxBufferGeom(m_kHDRSceneScaled, false, m_kBrightPass, true, spBrightPassFilterMaterial, m_pkAdaptedLumCur->m_spTex); // Perform a 5x5 gaussian blur on BrightPass and place the result // in StarSource. The bright-pass filtered image is blurred before // being used for star operations to avoid aliasing artifacts. // The gaussian blur smooths out rough edges to avoid aliasing effects // when the star effect is run CreateAuxBufferGeom(m_kBrightPass, false, m_kStarSource, true, spGaussBlur5x5Material); // Scale down StarSource by 1/2 x 1/2 and place the result in // BloomSource // Create an exact 1/2 x 1/2 copy of the source texture // Draw bloom source from star source NiMaterialPtr spDownScale2x2Material = NiSingleShaderMaterial::Create("HDRScene_DownScale2x2"); NIASSERT(spDownScale2x2Material); CreateAuxBufferGeom(m_kStarSource, true, m_kBloomSource, true, spDownScale2x2Material); // Render the blooming effect // Render the gaussian blur CreateAuxBufferGeom(m_kBloomSource, true, m_akBlooms[2], true, spGaussBlur5x5Material); //////////////////////////// // Bloom Pass for Horizontal NiMaterialPtr spBloomMaterial = NiSingleShaderMaterial::Create("HDRScene_Bloom"); NIASSERT(spBloomMaterial); CreateAuxBufferGeom(m_akBlooms[2], true, m_akBlooms[1], true, spBloomMaterial); //////////////////////////// // Bloom Pass for Vertical CreateAuxBufferGeom(m_akBlooms[1], true, m_akBlooms[0], false, spBloomMaterial); }
2、HDR渲染开始
(1)将Scene渲染到我们新的RT上,由于RT是就是m_kHDRScene的贴图,我们能够保存超过0-1的数据。
然而超过0-1的数据时如何保证的呢,我们会遍历相应的场景节点,对需要进行HDR处理的亮光部分,创建相应的纹理也就是
D3DFMT_A16B16G16R16F.代码如下,大家都会:
NiPixelData* WorldManager::ConvertPixelDataToHDR(const NiPixelData* pkSrc, unsigned int uiMaxScale) { NIASSERT(pkSrc); NiPixelData* pkFloatPD = NiNew NiPixelData( pkSrc->GetWidth(), pkSrc->GetHeight(), #if defined(_PS3) NiPixelFormat::RGBA64_BE, #else NiPixelFormat::RGBA64, #endif pkSrc->GetNumMipmapLevels()); NIASSERT(pkFloatPD); NiDevImageConverter::PixelBits kSrcBits(pkSrc->GetPixelFormat()); const float fMaxScale = (float)uiMaxScale; const float fResScale = 1.0f / 255.0f; const float fRampScale = fMaxScale / 254.0f; for (unsigned int m = 0; m < pkSrc->GetNumMipmapLevels(); m++) { const unsigned int* pucSrc = (unsigned int*)pkSrc->GetPixels(m); NIASSERT(pucSrc); #if defined(WIN32) || defined(_XENON) D3DXFLOAT16* pufDest = (D3DXFLOAT16*)pkFloatPD->GetPixels(m); #elif defined(_PS3) half* pufDest = (half*)pkFloatPD->GetPixels(m); #endif NIASSERT(pufDest); for (unsigned int h = 0; h < pkSrc->GetHeight(m); h++) { for (unsigned int w = 0; w < pkSrc->GetWidth(m); w++) { unsigned char ucR = NiDevImageConverter::UnpackRedChannel(*pucSrc, kSrcBits); unsigned char ucG = NiDevImageConverter::UnpackGreenChannel(*pucSrc, kSrcBits); unsigned char ucB = NiDevImageConverter::UnpackBlueChannel(*pucSrc, kSrcBits); unsigned char ucA = NiDevImageConverter::UnpackAlphaChannel(*pucSrc, kSrcBits); pucSrc++; float fRamp = 1.0f + (ucA - 1) * fRampScale; *(pufDest++) = (float)ucR * fResScale * fRamp; *(pufDest++) = (float)ucG * fResScale * fRamp; *(pufDest++) = (float)ucB * fResScale * fRamp; // I have no definite concept of what floating point alpha // means here. 0.0f is apparently completely transparent, but // I'm completely unsure what represents completely opaque. // Try sticking in 0.0f or FLT_MAX, compare // the differences, and then explain it to me! // In the mean time, scaling alpha like the other // channels appears to do what is needed for the demo // as it stands currently *(pufDest++) = (float)ucA * fResScale * fRamp; } } // Swap back to little-endian. This is why we need to fix endianess // issues. This is stupid! -dba (man and dh concur) #if defined(_XENON) pufDest = (D3DXFLOAT16*)pkFloatPD->GetPixels(m); NiEndian::Swap16((char*)pufDest, pkFloatPD->GetWidth(m) * pkFloatPD->GetHeight(m) * 4); #elif defined(_PS3) // Nothing needs to be done as we've already requested a big-endian // format above #elif defined(WIN32) // Nothing needs to be done for a little-endian platform #else #error "Unsupported platform" #endif } return pkFloatPD; }
(2)将m_kHDRScene渲染到m_kHDRSceneScale上,也就是缩小到1/4,这样的作用是在下面的处理能提高不少速度.
我们来看相应的Shader代码:
float4 DownScale2x2(in float2 kScreenPosition : TEXCOORD0) : COLOR { float4 kSample = 0.0f; for (int i = 0; i < 4; i++) { kSample += tex2D(BasePointClampSampler, kScreenPosition + gakSampleOffsets[i] ); } return kSample / 4; }
这里就是按照gakSampleOffsets的偏移值采样16个texel,然后计算均值,gakSampleOffsets的生成代码也比较简单:
NiRenderTargetGroup* pkRT = kDest->GetRenderTargetGroup(); for (int x = -1; x <= 1; x++) { for (int y = -1; y <= 1; y++) { akSampleOffsets[iIndex].x = x * fU; akSampleOffsets[iIndex].y = y * fV; iIndex++; } }
(3)Draw quad to create final luminance tone map ,构建m_akToneMaps[4],计算场景的亮度值用的系列贴图,大小为(1x1, 4x4, 16x16, 64x64)。
在你的程序能缩放场景强度之前,你需要确定场景在开始时有多亮。目的是为平均场景亮度作个好的估计,以最小化计算所需的时间消耗数量。减少采样纹理可以提升计算速度,但是较少采样会面临丢失亮区域的风险。在这个例子中最接近的方法是首先按1/4 x 1/4比例缩放场景,使用平均每个4 x 4的纹理块减少采样。这个缩放纹理也用来建立光照效果的资源纹理,因此缩放操作的精确度是很重要的,以避免镜头在场景中移动出现闪烁现象。
下面的亮度方程方法用来测量平均场景亮度和完成色调映射的白纸特征Photographic Tone Reproduction for Digital Images
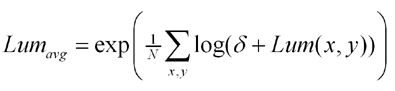
平均场景亮度用来最后计算所有采样像素平均对数值的逆对数。Delta包含一个小值来操作纯黑纹理情况。这个方程实现了测量亮度方法的四个像素着色过程,如下:
1.样本平均值 log() 值到一个64 x 64 纹理中。
2.按比例缩小到16 x 16。
3.按比例缩小到4 x 4。
4.按比例缩小到1 x 1并在结果上执行一个exp()操作。
保存一个1 x 1的纹理,计算需要平均亮度值,计算工作能被视频卡完全处理而不需要AGP总线传输。
代码如下:
//----------------------------------------------------------------------------- // Pixel Shader: SampleLumIterative // Desc: Scale down the luminance texture by blending sample points //----------------------------------------------------------------------------- float4 SampleLumIterative(in float2 kScreenPosition : TEXCOORD0) : COLOR { float fResampleSum = 0.0f; for (int iSample = 0; iSample < 16; iSample++) { // Compute the sum of luminance throughout the sample points fResampleSum += tex2D(BasePointClampSampler, kScreenPosition + gakSampleOffsets[iSample]); } // Divide the sum to complete the average fResampleSum /= 16; return float4(fResampleSum, fResampleSum, fResampleSum, 1.0f); } //于是m_akToneMaps[3]保存的就是按照3X3的方式采样得到的平均的Log值,我们的目标是计算出所有的像素的Log的 平均值然后exp,我们下一部就是利用每次的缩小,取得更大范围的平均值,最后到4X4得贴图,我们在采样这最后的16个像素,然后exp(value/16); //----------------------------------------------------------------------------- // Pixel Shader: SampleLumFinal // Desc: Extract the average luminance of the image by completing the averaging // and taking the exp() of the result //----------------------------------------------------------------------------- float4 SampleLumFinal(in float2 kScreenPosition : TEXCOORD0) : COLOR { float fResampleSum = 0.0f; for (int iSample = 0; iSample < 16; iSample++) { // Compute the sum of luminance throughout the sample points fResampleSum += tex2D(BasePointClampSampler, kScreenPosition + gakSampleOffsets[iSample]); } // Divide the sum to complete the average, and perform an exp() to complete // the average luminance calculation fResampleSum = exp(fResampleSum / 16); fResampleSum = min(SQRT_MAX_HALF, fResampleSum); fResampleSum = max(0.0f, fResampleSum); return float4(fResampleSum, fResampleSum, fResampleSum, 1.0f); }
(4)曝光控制:
暴光控制是找出一个适当的低动态范围的HDR场景视图的方法。在物理镜头系统中,光圈调整光线进入系统的数量极限。该方法使用计算机图像来模拟通常叫做色调映射的暴光控制。它引用映射一个HDR图像空间到低动态范围空间中以适合于视频显示的方法。不同于暴光控制,色调映射时所有高范围数据是有效的;所以,依赖于操作,图像比使用传统的摄像机可能包含更多的来自亮区和暗区的细节。
在平均场景亮度计算之后,HDR场景纹理能被按照目标平均亮度缩放,表现在下面方程式的alpha上:

这个方程式为最终场景简单的产生一个围绕物体平均亮度的场景亮度中心的线性缩放;然而,这个结果值还尚未被压缩到适合于可视化屏幕的低动态范围0.0 到 1.0。下面的色调映射操作完成期望的压缩。

人类视觉系统不能对光线环境亮度的变化作出瞬间调整,这种特性容易被稍微扩展的色调映射计算模拟。通过色调映射公式用使用者当前适当亮度值替代平均场景亮度。这个适当亮度值存储在1 x 1的纹理中并调整每一帧缓慢追踪测量场景的亮度,如下代码片段所示: float fNewAdaptation = fAdaptedLum + (fCurrentLum - fAdaptedLum) * ( 1 - pow( 0.98f, 30 * g_fElapsedTime ) );例如,如果摄像机是固定的,适合的亮度最后将匹配标准的亮度,色调映射的输出和适配器无效时输出的结果一致。可是,如果摄像机焦点移动到不同亮度量级的区域,在整个视野调整到新光照环境过程中图像将出现暴光过度或暴光不足,适应性模式在这个例子中不是预期的人类适应性的真实模式,它至少比一个半小时的全黑适应要好的多。
这个部分我主要通过 m_pkAdaptedLumCur,m_pkAdaptedLumLast两个Click去控制,其对应的材质shader为:
float4 CalculateAdaptedLum(in float2 kScreenPosition : TEXCOORD0) : COLOR { float fAdaptedLum = tex2D(BasePointClampSampler, float2(0.5f, 0.5f)); float fCurrentLum = tex2D(Shader0PointClampSampler, float2(0.5f, 0.5f)); // The user's adapted luminance level is simulated by closing // the gap between adapted luminance and current luminance by // 2% every frame, based on an assumed frame rate. This is not an accurate // model of human adaptation, which can take longer than half an hour. float fNewAdaptation = fAdaptedLum + (fCurrentLum - fAdaptedLum) * (1 - pow(gfAdaptationScale, gfAssumedHz * gfElapsedTime)); return float4(fNewAdaptation, fNewAdaptation, fNewAdaptation, 1.0f); }
void HDRScene::CalculateAdaptation(float fElapsedTime) { // Increment the user's adapted luminance // Swap current & last luminance AuxBuffer* pkSwap = m_pkAdaptedLumLast; m_pkAdaptedLumLast = m_pkAdaptedLumCur; m_pkAdaptedLumCur = pkSwap; // This simulates the light adaptation that occurs when moving from a // dark area to a bright area, or vice versa. The g_pTexAdaptedLum // texture stores a single texel cooresponding to the user's adapted // level. float fTime = fElapsedTime - m_fLastFrameTime; NiShaderFactory::UpdateGlobalShaderConstant("gfElapsedTime", sizeof(float), &fTime); m_fLastFrameTime = fElapsedTime; // Draw quad to create final luminance tone map m_pkAdaptedLumCur->Render(m_pkRenderer->GetFrameID()); // Update rendering statistics. m_uiNumObjectsDrawn += m_pkAdaptedLumCur->GetNumObjectsDrawn(); m_fCullTime += m_pkAdaptedLumCur->GetCullTime(); m_fRenderTime += m_pkAdaptedLumCur->GetRenderTime(); }
(5)光亮过滤器
色调映射执行两处代码;一处是在渲染中作为最终着色器的一部分传给合成的耀光纹理到场景中,一处是作为光亮过滤器的一部分。光亮过滤器使用色调映射首先测定哪个最终场景图像区域将被照亮,然后排除剩余数据。由于HDR光照效果与当前暴光相关,这些效果能在色调映射图像上完成并直接到场景输出。这个程序优势在于能用整数纹理产生眩光。
下面的代码片段展示了光亮过滤器在减去黑暗区域之前首先映射场景到希望的中等灰度的亮度的物体。色调映射操作从稍微修改的最终方程中转换了场景的亮度到0.0 ~span>1.0f范围之间。不是用亮度增量来区分亮度,而是用一个偏移值替换公式中的一个量。当偏移值增加,独立在场景亮区和暗区的部分也相应增加。
float4 BrightPassFilter(in float2 kScreenPosition : TEXCOORD0) : COLOR { float4 kSample = tex2D(BasePointClampSampler, kScreenPosition ); float fAdaptedLum = tex2D(Shader0PointClampSampler, float2(0.5f, 0.5f) ); // Determine what the pixel's value will be after tone-mapping occurs kSample.rgb *= gfMiddleGray / (fAdaptedLum + 0.001f); // Subtract out dark pixels kSample.rgb -= gfBrightPassThreshold; // Clamp to 0 kSample = max(kSample, 0.0f); // Map the resulting value into the 0 to 1 range. Higher values for // gfBrightPassOffset will isolate lights from illuminated scene objects. kSample.rgb /= (gfBrightPassOffset + kSample); return kSample; }
void HDRScene::DrawBrightPassFromSceneScaled() { // Draw quad to create bright pass map m_kBrightPass.Render(m_pkRenderer->GetFrameID()); // Update rendering statistics. m_uiNumObjectsDrawn += m_kBrightPass.GetNumObjectsDrawn(); m_fCullTime += m_kBrightPass.GetCullTime(); m_fRenderTime += m_kBrightPass.GetRenderTime(); }
(6)光晕效果
在完成光晕之前,光亮过滤器图像已被缩小和模糊到原始场景纹理1/8 x 1/8比例,光晕处理只是一个简单的水平线与垂直线的光亮过滤器场景中的高斯模糊的两次分别处理。纹理首先被沿着水平线模糊,然后水平模糊后的纹理沿着垂直方向模糊以完成这个处理。作为最终场景的一部分,光晕纹理缩小到使用双线性过滤和场景直接输出的后缓冲尺寸。
float4 Bloom(in float2 kScreenPosition : TEXCOORD0) : COLOR { float4 kSample = 0.0f; float4 kColor = 0.0f; float2 kSamplePosition; // Perform a one-directional gaussian blur for (int iSample = 0; iSample < 15; iSample++) { kSamplePosition = kScreenPosition + gakSampleOffsets[iSample]; kColor = tex2D(BasePointClampSampler, kSamplePosition); kSample += gakSampleWeights[iSample] * kColor; } return kSample; }
光晕的shader代码也比较简单,对前面活动的BrightPass贴图进行水平,垂直模糊就OK。。
相应的C++代码:
void HDRScene::DrawBloomSourceFromStarSource() { // Scale down StarSource by 1/2 x 1/2 and place the result in // BloomSource NiPoint2 akSampleOffsets[MAX_SAMPLES]; GetSampleOffsets_DownScale2x2(m_kBrightPass.m_spTex->GetWidth(), m_kBrightPass.m_spTex->GetHeight(), akSampleOffsets); UpdateSampleConstants(akSampleOffsets); // Create an exact 1/2 x 1/2 copy of the source texture // Draw bloom source from star source m_kBloomSource.Render(m_pkRenderer->GetFrameID()); // Update rendering statistics. m_uiNumObjectsDrawn += m_kBloomSource.GetNumObjectsDrawn(); m_fCullTime += m_kBloomSource.GetCullTime(); m_fRenderTime += m_kBloomSource.GetRenderTime(); }
(7)星光效果
星光效果可能需要对每个星光光线至少三次以上的渲染。星光模式可以有不同星光类型的特征,包括光线数目,光线方向,和色彩偏移,一次渲染全部单独方向的光线,穿过单独光线纹理的平均纹理值用于建立最终的合成的星光纹理。这个合成纹理是缩小的和直接到最终场景的图像。相对应的shader代码,大家大可以做出不同的改变
//----------------------------------------------------------------------------- // Pixel Shader: GaussBlur5x5 // Desc: Simulate a 5x5 kernel gaussian blur by sampling the 13 points closest // to the center point. //----------------------------------------------------------------------------- float4 GaussBlur5x5(in float2 kScreenPosition : TEXCOORD0) : COLOR { float4 kSample = 0.0f; for (int i = 0; i <= 12; i++) { kSample += gakSampleWeights[i] * tex2D(BasePointClampSampler, kScreenPosition + gakSampleOffsets[i] ); } return kSample; }
(8)最终结果输出,这是等待已久的。
bool HDRScene::SetOutputRenderTargetGroup( NiRenderTargetGroup* pkOutputRenderTargetGroup) { NIASSERT(pkOutputRenderTargetGroup); if (!m_kOutputBuffer.GetRenderTargetGroup()) { m_kOutputBuffer.SetRenderTargetGroup(pkOutputRenderTargetGroup); CreateAuxBufferGeom(m_kHDRScene, false, m_kOutputBuffer, false, m_spFinalScenePassMaterial, m_akBlooms[0].m_spTex, m_pkAdaptedLumCur->m_spTex); } m_kOutputBuffer.SetRenderTargetGroup(pkOutputRenderTargetGroup); return true; }
shader代码如下:
float4 FinalScenePass(in float2 kScreenPosition : TEXCOORD0) : COLOR { float4 kSample = tex2D(BasePointClampSampler, kScreenPosition); float4 kBloom = tex2D(Shader0LinearClampSampler, kScreenPosition); float fAdaptedLum = tex2D(Shader1PointClampSampler, float2(0.5f, 0.5f)); // Map the high range of color values into a range appropriate for // display, taking into account the user's adaptation level, and selected // values for for middle gray and white cutoff. kSample.rgb *= (gfMiddleGray / (fAdaptedLum + 0.001f)); kSample.rgb /= (1.0f + kSample); // Add the bloom post processing effect kSample += gfBloomScale * kBloom; return kSample; }
对Star后的结果进行Bloom,后得到的贴图,做出平衡光过渡,混合。得到最后结果。。。其实每个阶段相应的处理
都是可以优化和调参数得到更好效果的。我已把HDR移进我的客户端,最后要和美术交流得出最终的解决方案。大家
如有什么意见可以提出:[email protected]