【Unity】新的UI系统技巧
从Unity4.6开始,集成了新的UI系统。这篇文章将记录新的UI系统的一些使用技巧,内容将不断增加~~~
1)给人物加血条效果
把血条的sprite的anchors都设置为0;假设3d摄像机对象为cam3d,在场景中把要挂载血条的位置用一个空对象表示,这里对其引用为targetPos;相关代码如下:
	public GameObject targetPos;
	public Camera cam3d;
	RectTransform bloodRectTrans;
	void Start () {
		bloodRectTrans = GetComponent<RectTransform> ();
	}
	void Update () {
		bloodRectTrans.anchoredPosition = RectTransformUtility.WorldToScreenPoint (cam3d, targetPos.transform.position);
	}
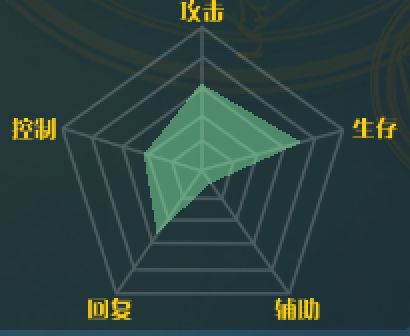
2) 定制一个雷达图控件:
using System.Collections;
using UnityEngine.UI;

[ExecuteInEditMode]
public class RadarChart : Graphic {
	public RectTransform[] maxPoints;
	private float[] percents = new float[5] { 1, 1, 1, 1, 1 };
    private Vector3[] vertexes = new Vector3[6];
	private bool isDirty = true;

	void Update() {
		#if UNITY_EDITOR
		isDirty = true;
		#endif
		if(isDirty) {
			isDirty = false;
			refresh();
		}
	}

	public void refresh() {
		vertexes[0] = maxPoints[0].anchoredPosition;
		for(int i=1; i<maxPoints.Length; i++) {
			vertexes[i] = maxPoints[0].anchoredPosition + (maxPoints[i].anchoredPosition - maxPoints[0].anchoredPosition)*percents[i-1];
		}
		SetAllDirty();
	}

	public float perA {
		get {
			return percents[0];
		}
		set {
			percents[0] = Mathf.Clamp01(value);
			isDirty = true;
		}
	}

	public float perB {
		get {
			return percents[1];
		}
		set {
			percents[1] = Mathf.Clamp01(value);
			isDirty = true;
		}
	}

	public float perC {
		get {
			return percents[2];
		}
		set {
			percents[2] = Mathf.Clamp01(value);
			isDirty = true;
		}
	}

	public float perD {
		get {
			return percents[3];
		}
		set {
			percents[3] = Mathf.Clamp01(value);
			isDirty = true;
		}
	}

	public float perE {
		get {
			return percents[4];
		}
		set {
			percents[4] = Mathf.Clamp01(value);
			isDirty = true;
		}
	}

    protected override void OnPopulateMesh(Mesh m)
    {
        var r = GetPixelAdjustedRect();
        var v = new Vector4(r.x, r.y, r.x + r.width, r.y + r.height);

        Color32 color32 = color;
        using (var vh = new VertexHelper())
        {
            foreach (Vector3 p in vertexes)
            {
                vh.AddVert(p, color32, Vector2.zero);
            }

            vh.AddTriangle(2, 0, 1);
            vh.AddTriangle(3, 0, 2);
            vh.AddTriangle(4, 0, 3);
            vh.AddTriangle(5, 0, 4);
            vh.AddTriangle(1, 0, 5);

            vh.FillMesh(m);
        }
    }
}
3) 定制属性面板
官方有一个很不错的例子:http://docs.unity3d.com/ScriptReference/Editor.html
把Property暴露到面板上:http://wiki.unity3d.com/index.php?title=Expose_properties_in_inspector
详细的Editor例子:http://catlikecoding.com/unity/tutorials/editor/custom-list/
http://catlikecoding.com/unity/tutorials/editor/custom-data/
Editor高阶例子:http://catlikecoding.com/unity/tutorials/editor/star/
