ASP.NET 2.0 本地化技术之研究(二)
在 ASP.NET 2.0 本地化技术之研究的回复中提到了以下两点:
1.这只是单个页面的切换,如何做整个站点的切换呢?( hjh )
2.关于如何将资源直接显示……既然控件能够将嵌入dll的资源直接显示,不知道网站能否也将嵌入资源直接调用WebResource显示呢?( Cat Chen )
由于不是一两句可以说清,所以再开一篇仔细讲一下。
内容列表:
1.整站本地化资源的切换
2.使用ProFile保存用户选择的语言
3.关于WebResource的使用
4.代码下载
1.整站本地化资源的切换
在上一篇里我们讲到,可以通过重载页面的InitializeCulture函数,在其中切换当前线程的CurrentUICulture和CurrentCulture来实现本页的资源切换。那么整站呢?总不能在每个页面里都写上这几句吧。。。
首先,我想到的是使用MasterPage,如果在MasterPage里加上资源切换的代码,那么所有使用该母板的页面都具备这种能力了吧,呵呵(想得不错)。但如意算盘打破了,MasterPage是使用@Master来声明的,根本和Page是两个继承路线,所以MasterPage里没有InitializeCulture这个虚函数!
没办法,想到了另一个解决方案,创建一个从System.Web.UI.Page继承下来的基类,在其中实现资源切换,而站内所有页面的实现类都从该类继承。OK,就这么办!
打开上一篇完成的网站,选中网站,右键在弹出菜单中点击[添加ASP.NET文件夹]-[App_Code]。
选中该文件夹,右键点击[添加新项],在弹出式窗口中选择“类”,命名为LocalizedPage.cs,点击[添加]完成,如图所示:
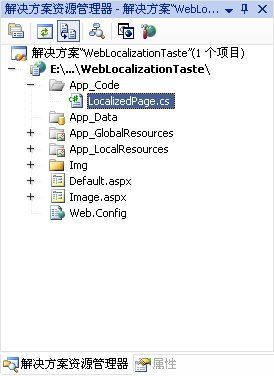
编辑LocalizedPage.cs,代码如下:
编辑Image.aspx.cs,去除其重载的InitialzeCulture()函数,将其基类改为LocalizedPage,代码如下:
运行网站,可以看到由Image页面负责输出的图片,可以按选中的语言正常切换。
再编辑Default.aspx.cs,调整代码如下:
运行程序,一切正常。
总结:利用这种方式,新建页面时只需修改其继承的基类为LocalizedPage即可。对于已经建好的站点,同理,也可以很方便的加入资源切换的支持。
2.使用ProFile保存用户选择的语言
前面我们是通过URL传参的方式将用户选择的语言传递到各个页面,感觉不爽。那么使用Session呢?听上去不错,但是你没听过ProFile吗?这可是ASP.NET 2.0的新特性之一呀!与Session一样ProFile是针对一个特定用户的,但ProFile更好用,因为它有以下特点:
1)可存储,默认是保存在SQL Server Express中,但通过实现Provider可以将它存储到任何地方
2)支持匿名使用,在用户认证后还可以迁移到认证用户中(具体实现方法据说是非常的“巧妙”)
3)支持生成和管理报告
不错吧,那么我们就用ProFile来保存用户选择的语言信息吧。
注意:由于ProFile默认是由SQL Server Express来存储的,所以要保证你的VS2005已经安装该模块。
编辑Web.Config,在system.web节点下增加以下配置
同时加入的anonymousIdentification节,是为了让系统自动为匿名用户生成唯一标识。另外的allowAnonymous="true"表明LanguagePreference属性可以被匿名用户访问。
编辑Default.aspx,切换到[设计]视图,删除原来用于切换语言的两个链接“中文(中国)”和“English(USA)”。从工具箱中拖一个DropDownList控件到页面上,设置其AutoPostBack属性为True( 切记!),然后编辑它的Items属性,如图所示:
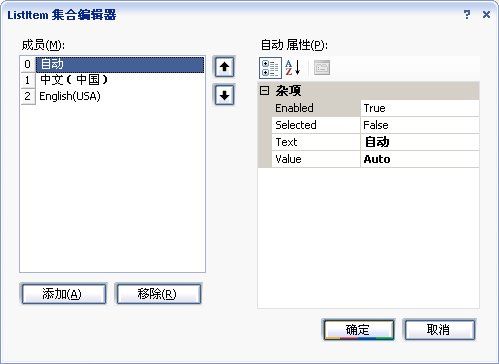
中文(中国)的Value为zh-cn,英文(美国)的Value为en-us。
编辑Default.aspx.cs,为DropDownList编写SelectedIndexChanged事件的实现,代码如下:
修改Page_Load的实现,代码如下:
然后再编辑LocalizedPage.cs,代码如下:
注意:我们在Default.aspx.cs之所以可以直接使用Profile来访问用户个人信息,是因为ASP.NET在页面运行时自动为我们生成了一个继承自System.Web.Profile.ProfileBase的ProfileCommon类。而在App_Code目录的代码开始执行时,ProfileCommon还没有生成,更别提Profile了。所幸的是,我们可以通过上面代码的方式访问到用户个人信息(真的研究了好长时间。。。 )
)
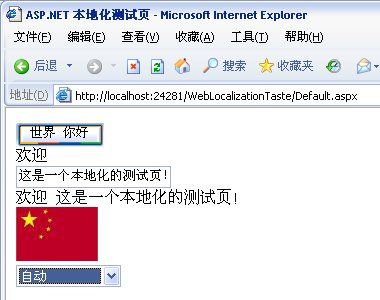
运行程序,切换语言,运行效果如图所示:
中文(中国)
英文(美国)
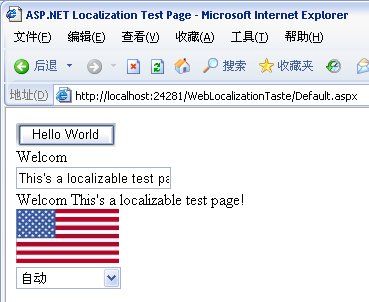
注意哟,退出程序后,再次运行,所有页面将按你上次设置的语言显示,Profile真的很不错。
3.关于WebResource的使用
ASP.NET是在运行时将全局资源和本地资源进行编译,象.aspx文件一样,所以我们只需要将.resx文件xcopy到正在运行的WEB服务器上,即可为新语言提供本地化的支持。但如果我们开发了一个WEB控件,其中使用到了一些资源(如图片),那就要求我们必须将DLL和资源文件一起部署到WEB服务器上,比较麻烦。
ASP.NET开发团队考虑到了这一点,现在我们可以在网站里使用资源DLL,这样在发布DLL时资源也同时被分配了。该技术是通过在控件代码里调用GetWebResourceUrl方法,这个方法指向一个名为WebResource.axd的内置HTTP处理程序的URL。通过加载一个名为AssemblyResourceLoader的HttpHandler类,ASP.NET运行时响应WebResource.axd的请求,返回指定资源的URL。
该技术有以下缺点:
1)只能在面向 ASP.NET 2.0 网站的 DLL 项目内使用该技术,而无法网站内直接使用该技术
2)该技术实际上并不支持任何形式的本地化(说到这,感觉把这家伙写到本随笔里不太合适。。。管它呢,先写完再说! )
)
选中网解决方案,右键在弹出式菜单里点击[添加]->[新建项目],在弹出窗口选中Visual C#项目下的类库,并设好保存路径,如图所示:
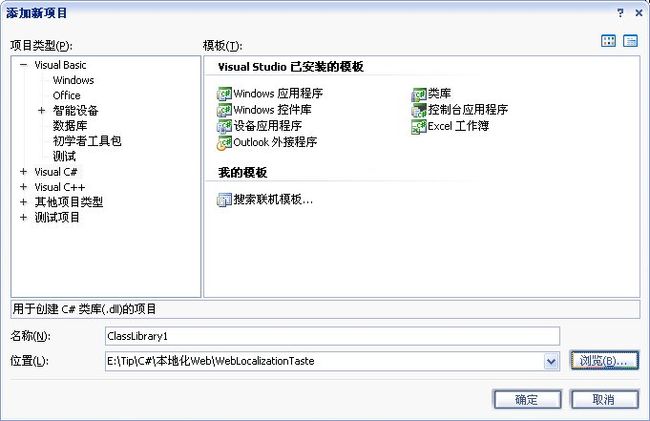
点击确定,删除Class1.cs。选中ClassLibrary1项目,右键在弹出菜单里点击[添加]->[新建项],在弹出窗口选择“WEB 自定义控件”,如图所示:
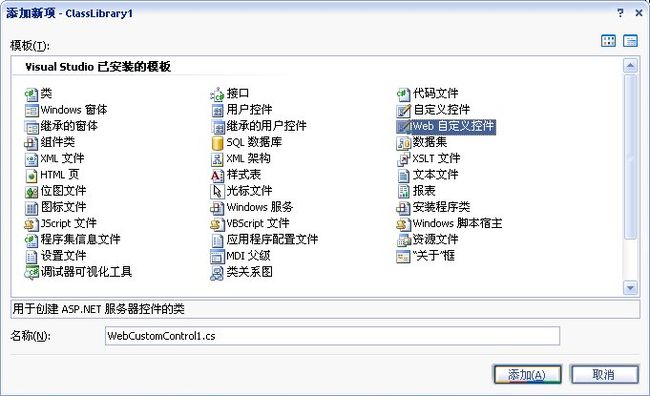
点击[添加],现在解决方案里已经包含两个项目了,如图所示:
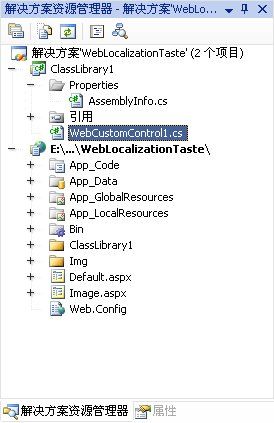
右键ClassLibrary1项目,选择[添加]->[现有项],随便找一张图片(我使的是园子的logo,嘿嘿),如图所示:
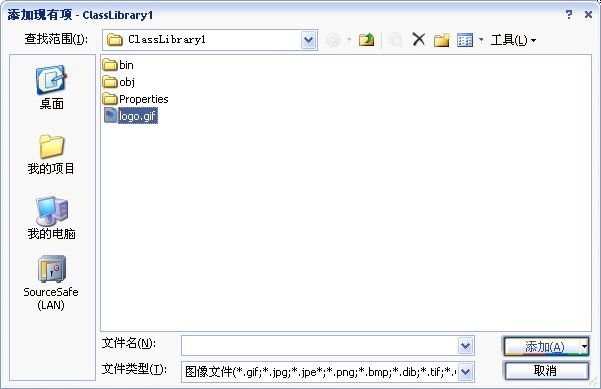
点击[添加],右键刚添加的图片点击[属性],将“生成操作”设为“嵌入的资源”,如图所示:
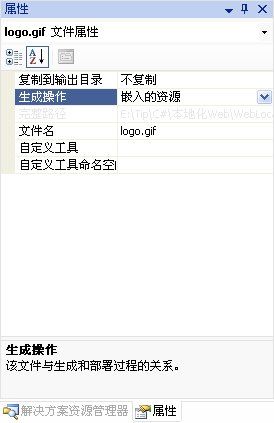
编辑WebCustomControl1.cs,代码如下:
编辑网站的Default.aspx文件,切换到[设计]视图,将工具箱的ClassLibrary1面板里的WebCustomControl1控件拖到页面上,运行程序,效果如图所示:
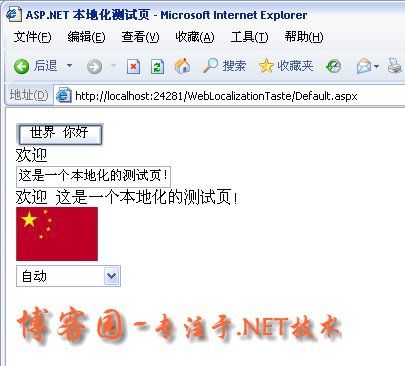
4.代码下载
下载地址: http://www.cnblogs.com/Files/reonlyrun/WebLocalizationTaste2.rar
1.这只是单个页面的切换,如何做整个站点的切换呢?( hjh )
2.关于如何将资源直接显示……既然控件能够将嵌入dll的资源直接显示,不知道网站能否也将嵌入资源直接调用WebResource显示呢?( Cat Chen )
由于不是一两句可以说清,所以再开一篇仔细讲一下。
内容列表:
1.整站本地化资源的切换
2.使用ProFile保存用户选择的语言
3.关于WebResource的使用
4.代码下载
1.整站本地化资源的切换
在上一篇里我们讲到,可以通过重载页面的InitializeCulture函数,在其中切换当前线程的CurrentUICulture和CurrentCulture来实现本页的资源切换。那么整站呢?总不能在每个页面里都写上这几句吧。。。
首先,我想到的是使用MasterPage,如果在MasterPage里加上资源切换的代码,那么所有使用该母板的页面都具备这种能力了吧,呵呵(想得不错)。但如意算盘打破了,MasterPage是使用@Master来声明的,根本和Page是两个继承路线,所以MasterPage里没有InitializeCulture这个虚函数!
没办法,想到了另一个解决方案,创建一个从System.Web.UI.Page继承下来的基类,在其中实现资源切换,而站内所有页面的实现类都从该类继承。OK,就这么办!
打开上一篇完成的网站,选中网站,右键在弹出菜单中点击[添加ASP.NET文件夹]-[App_Code]。
选中该文件夹,右键点击[添加新项],在弹出式窗口中选择“类”,命名为LocalizedPage.cs,点击[添加]完成,如图所示:

编辑LocalizedPage.cs,代码如下:
using
System;
using System.Data;
using System.Configuration;
using System.Web;
using System.Web.Security;
using System.Web.UI;
using System.Web.UI.WebControls;
using System.Web.UI.WebControls.WebParts;
using System.Web.UI.HtmlControls;
using System.Threading;
using System.Globalization;
/// <summary>
/// 所有需要本地化资源切换的页面基类
/// </summary>
public class LocalizedPage : System.Web.UI.Page
{
protected override void InitializeCulture()
{
String s = Request.QueryString[ " currentculture " ];
if ( ! String.IsNullOrEmpty(s))
{
// UICulture - 决定了采用哪一种本地化资源,也就是使用哪种语言
// Culture - 决定各种数据类型是如何组织,如数字与日期
Thread.CurrentThread.CurrentUICulture = new CultureInfo(s);
Thread.CurrentThread.CurrentCulture = CultureInfo.CreateSpecificCulture(s);
}
}
}
编辑Image.aspx.cs,去除其重载的InitialzeCulture()函数,将其基类改为LocalizedPage,代码如下:
using
System;
using System.Data;
using System.Configuration;
using System.Collections;
using System.Web;
using System.Web.Security;
using System.Web.UI;
using System.Web.UI.WebControls;
using System.Web.UI.WebControls.WebParts;
using System.Web.UI.HtmlControls;
using System.Threading;
using System.Globalization;
public partial class Image : LocalizedPage
{
protected void Page_Load( object sender, EventArgs e)
{
System.Drawing.Bitmap img = (System.Drawing.Bitmap)GetGlobalResourceObject(
" LocalizedText " ,
CultureInfo.CurrentCulture.Name.ToLower().Replace( " - " , " _ " ) + " _flag " );
System.IO.MemoryStream ms = new System.IO.MemoryStream();
img.Save(ms, System.Drawing.Imaging.ImageFormat.Jpeg);
Response.ClearContent();
Response.ContentType = " image/jpeg " ;
Response.BinaryWrite(ms.ToArray());
img.Dispose();
ms.Dispose();
ms.Flush();
}
}
运行网站,可以看到由Image页面负责输出的图片,可以按选中的语言正常切换。
再编辑Default.aspx.cs,调整代码如下:
using
System;
using System.Data;
using System.Configuration;
using System.Web;
using System.Web.Security;
using System.Web.UI;
using System.Web.UI.WebControls;
using System.Web.UI.WebControls.WebParts;
using System.Web.UI.HtmlControls;
using System.Globalization;
using System.Threading;
public partial class _Default : LocalizedPage
{
protected void Page_Load( object sender, EventArgs e)
{
String s = Request.QueryString[ " currentculture " ];
Image1.ImageUrl = " ~/Image.aspx?currentculture= " + s;
}
protected void Button1_Click( object sender, EventArgs e)
{
Localize1.Text = (String)GetLocalResourceObject( " Label1Resource1.Text " ) + " " +
(String)GetGlobalResourceObject( " LocalizedText " , " Msg1 " );
}
}
运行程序,一切正常。
总结:利用这种方式,新建页面时只需修改其继承的基类为LocalizedPage即可。对于已经建好的站点,同理,也可以很方便的加入资源切换的支持。
2.使用ProFile保存用户选择的语言
前面我们是通过URL传参的方式将用户选择的语言传递到各个页面,感觉不爽。那么使用Session呢?听上去不错,但是你没听过ProFile吗?这可是ASP.NET 2.0的新特性之一呀!与Session一样ProFile是针对一个特定用户的,但ProFile更好用,因为它有以下特点:
1)可存储,默认是保存在SQL Server Express中,但通过实现Provider可以将它存储到任何地方
2)支持匿名使用,在用户认证后还可以迁移到认证用户中(具体实现方法据说是非常的“巧妙”)
3)支持生成和管理报告
不错吧,那么我们就用ProFile来保存用户选择的语言信息吧。
注意:由于ProFile默认是由SQL Server Express来存储的,所以要保证你的VS2005已经安装该模块。
编辑Web.Config,在system.web节点下增加以下配置
<
configuration
>
< system .web >
< anonymousIdentification enabled ="true" />
< profile >
< properties >
< add name ="LanguagePreference" type ="string"
defaultValue ="Auto" allowAnonymous ="true" />
</ properties >
</ profile >
</ system.web >
</ configuration >
< system .web >
< anonymousIdentification enabled ="true" />
< profile >
< properties >
< add name ="LanguagePreference" type ="string"
defaultValue ="Auto" allowAnonymous ="true" />
</ properties >
</ profile >
</ system.web >
</ configuration >
同时加入的anonymousIdentification节,是为了让系统自动为匿名用户生成唯一标识。另外的allowAnonymous="true"表明LanguagePreference属性可以被匿名用户访问。
编辑Default.aspx,切换到[设计]视图,删除原来用于切换语言的两个链接“中文(中国)”和“English(USA)”。从工具箱中拖一个DropDownList控件到页面上,设置其AutoPostBack属性为True( 切记!),然后编辑它的Items属性,如图所示:

中文(中国)的Value为zh-cn,英文(美国)的Value为en-us。
编辑Default.aspx.cs,为DropDownList编写SelectedIndexChanged事件的实现,代码如下:
protected
void
DropDownList1_SelectedIndexChanged(
object
sender, EventArgs e)
{
Profile.LanguagePreference = DropDownList1.SelectedValue;
Response.Redirect(Request.Url.AbsolutePath);
}
{
Profile.LanguagePreference = DropDownList1.SelectedValue;
Response.Redirect(Request.Url.AbsolutePath);
}
修改Page_Load的实现,代码如下:
protected
void
Page_Load(
object
sender, EventArgs e)
{
String s = Profile.LanguagePreference;
Image1.ImageUrl = " ~/Image.aspx " ;
}
{
String s = Profile.LanguagePreference;
Image1.ImageUrl = " ~/Image.aspx " ;
}
然后再编辑LocalizedPage.cs,代码如下:
protected
override
void
InitializeCulture()
{
String s = (String)Context.Profile.GetPropertyValue( " LanguagePreference " );
if ( ! String.IsNullOrEmpty(s) && (s != " Auto " ))
{
// UICulture - 决定了采用哪一种本地化资源,也就是使用哪种语言
// Culture - 决定各种数据类型是如何组织,如数字与日期
Thread.CurrentThread.CurrentUICulture = new CultureInfo(s);
Thread.CurrentThread.CurrentCulture = CultureInfo.CreateSpecificCulture(s);
}
}
{
String s = (String)Context.Profile.GetPropertyValue( " LanguagePreference " );
if ( ! String.IsNullOrEmpty(s) && (s != " Auto " ))
{
// UICulture - 决定了采用哪一种本地化资源,也就是使用哪种语言
// Culture - 决定各种数据类型是如何组织,如数字与日期
Thread.CurrentThread.CurrentUICulture = new CultureInfo(s);
Thread.CurrentThread.CurrentCulture = CultureInfo.CreateSpecificCulture(s);
}
}
注意:我们在Default.aspx.cs之所以可以直接使用Profile来访问用户个人信息,是因为ASP.NET在页面运行时自动为我们生成了一个继承自System.Web.Profile.ProfileBase的ProfileCommon类。而在App_Code目录的代码开始执行时,ProfileCommon还没有生成,更别提Profile了。所幸的是,我们可以通过上面代码的方式访问到用户个人信息(真的研究了好长时间。。。
运行程序,切换语言,运行效果如图所示:
中文(中国)

英文(美国)

注意哟,退出程序后,再次运行,所有页面将按你上次设置的语言显示,Profile真的很不错。
3.关于WebResource的使用
ASP.NET是在运行时将全局资源和本地资源进行编译,象.aspx文件一样,所以我们只需要将.resx文件xcopy到正在运行的WEB服务器上,即可为新语言提供本地化的支持。但如果我们开发了一个WEB控件,其中使用到了一些资源(如图片),那就要求我们必须将DLL和资源文件一起部署到WEB服务器上,比较麻烦。
ASP.NET开发团队考虑到了这一点,现在我们可以在网站里使用资源DLL,这样在发布DLL时资源也同时被分配了。该技术是通过在控件代码里调用GetWebResourceUrl方法,这个方法指向一个名为WebResource.axd的内置HTTP处理程序的URL。通过加载一个名为AssemblyResourceLoader的HttpHandler类,ASP.NET运行时响应WebResource.axd的请求,返回指定资源的URL。
该技术有以下缺点:
1)只能在面向 ASP.NET 2.0 网站的 DLL 项目内使用该技术,而无法网站内直接使用该技术
2)该技术实际上并不支持任何形式的本地化(说到这,感觉把这家伙写到本随笔里不太合适。。。管它呢,先写完再说!
选中网解决方案,右键在弹出式菜单里点击[添加]->[新建项目],在弹出窗口选中Visual C#项目下的类库,并设好保存路径,如图所示:

点击确定,删除Class1.cs。选中ClassLibrary1项目,右键在弹出菜单里点击[添加]->[新建项],在弹出窗口选择“WEB 自定义控件”,如图所示:

点击[添加],现在解决方案里已经包含两个项目了,如图所示:

右键ClassLibrary1项目,选择[添加]->[现有项],随便找一张图片(我使的是园子的logo,嘿嘿),如图所示:

点击[添加],右键刚添加的图片点击[属性],将“生成操作”设为“嵌入的资源”,如图所示:

编辑WebCustomControl1.cs,代码如下:
using
System;
using System.Collections.Generic;
using System.ComponentModel;
using System.Text;
using System.Web;
using System.Web.UI;
using System.Web.UI.WebControls;
[assembly: WebResource( " ClassLibrary1.logo.gif " , " image/gif " )]
namespace ClassLibrary1
{
[ToolboxData( " <{0}:WebCustomControl1 runat=server></{0}:WebCustomControl1> " )]
public class WebCustomControl1 : WebControl
{
protected override void RenderContents(HtmlTextWriter output)
{
output.WriteBeginTag( " image " );
String url = Page.ClientScript.GetWebResourceUrl(GetType(), " ClassLibrary1.logo.gif " );
output.WriteAttribute( " src " , url);
output.WriteEndTag( " image " );
}
}
}
编辑网站的Default.aspx文件,切换到[设计]视图,将工具箱的ClassLibrary1面板里的WebCustomControl1控件拖到页面上,运行程序,效果如图所示:

4.代码下载
下载地址: http://www.cnblogs.com/Files/reonlyrun/WebLocalizationTaste2.rar