Android开发之道(5)Widget、Activity与Intent
转载请注明来自“柳大的CSDN博客”:http://blog.csdn.net/poechant
一、Widget
1、TextView
每个 Widget 都有很多属性,有一些属性是几乎每个 Widget 都有的,比如“id”、“layout_width”、“layout_height”。下面以 TextView 的几个常用属性为例,作为一个示范。
<TextView
android:id="@+id/text_view"
android:text="@string/text_view"
android:layout_width="wrap_content"
android:layout_height="wrap_content"/>
2、RadioGroup和RadioButton
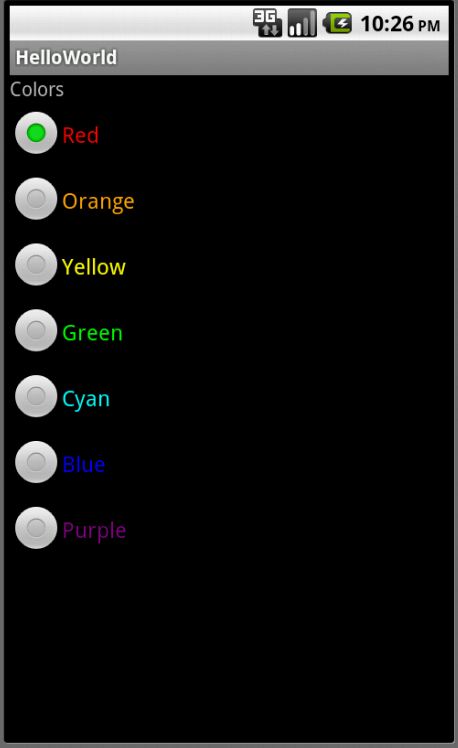
这里再以 RadioGroup 和 RadioButton 为例,设置七个不同的 RadioButton 分别为“Red、Orange、Yellow、Green、Cyan、Blue、Purple”七种颜色。下面是 res/layout/main.xml 布局文件中的主要代码。
<RadioGroup
android:id="@+id/RadioGroup"
android:layout_width="wrap_content"
android:layout_height="wrap_content">
<RadioButton
android:id="@+id/RadioButton01"
android:text="@string/radio_button_red"
android:textColor="@color/red"
android:layout_width="wrap_content"
android:layout_height="wrap_content"/>
<RadioButton
android:id="@+id/RadioButton02"
android:text="@string/radio_button_orange"
android:textColor="@color/orange"
android:layout_width="wrap_content"
android:layout_height="wrap_content"/>
<RadioButton
android:id="@+id/RadioButton03"
android:text="@string/radio_button_yellow"
android:textColor="@color/yellow"
android:layout_width="wrap_content"
android:layout_height="wrap_content"/>
<RadioButton
android:id="@+id/RadioButton04"
android:text="@string/radio_button_green"
android:textColor="@color/green"
android:layout_width="wrap_content"
android:layout_height="wrap_content"/>
<RadioButton
android:id="@+id/RadioButton05"
android:text="@string/radio_button_cyan"
android:textColor="@color/cyan"
android:layout_width="fill_parent"
android:layout_height="wrap_content"/>
<RadioButton
android:id="@+id/RadioButton06"
android:text="@string/radio_button_blue"
android:textColor="@color/blue"
android:layout_width="fill_parent"
android:layout_height="wrap_content"/>
<RadioButton
android:id="@+id/RadioButton07"
android:text="@string/radio_button_purple"
android:textColor="@color/purple"
android:layout_width="fill_parent"
android:layout_height="wrap_content"/>
</RadioGroup>
变量文件在这里就省略了。运行程序后的效果如下:
3、其他 Widget
其他常用的 Widget 还包括:View、ImageButton、Button、EditText、CheckBox、ImageView。这些可以参考 Android API 文档。下面介绍添加 Widget 的监听事件。
二、监听器
1、为 Button 添加一个监听器
以为一个 Button 创建监听器为例,为点击 Button 事件设置监听器,实现对按钮上的 Text 内容的修改。具体说就是载入时 Button 上的 Text 为“Click Me!”,点击后改变为“Clicked”,再点击则变为“Click Me!”,如此反复。实现这个功能的代码如下:
final Button button = (Button) findViewById(R.id.button);
button.setOnClickListener(new Button.OnClickListener() {
@Override
public void onClick(View v) {
String buttonText = button.getText().toString();
if (buttonText.equals("Click Me!")) {
button.setText("Clicked");
} else {
button.setText("Click Me!");
}
}
});
先通过 findViewById(R.id.button) 获取到我们创建的 button 按钮,然后类型转换为 Button,再为 button 设置监听器。程序运行效果如下:
2、实现切换两个 Activity
Activity 是最基本的模块,简单地说,一个 Activity 一般就是一个独立的屏幕。每个 Activity 由一个类来实现。比如我们实现 HelloWorldActivity.java 和 GoodbyeActivity.java 两个文件分别是两个 Activity 。而且这些自定义的 Activity 类要继承 Activity 类。一般来说,一个 Android 应用都是由多个 Activity 组成的。比如一个简单音乐播放器软件,一个 DisplayActivity 用来显示音乐播放界面,一个 ItemListActivity 用来显示音频文件列表。那么一个关键问题就出现了。如何实现两个界面之间的切换,也就是两个 Activity 之间的切换?
Android 提供 Intent 类,来实现不同的 Activity 之间的切换。当切换到一个新的 Activity 时,旧的 Activity 被保存在栈里,以备用户执行返回操作。接下来就具体说下如何用 Intent 实现 Activity 之间的切换。
首先创建两个类,分别是 HelloWorldActivity.java 和 GoodbyeActivity.java。其中 HelloWorldActivity.java 实现如下:
public class HelloWorldActivity extends Activity {
/** Called when the activity is first created. */
@Override
public void onCreate(Bundle savedInstanceState) {
super.onCreate(savedInstanceState);
setContentView(R.layout.main1);
final Button button = (Button) findViewById(R.id.button);
button.setOnClickListener(new Button.OnClickListener() {
@Override
public void onClick(View v) {
Intent intent = new Intent();
intent.setClass(HelloWorldActivity.this, GoodbyeActivity.class);
startActivity(intent);
HelloWorldActivity.this.finish();
}
});
}
}
可以看到,点击 button 后,会创建一个 Intent 对象,然后调用 setClass 方法,第一个参数就是当前的 Activity,第二个参数是所要切换到的 Activity 类。然后调用 startActivity 方法即实现了 Activity 切换。最后结束当前的 HelloWorldActivity,其被保存到栈中。而另一个 GoodbyeActivity 类中不同的是,加载 res/layout/main2.xml 布局文件,即 R.layout.main2。它们的布局文件的内容是一样的,分别有一个名为 button 的 Button。两个 Button 的 android:text 属性分别设置为 res/values/strings.xml 文件中的两个不同的 string。布局文件较简单,这里略去。res/values/strings.xml 中的两个 string为:
<stringname="button_text1">Hello World</string>
<stringname="button_text2">Goodbye</string>
另外要说到的,就是 AndroidManiFest.xml 文件,由于涉及到 intent,其中的 application 应如下编写:
<application
android:icon="@drawable/ic_launcher"
android:label="@string/app_name">
<activity
android:name=".HelloWorldActivity"
android:label="@string/app_name">
<intent-filter>
<action android:name="android.intent.action.MAIN"/>
<category android:name="android.intent.category.LAUNCHER"/>
</intent-filter>
</activity>
<activity
android:name=".GoodbyeActivity">
</activity>
</application>
然后运行这个应用,首先出现如下界面:
点击按钮后,界面转换到 GoodbyeActivity,如下:
如果我们为监听器设置的动作,为进行 setText 方法,则与上面实现的效果是一样的。但是这里只是做一个简单的演示,如果要实现一个实用的应用(比如上面提到的音乐播放器),则一定要用到多个 Activity,而不应仅仅是改变当前的 Widget 属性。
先到这里吧,感谢您的关注!
转载请注明来自“柳大的CSDN博客”:http://blog.csdn.net/poechant
-


