大家好,好久不见,今天要给大家讲一下Android Intent中如何传递对象,就我目前所知道的有两种方法:
一种是Bundle.putSerializable(Key,Object);
另一种是Bundle.putParcelable(Key, Object);
当然这些Object是有一定的条件的,前者是实现了Serializable接口,而后者是实现了Parcelable接口,为了让大家更容易理解我还是照常写了一个简单的Demo,大家就一步一步跟我来吧!
第一步:新建一个Android工程命名为ObjectTranDemo(类比较多哦)目录结构如下图:

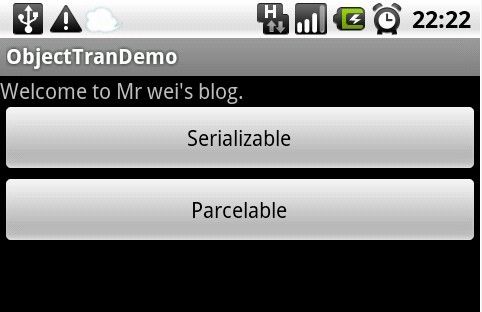
第二步:修改main.xml布局文件(这里我增加了两个按钮)代码如下:
|
1
2
3
4
5
6
7
8
9
10
11
12
13
14
15
16
17
18
19
20
21
22
23
24
|
<?
xml
version
=
"1.0"
encoding
=
"utf-8"
?>
<
LinearLayout
xmlns:android
=
"http://schemas.android.com/apk/res/android"
android:orientation
=
"vertical"
android:layout_width
=
"fill_parent"
android:layout_height
=
"fill_parent"
>
<
TextView
android:layout_width
=
"fill_parent"
android:layout_height
=
"wrap_content"
android:text
=
"Welcome to Mr wei's blog."
/>
<
Button
android:id
=
"@+id/button1"
android:layout_width
=
"fill_parent"
android:layout_height
=
"wrap_content"
android:text
=
"Serializable"
/>
<
Button
android:id
=
"@+id/button2"
android:layout_width
=
"fill_parent"
android:layout_height
=
"wrap_content"
android:text
=
"Parcelable"
/>
</
LinearLayout
>
|
第三步:新建两个类一个是Person.java实现Serializable接口,另一个Book.java实现Parcelable接口,代码分别如下:
Person.java:
|
1
2
3
4
5
6
7
8
9
10
11
12
13
14
15
16
17
18
19
20
21
22
23
24
25
26
|
package
com.tutor.objecttran;
import
java.io.Serializable;
public
class
Person
implements
Serializable {
private
static
final
long
serialVersionUID = -7060210544600464481L;
private
String name;
private
int
age;
public
String getName() {
return
name;
}
public
void
setName(String name) {
this
.name = name;
}
public
int
getAge() {
return
age;
}
public
void
setAge(
int
age) {
this
.age = age;
}
}
|
Book.java:
|
1
2
3
4
5
6
7
8
9
10
11
12
13
14
15
16
17
18
19
20
21
22
23
24
25
26
27
28
29
30
31
32
33
34
35
36
37
38
39
40
41
42
43
44
45
46
47
48
49
50
51
52
53
54
55
56
57
58
59
|
package
com.tutor.objecttran;
import
android.os.Parcel;
import
android.os.Parcelable;
public
class
Book
implements
Parcelable {
private
String bookName;
private
String author;
private
int
publishTime;
public
String getBookName() {
return
bookName;
}
public
void
setBookName(String bookName) {
this
.bookName = bookName;
}
public
String getAuthor() {
return
author;
}
public
void
setAuthor(String author) {
this
.author = author;
}
public
int
getPublishTime() {
return
publishTime;
}
public
void
setPublishTime(
int
publishTime) {
this
.publishTime = publishTime;
}
public
static
final
Parcelable.Creator<book> CREATOR =
new
Creator<book>() {
public
Book createFromParcel(Parcel source) {
Book mBook =
new
Book();
mBook.bookName = source.readString();
mBook.author = source.readString();
mBook.publishTime = source.readInt();
return
mBook;
}
public
Book[] newArray(
int
size) {
return
new
Book[size];
}
};
public
int
describeContents() {
return
0
;
}
public
void
writeToParcel(Parcel parcel,
int
flags) {
parcel.writeString(bookName);
parcel.writeString(author);
parcel.writeInt(publishTime);
}
}
</book></book>
|
第四步:修改ObjectTranDemo.java,并且新建两个Activity,一个是ObjectTranDemo1.java,别一个是ObjectTranDemo2.java.分别用来显示Person对像数据和Book对象数据,代码分别如下:
ObjectTranDemo.java:
|
1
2
3
4
5
6
7
8
9
10
11
12
13
14
15
16
17
18
19
20
21
22
23
24
25
26
27
28
29
30
31
32
33
34
35
36
37
38
39
40
41
42
43
44
45
46
47
48
49
50
51
52
53
54
55
56
57
58
59
60
61
62
63
64
65
66
|
package
com.tutor.objecttran;
import
android.app.Activity;
import
android.content.Intent;
import
android.os.Bundle;
import
android.view.View;
import
android.view.View.OnClickListener;
import
android.widget.Button;
public
class
ObjectTranDemo
extends
Activity
implements
OnClickListener {
private
Button sButton, pButton;
public
final
static
String SER_KEY =
"com.tutor.objecttran.ser"
;
public
final
static
String PAR_KEY =
"com.tutor.objecttran.par"
;
public
void
onCreate(Bundle savedInstanceState) {
super
.onCreate(savedInstanceState);
setContentView(R.layout.main);
setupViews();
}
// 我的一贯作风呵呵
public
void
setupViews() {
sButton = (Button) findViewById(R.id.button1);
pButton = (Button) findViewById(R.id.button2);
sButton.setOnClickListener(
this
);
pButton.setOnClickListener(
this
);
}
// Serializeable<a title="传递对象" href="http://www.android-study.com/jichuzhishi/191.html">传递对象</a>的方法
public
void
SerializeMethod() {
Person mPerson =
new
Person();
mPerson.setName(
"frankie"
);
mPerson.setAge(
25
);
Intent mIntent =
new
Intent(
this
, ObjectTranDemo1.
class
);
Bundle mBundle =
new
Bundle();
mBundle.putSerializable(SER_KEY, mPerson);
mIntent.putExtras(mBundle);
startActivity(mIntent);
}
// Pacelable<a title="传递对象" href="http://www.android-study.com/jichuzhishi/191.html">传递对象</a>方法
public
void
PacelableMethod() {
Book mBook =
new
Book();
mBook.setBookName(
"Android Tutor"
);
mBook.setAuthor(
"Frankie"
);
mBook.setPublishTime(
2010
);
Intent mIntent =
new
Intent(
this
, ObjectTranDemo2.
class
);
Bundle mBundle =
new
Bundle();
mBundle.putParcelable(PAR_KEY, mBook);
mIntent.putExtras(mBundle);
startActivity(mIntent);
}
// 铵钮点击事件响应
public
void
onClick(View v) {
if
(v == sButton) {
SerializeMethod();
}
else
{
PacelableMethod();
}
}
}
|
ObjectTranDemo1.java:
|
1
2
3
4
5
6
7
8
9
10
11
12
13
14
15
16
17
18
19
20
|
package
com.tutor.objecttran;
import
android.app.Activity;
import
android.os.Bundle;
import
android.widget.TextView;
public
class
ObjectTranDemo1
extends
Activity {
@Override
public
void
onCreate(Bundle savedInstanceState) {
super
.onCreate(savedInstanceState);
TextView mTextView =
new
TextView(
this
);
Person mPerson = (Person) getIntent().getSerializableExtra(
ObjectTranDemo.SER_KEY);
mTextView.setText(
"You name is: "
+ mPerson.getName() +
"/n"
+
"You age is: "
+ mPerson.getAge());
setContentView(mTextView);
}
}
|
ObjectTranDemo2.java:
|
1
2
3
4
5
6
7
8
9
10
11
12
13
14
15
16
17
18
19
|
package
com.tutor.objecttran;
import
android.app.Activity;
import
android.os.Bundle;
import
android.widget.TextView;
public
class
ObjectTranDemo2
extends
Activity {
public
void
onCreate(Bundle savedInstanceState) {
super
.onCreate(savedInstanceState);
TextView mTextView =
new
TextView(
this
);
Book mBook = (Book) getIntent().getParcelableExtra(
ObjectTranDemo.PAR_KEY);
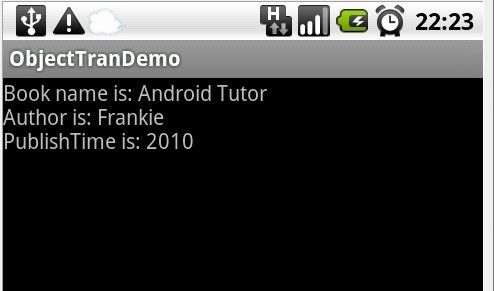
mTextView.setText(
"Book name is: "
+ mBook.getBookName() +
"/n"
+
"Author is: "
+ mBook.getAuthor() +
"/n"
+
"PublishTime is: "
+ mBook.getPublishTime());
setContentView(mTextView);
}
}
|
第五步:比较重要的一步啦,修改AndroidManifest.xml文件(将两个新增的Activity,ObjectTranDemo1,ObjectTranDemo2)申明一下代码如下(第14,15行):
|
1
2
3
4
5
6
7
8
9
10
11
12
13
14
15
16
|
<?
xml
version
=
"1.0"
encoding
=
"utf-8"
?>
<
manifest
xmlns:android
=
"http://schemas.android.com/apk/res/android"
package
=
"com.tutor.objecttran"
android:versionCode
=
"1"
android:versionName
=
"1.0"
>
<
application
android:icon
=
"@drawable/icon"
android:label
=
"@string/app_name"
>
<
activity
android:name
=
".ObjectTranDemo"
android:label
=
"@string/app_name"
>
<
intent-filter
>
<
action
android:name
=
"android.intent.action.MAIN"
/>
<
category
android:name
=
"android.intent.category.LAUNCHER"
/>
</
intent-filter
>
</
activity
>
<
activity
android:name
=
".ObjectTranDemo1"
></
activity
>
<
activity
android:name
=
".ObjectTranDemo2"
></
activity
>
</
application
>
<
uses-sdk
android:minSdkVersion
=
"7"
/>
</
manifest
>
|
第六步:运行上述工程查看效果图啦。
效果1:首界面
效果2:点击Serializable按钮

效果3:点击Parcelable按钮