TinyXML2 学习
换cocos2d-x版本到2.1.3之后,自己的文件读写也用了引擎CCUserDefault使用的TinyXML2,在这汇总了一下TinyXML2的使用,希望大家看这一篇文章就可以解决自己的问题,省得到处查阅……
注意,文章一次解释了写操作->读操作->TinyXML2属性介绍,均h3+红色字体表明,如不明白,可以点链接进入原文。。。
以下是TinyXml的写操作,摘自:http://www.cppblog.com/zhaoyg/archive/2010/03/29/110862.html
int Write()
{
TiXmlDocument doc ;
TiXmlDeclaration *declare =new TiXmlDeclaration("1.0" , "","");
doc.LinkEndChild(declare);
doc.LinkEndChild(new TiXmlComment("群英集团人力资源表"));
TiXmlElement *root = new TiXmlElement("群英集团");
TiXmlElement *sub = new TiXmlElement("员工");
sub->SetAttribute("ID" , "011"); // 向sub中添加属性
sub->SetAttribute("职位" , "技术总监");
TiXmlElement *child = new TiXmlElement("姓名"); // 建立子元素
TiXmlText *content =new TiXmlText("虚竹"); // 建立文本
child->LinkEndChild(content); // 将建立的文本追加到child所指的子元素中
sub->LinkEndChild(child); // 将child追加到sub中,以作为子元素
root->LinkEndChild(sub); // 将sub追加到root中,以作为子元素
sub = new TiXmlElement("员工");
sub->SetAttribute("ID" , "029");
sub->SetAttribute("职位" , "技术总监");
child = new TiXmlElement("姓名");
content =new TiXmlText("乔峰");
child->LinkEndChild(content);
sub->LinkEndChild(child);
root->LinkEndChild(sub);
sub = new TiXmlElement("员工");
sub->SetAttribute("ID" , "100");
sub->SetAttribute("职位" , "总架构师");
child = new TiXmlElement("姓名");
content =new TiXmlText("扫地僧");
child->LinkEndChild(content);
sub->LinkEndChild(child);
root->LinkEndChild(sub);
sub = new TiXmlElement("员工");
sub->SetAttribute("ID" , "101");
sub->SetAttribute("职位" , "公关部经理");
child = new TiXmlElement("姓名");
content =new TiXmlText("韦小宝");
child->LinkEndChild(content);
sub->LinkEndChild(child);
root->LinkEndChild(sub);
sub = new TiXmlElement("员工");
sub->SetAttribute("ID" , "102");
sub->SetAttribute("职位" , "人事部经理");
child = new TiXmlElement("姓名");
content =new TiXmlText("黄蓉");
child->LinkEndChild(content);
sub->LinkEndChild(child);
root->LinkEndChild(sub);
doc.LinkEndChild(root);
doc.SaveFile("WriteTest.xml");
return 0;
}
输出效果:
<?xml version="1.0" ?>
<!--群英集团人力资源表-->
<群英集团>
<员工 ID="011" 职位="技术总监">
<姓名>虚竹</姓名>
</员工>
<员工 ID="029" 职位="技术总监">
<姓名>乔峰</姓名>
</员工>
<员工 ID="100" 职位="总架构师">
<姓名>扫地僧</姓名>
</员工>
<员工 ID="101" 职位="公关部经理">
<姓名>韦小宝</姓名>
</员工>
<员工 ID="102" 职位="人事部经理">
<姓名>黄蓉</姓名>
</员工>
</群英集团>
在网上搜索如何用TinyXml时,本人普遍的发现了类似如下的代码
TiXmlDocument doc;
TiXmlElement *ele = new TiXmlElement("test");
doc.LinkEndChild(ele);
doc.SaveFile("test.xml");
也就是只有new而没有delete。
于是当我第一次写的时候,就很守规矩的按部就班的在doc.SaveFile后面加上了delete ele,而这一加就把问题加出来了,程序直接在运行时崩掉了。
后来才知道,人家那样写是有原因的。当析构时,tinyxml会对所有已经连接进来的节点进行释放,所以不需要手动的去释放所new出来的东西,而如果TiXmlDocument对象也是new出来的,则需要对TiXmlDocument对象执行delete。
——-cocos2d-x[2.1.3]——-奉献Demo[self]————–
bool FDTinyXML2::createXMLFile()
{
bool bRet = false;
tinyxml2::XMLDocument *pDoc = new tinyxml2::XMLDocument();
if (NULL == pDoc) {
return false;
}
tinyxml2::XMLDeclaration *pDeclaration = pDoc->NewDeclaration("xml version=\"1.0\" encoding=\"UTF-8\"");
if (NULL == pDeclaration) {
return false;
}
pDoc->LinkEndChild(pDeclaration);
tinyxml2::XMLElement *pRootEle = pDoc->NewElement(FDTinyXML2_ROOT_NAME);
if (NULL == pRootEle) {
return false;
}
pDoc->LinkEndChild(pRootEle);
tinyxml2::XMLElement *subGroundGrass = pDoc->NewElement("groundGrass");
tinyxml2::XMLText *content = pDoc->NewText("content:groudText");
subGroundGrass->LinkEndChild(content);
CCLog("%s",subGroundGrass->GetText());
pRootEle->LinkEndChild(subGroundGrass);
tinyxml2::XMLElement *subGroundSoil = pDoc->NewElement("groundSoil");
subGroundSoil->SetAttribute("soil-attribute", "text:soil");
pRootEle->LinkEndChild(subGroundSoil);
bRet = tinyxml2::XML_SUCCESS == pDoc->SaveFile(m_sFilePath.c_str());
if (pDoc) {
delete pDoc;
}
return bRet;
}
————————-奉献Demo—–END——————
以下是TinyXml的读操作,摘自:http://blog.csdn.net/qp120291570/article/details/8491154
读取和设置xml配置文件是最常用的操作,试用了几个C++的XML解析器,个人感觉TinyXML是使用起来最舒服的,因为它的API接口和Java的十分类似,面向对象性很好。
TinyXML是一个开源的解析XML的解析库,能够用于C++,能够在Windows或Linux中编译。这个解析库的模型通过解析XML文件,然后在内存中生成DOM模型,从而让我们很方便的遍历这棵XML树。
DOM模型即文档对象模型,是将整个文档分成多个元素(如书、章、节、段等),并利用树型结构表示这些元素之间的顺序关系以及嵌套包含关系。
不过官方的文档并不是很完善,例子更是不知所云…然后就有了下面的内容。
这里用的是TinyXML2,相比于TinyXML1,它更小,更轻量,内存的使用也更加有效。
1.配置TinyXML2
去这里把项目弄下来,然后解压,我们之需要里面的tinyxml2.h和tinyxml2.cpp,将他们拷到工程目录里面。
2.HelloWorld
在项目中创建test.xml,内容如下:
创建main.cpp
#include <iostream>
#include"tinyxml2.h"
using namespace std;
using namespace tinyxml2;
void example1()
{
XMLDocument doc;
doc.LoadFile("test.xml");
const char* content= doc.FirstChildElement( "Hello" )->GetText();
printf( "Hello,%s", content );
}
int main()
{
example1();
return 0;
}
编译运行:
下面这个例子的场景更可能在工程中遇到,就是在XML中存储一些数据,然后由程序来调用。
<?xml version="1.0"?>
<scene name="Depth">
<node type="camera">
<eye>0 10 10</eye>
<front>0 0 -1</front>
<refUp>0 1 0</refUp>
<fov>90</fov>
</node>
<node type="Sphere">
<center>0 10 -10</center>
<radius>10</radius>
</node>
<node type="Plane">
<direction>0 10 -10</direction>
<distance>10</distance>
</node>
</scene>
#include <iostream>
#include"tinyxml2.h"
using namespace std;
using namespace tinyxml2;
void example2()
{
XMLDocument doc;
doc.LoadFile("test.xml");
XMLElement *scene=doc.RootElement();
XMLElement *surface=scene->FirstChildElement("node");
while (surface)
{
XMLElement *surfaceChild=surface->FirstChildElement();
const char* content;
const XMLAttribute *attributeOfSurface = surface->FirstAttribute();
cout<< attributeOfSurface->Name() << ":" << attributeOfSurface->Value() << endl;
while(surfaceChild)
{
content=surfaceChild->GetText();
surfaceChild=surfaceChild->NextSiblingElement();
cout<<content<<endl;
}
surface=surface->NextSiblingElement();
}
}
int main()
{
example1();
return 0;
}
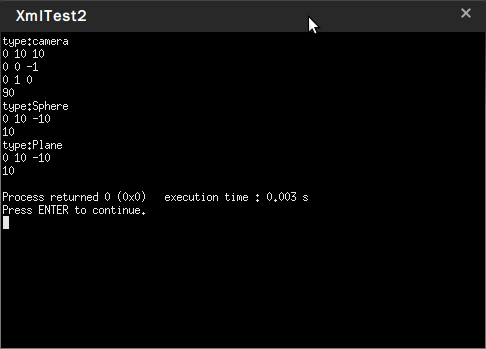
运行结果
解释一下几个函数:
FirstChildElement(const char* value=0):获取第一个值为value的子节点,value默认值为空,则返回第一个子节点。
RootElement():获取根节点,相当于FirstChildElement的空参数版本;
const XMLAttribute* FirstAttribute() const:获取第一个属性值;
XMLHandle NextSiblingElement( const char* _value=0 ) :获得下一个节点。
——-cocos2d-x[2.1.3]——-奉献Demo[self]————–
void FDTinyXML2::readXML()
{
tinyxml2::XMLDocument *pDoc = new tinyxml2::XMLDocument();
tinyxml2::XMLElement *rootNode = NULL;
tinyxml2::XMLElement *curNode = NULL;
const tinyxml2::XMLAttribute *curAttribute = NULL;
do {
unsigned long nSize;
const char *pXmlBuffer = (const char*)CCFileUtils::sharedFileUtils()->getFileData(m_sFilePath.c_str(), "rb", &nSize);
if (NULL == pXmlBuffer) {
break;
}
pDoc->Parse(pXmlBuffer);
rootNode = pDoc->RootElement();
if (NULL == rootNode) {
break;
}
curNode = rootNode->FirstChildElement();
XMLElement *secondNode = curNode->NextSiblingElement();
CCLog("---------------Test------------------");
CCLog("GetText():%s",secondNode->GetText());
CCLog("Name():%s",secondNode->Name());
CCLog("Value():%s",secondNode->Value());
CCLog("---------------Test------------------");
curAttribute = curNode->FirstAttribute();
while (NULL != curNode) {
CCLog("GetText():%s",curNode->GetText());
CCLog("Value():%s",curNode->Value());
while (NULL != curAttribute) {
CCLog("curAttribute->Name():%s",curAttribute->Name());
CCLog("curAttribute->Value():%s",curAttribute->Value());
curAttribute = curAttribute->Next();
}
curNode = curNode->NextSiblingElement();
if (curNode) {
curAttribute = curNode->FirstAttribute();
}
CCLog("---------------END----------------");
}
if (pDoc) {
delete pDoc;
}
} while (0);
}
————————-奉献Demo—–END——————
以下是各种元素的解释,摘自:http://www.cnblogs.com/freecoder/archive/2006/08/07/TinyXmlStapleA.html
这次使用了TinyXML后,觉得这个东西真是不错,于是将使用方法坐下总结来和大家分享。
该解析库在开源网站(http://sourceforge.net )上有下载,在本Blog也提供下载(下载TinyXML)
TinyXML是一个开源的解析XML的解析库,能够用于C++,能够在Windows或Linux中编译。这个解析库的模型通过解析XML文件,然后在内存中生成DOM模型,从而让我们很方便的遍历这课XML树。
注:DOM模型即文档对象模型,是将整个文档分成多个元素(如书、章、节、段等),并利用树型结构表示这些元素之间的顺序关系以及嵌套包含关系(理解html语言的读者会很容易理解这种树状模型)。
如下是一个XML片段:
<Persons>
< Person ID=”1″>
< name>周星星</name>
< age>20</age>
< /Person>
< Person ID=”2″>
< name>白晶晶</name>
< age>18</age>
< /Person>
< /Persons>
在TinyXML中,根据XML的各种元素来定义了一些类:
TiXmlBase:整个TinyXML模型的基类。
TiXmlAttribute:对应于XML中的元素的属性。
TiXmlNode:对应于DOM结构中的节点。
TiXmlComment:对应于XML中的注释。
TiXmlDeclaration:对应于XML中的申明部分,即<?versiong=”1.0″ ?>。
TiXmlDocument:对应于XML的整个文档。
TiXmlElement:对应于XML的元素。
TiXmlText:对应于XML的文字部分。
TiXmlUnknown:对应于XML的未知部分。
TiXmlHandler:定义了针对XML的一些操作。
那我们如何使用这些类以及他们的方法来操纵我们的XML呢?请看下面。
一、读取XML(假设我们的Xml文档中的内容与上面的Xml内容一样)
//创建一个XML的文档对象。
TiXmlDocument *myDocument = new TiXmlDocument("填上你的Xml文件名");
myDocument->LoadFile();
//获得根元素,即Persons。
TiXmlElement *RootElement = myDocument.RootElement();
//输出根元素名称,即输出Persons。
cout << RootElement->Value() << endl;
//获得第一个Person节点。
TiXmlElement *FirstPerson = RootElement->FirstChildElement();
//获得第一个Person的name节点和age节点和ID属性。
TiXmlElement *NameElement = FirstPerson->FirstChildElement();
TiXmlElement *AgeElement = NameElement->NextSiblingElement();
TiXmlAttribute *IDAttribute = FirstPerson->FirstAttribute();
//输出第一个Person的name内容,即周星星;age内容,即20;ID属性,即1。
cout << NameElement->FirstChild()->Value << endl;
cout << AgeElement->FirstChild()->Value << endl;
cout << IDAttribute->Value() << endl;
看,读取XML是不是很简单阿,和Java的XML解析库非常的相似,就是名字改了一下而已。
二、生成XML内容
//创建一个XML的文档对象。
TiXmlDocument *myDocument = new TiXmlDocument();
//创建一个根元素并连接。
TiXmlElement *RootElement = new TiXmlElement("Persons");
myDocument->LinkEndChild(RootElement);
//创建一个Person元素并连接。
TiXmlElement *PersonElement = new TiXmlElement("Person");
RootElement->LinkEndChild(PersonElement);
//设置Person元素的属性。
PersonElement->SetAttribute("ID", "1");
//创建name元素、age元素并连接。
TiXmlElement *NameElement = new TiXmlElement("name");
TiXmlElement *AgeElement = new TiXmlElement("age");
PersonElement->LinkEndChild(NameElement);
PersonElement->LinkEndChild(AgeElement);
//设置name元素和age元素的内容并连接。
TiXmlText *NameContent = new TiXmlText("周星星");
TiXmlText *AgeContent = new TiXmlText("20");
NameElement->LinkEndChild(NameContent);
AgeElement->LinkEndChild(AgeContent);
//保存到文件
myDocument->SaveFile("要保存的xml文件名");
这样,便创建了一个如下的xml文件:
<Persons>
<Person ID=”1″>
<name>周星星</name>
<age>20</age>
</Person>
<Person ID=”2″>
<name>白晶晶</name>
<age>18</age>
</Person>
</Persons>

