Abdroid JAVA service
有时间,重新复习下,把以前做过的server 相关 整理下。当时可还是花了些时间查代码的。
从最简单的server 到支持回调的server。
1:最简单的server,指只要应用的人来呼叫下,启动他,没别的交互的。
server端注意事项:
生成一个Service 的继承类,默认重载onBind函数。(后面的代码需要修改这个函数) 现在不用管他。
在AndroidManifest.xml里面申明这个类
<service android:name=".TestServer" >
<intent-filter>
<action android:name="TestServer" />
<category android:name="android.intent.category.DEFAULT"
/>
</intent-filter>
</service>
client 端:
Intent i = new Intent();
i.setClassName( "com.test.testserver",
"com.test.testserver.TestServer" );
startService(i);
这样一个简单的引用就完成了。
注:这样启动的service是会一直存在的,不管客户端的情况。除非你调用stopService(Intent)。
另外,也可以用bindService(i, null, Context.BIND_AUTO_CREATE);来启动service,这样这个service是依附在client 上的,如果客户端关掉,他也会关掉。bindService(i, null, Context.BIND_AUTO_CREATE);
2: 支持aidl的service,支持函数调用 (这样不涉及到原理,相关android 原理我准备下一篇文章讨论)
server端注意事项:
搞一个aidl文件,这个类似java的 interface
interface Itestserver {
int testAdd(int i, int j);
}
这样就会生成一个自动interface
public interface Itestserver extends android.os.IInterface
和一个类
public static abstract class Stub extends android.os.Binder implements com.arcsoft.testserver.Itestserver
这样在代码里面生成新建立这样一个对象,并实现定义的函数:
private final Itestserver.Stub mBinder = new Itestserver.Stub() {
@Override
public int testAdd(int i, int j) throws RemoteException {
// TODO Auto-generated method stub
return i+j;
}
};
修改OnBinder函数
public IBinder onBind(Intent arg0) {
// TODO Auto-generated method stub
return mBinder;
}
client 端:
把aidl 也copy过去,这样也得到自动的Itestserver
实现一个ServiceConnection的子类。
class AdderServiceConnection implements ServiceConnection
{
public void onServiceConnected(ComponentName className,
IBinder boundService )
{
service = Itestserver.Stub.asInterface((IBinder)boundService);
//Log.d( "ADDERSERVICECLIENT","onServiceConnected" );
}
public void onServiceDisconnected(ComponentName className)
{
service = null;
// Log.d( "ADDERSERVICECLIENT","onServiceDisconnected" );
}
};
调用binder方式来启动service
conn = new AdderServiceConnection();
Intent i = new Intent();
i.setClassName( "com.arcsoft.testserver",
"com.arcsoft.testserver.TestServer" );
bindService( i, conn, Context.BIND_AUTO_CREATE);
这样就可以简单的调用接口了:
int t = service.testAdd(5,6);
3: 支持回调的service
如果涉及到类似UI刷新的问题,就必需支持回调。
要支持回调,有两个需要注意的地方:
1:新定义一个回调AIDL,注意这个AIDL对应的stub要放在客户端来实现,调用在service端。
2:使用RemoteCallbackList,来得的一个安全的调用。
服务器端:
新的AIDL
oneway interface ItestserverCallback {
void processCompleted(int Retvalue);
}
修改前面的AIDL,增加注册回调接口
interface Itestserver {
int testAdd(int i, int j);
void registerCallback(in ItestserverCallback cb);
void unregisterCallback(in ItestserverCallback cb);
}
在代码中增加新的对象:
final RemoteCallbackList<ItestserverCallback> mCallbacks = new RemoteCallbackList<ItestserverCallback>();
同时实现新的函数:
@Override
public void registerCallback(ItestserverCallback cb)
throws RemoteException {
// TODO Auto-generated method stub
if (cb != null)
mCallbacks.register(cb);
}
@Override
public void unregisterCallback(ItestserverCallback cb)
throws RemoteException {
// TODO Auto-generated method stub
if (cb != null)
mCallbacks.unregister(cb);
}
这样就可以在server端使用这个回调了。
如在某个异步函数结束的时候调用以下函数
void processend(final int res) {
// Broadcast to all clients the new value.
final int N = mCallbacks.beginBroadcast();
for (int i = 0; i < N; i++) {
try {
mCallbacks.getBroadcastItem(i).processCompleted(res);
} catch (RemoteException e) {
// The RemoteCallbackList will take care of removing
// the dead object for us.
}
}
mCallbacks.finishBroadcast();
}
客户端:
同样引入新的AIDL
同时实现register的stub,并且注册进去
private final ItestserverCallback.Stub mBinder = new ItestserverCallback.Stub() {
@Override
public void processCompleted(int Retvalue) throws RemoteException {
// TODO Auto-generated method stub
mHanler.sendMessage(mHanler.obtainMessage(1, Retvalue, 0));
}
};
try {
service.registerCallback(mBinder);
} catch (RemoteException e) {
// TODO Auto-generated catch block
e.printStackTrace();
}
try {
service.unregisterCallback(mBinder);
} catch (RemoteException e) {
// TODO Auto-generated catch block
e.printStackTrace();
}
这样就可以通过管理handler,来处理事务了。
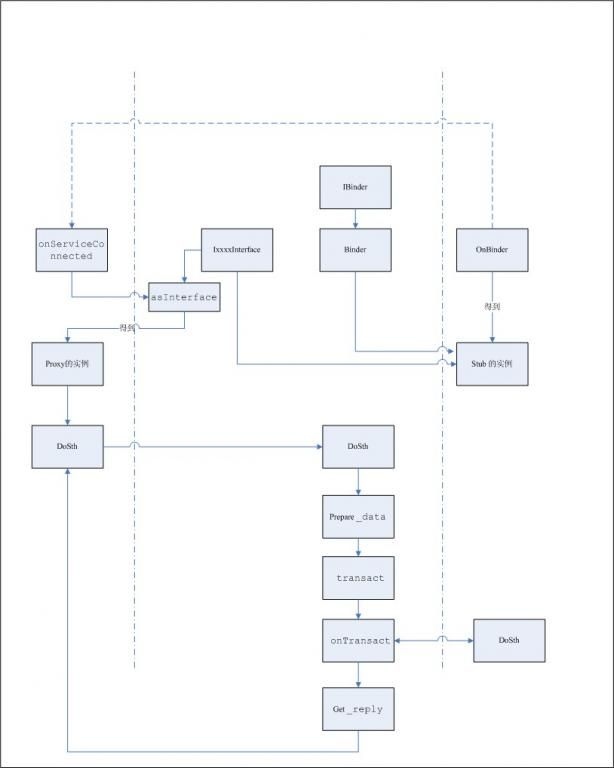
加一张流程图,解释整个RPC流程。