在Mac OS X10.5 以上系统 启用php
原文:
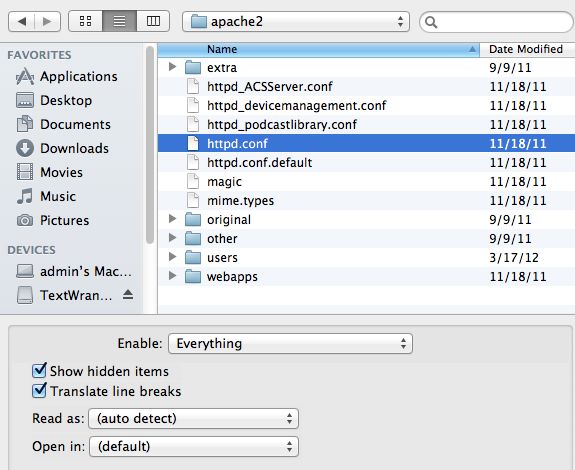
下载工具,界面有些不一样,勾选 显示隐藏
-
Open BBEdit or TextWrangler (a free, cut-down version of BBEdit available fromwww.barebones.com). From the File menu, select Open Hidden. In the Open dialog box, select All Files from the Enable drop-down menu. Then navigate to
Macintosh HD:private:etc:apache2:httpd.conf, and click Open. -
This opens the main configuration file for Apache 2.2.6. It's a system file, so you need to unlock it by clicking the icon of a pencil with a line through it at the top-left of the toolbar, as shown in the following screenshot:

-
You will be told that the document is owned by "root", and be asked to confirm that you want to unlock it. Click Unlock. This removes the line through the pencil, and readies the file for editing. Normally, when editing system files, it's a good idea to make a backup. However, it's not necessary in this case, because backup copies of all the Apache configuration files are in the
originalsubfolder of theApache2folder. -
Scroll down until you find the code shown on line 114 in the following screenshot (although the line number is likely to be the same in your version, it's the code that's important, not which line it's on):

-
Position your cursor at the beginning of that line, and remove the hash or pound sign (
#). It should now look like this:LoadModule php5_module libexec/apache2/libphp5.soThis enables PHP 5 on your computer.
-
Save the file. Because it's owned by "root", you will be prompted to enter your Mac password. That takes care of the basic configuration. In theory, you could now start Apache and PHP would be up and running. However, the default installation doesn't use the PHP configuration file
php.ini. You need to need to make a copy of a file calledphp.ini.default, and edit it. -
Unfortunately, you can't open
php.ini.defaultin BBEdit or TextWrangler and save it with a different name. You need to go under the hood of OS X by opening Terminalin theApplications:Utilitiesfolder. Similar to the Command Prompt in Windows, Terminal gives you direct access to the underlying operating system on a Mac. -
With Terminal open, type the following series of commands, each followed by Return:
cd /private/etcsudo cp php.ini.default php.iniThis moves you into the
private:etcfolder, and then copiesphp.ini.defaulttophp.iniin the same folder, using thesudocommand. You need to usesudobecause it's a system file. Enter your Mac administrator password when prompted. Terminal should now look something like this:
-
Open
php.iniin BBEdit or TextWrangler using Open Hidden in the same way as withhttp.conf. You should findphp.iniinMacintosh HD:private:etc. Click the icon of a pencil with a line through it to enable editing. -
How you edit
php.iniis mainly a question of preference, but the most important change is to a command callederror_reporting. The default setting (it should be on line 305) looks like this:error_reporting = E_ALL & ~E_NOTICEChange it to this:
error_reporting = E_ALLThis ensures that PHP reports all errors. Although no one likes error messages, it's vital to eliminate any errors (even seemingly minor ones) before deploying scripts on a live web server.
NOTE: There are several lines that look similar. Make sure that you edit the line that does NOT begin with a semicolon. A semicolon at the beginning of a line in
php.iniindicates a comment, which is ignored by the server. -
Save
php.ini. -
You can now start Apache by going to System Preferences. Click Sharing inInternet & Network. Then place a checkmark in Web Sharing. When Apache starts up, System Preferences should display Web Sharing: On.
-
Click the link under Your computer's website. This should launch Safari and display an Apache web page.
-
Create a page called
test.php, and type in the following code:<?php phpinfo(); ?>Save it in
Macintosh HD:Library:WebServer:Documents. -
Load the following URL into your browser:
http://localhost/test.phpIf you see the PHP configuration screen, you're up and running!
NOTE: If you did an upgrade install of Leopard, you cannot view pages stored in your personal Sites folder, because the necessary file(s) won't have been copied to the correct folder for Apache 2. To copy the file(s), open Terminal and type the following commands, both followed by Return:
cd /private/etc/httpd/usersls
You should see at least one file that uses your Mac username followed by .conf. For example, on my computer, it's called davidpowers.conf. You need to copy this file for each user to a folder where Apache 2 can find it. Type the following command, using the name of the file on your computer instead of davidpowers.conf:
sudo cp davidpowers.conf /private/etc/Apache2/users
If there are several .conf files to copy, you can use the following command instead:
sudo cp *.conf /private/etc/Apache2/users
However, if you have previously installed the Mac PHP package from Marc Liyanage, do not copy entropy-php.conf.
For this (or any other) change to take effect, go to Sharing in System Preferences, deselect Web Sharing, and then reselect it. This restarts Apache and implements any changes made to the Apache or PHP configuration.
http://foundationphp.com/tutorials/php_leopard.php
