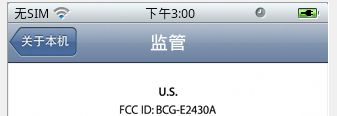
android实用代码积累
一,.自定义标题栏
1.Oncreate中实现关键性代码
public void onCreate(Bundle savedInstanceState) {
super.onCreate(savedInstanceState);
requestWindowFeature(Window.FEATURE_CUSTOM_TITLE);//必须在setcontentview方法之前调用
setContentView(R.layout.supervise);
getWindow().setFeatureInt(Window.FEATURE_CUSTOM_TITLE, R.layout.titlebar);//设置自定义标题
back=(ImageButton)findViewById(R.id.imageButton1);
title=(TextView)findViewById(R.id.textView1);
title.setText(R.string.Supervise);
back.setOnClickListener(this);
}
2.titleBar布局
<?xml version="1.0" encoding="utf-8"?>
<RelativeLayout xmlns:android="http://schemas.android.com/apk/res/android"
android:layout_width="match_parent"
android:layout_height="match_parent"
android:orientation="horizontal"
android:gravity="center_vertical"
>
<ImageButton
android:id="@+id/imageButton1"
android:layout_width="wrap_content"
android:layout_height="wrap_content"
android:layout_alignParentLeft="true"
android:layout_centerVertical="true"
android:src="@drawable/back_btn"
android:background="@null"
/>
<TextView
android:id="@+id/textView1"
android:layout_width="wrap_content"
android:layout_height="wrap_content"
android:layout_centerVertical="true"
android:layout_centerInParent="true"
android:text="@string/Supervise"
android:textAppearance="?android:attr/textAppearanceMedium"
/>
</RelativeLayout>
3.实用style定义标题栏风格,宽度,背景等
<?xml version="1.0" encoding="utf-8"?>
<resources>
<style parent="android:Theme" name="titleStyle">
<item name="android:windowTitleSize">40dp</item>
</style>
</resources>
二。 获取APK未安装包的ICON及Label、
1.获取ICON
public static Drawable getApkIcon(Context context,File file) {
String apkPath=file.getAbsolutePath();
PackageManager pm = context.getPackageManager();
PackageInfo info = pm.getPackageArchiveInfo(apkPath, 0);
if (info != null) {
ApplicationInfo appInfo = info.applicationInfo;
appInfo.publicSourceDir=apkPath;
try {
return zoomDrawable(appInfo.loadIcon(pm), 48, 48);
} catch (OutOfMemoryError e) {
Log.e("ApkIconLoader", e.toString());
}
}
return null;
}
2 public static String getApkLabel(Context context, File file) {
String apkPath=file.getAbsolutePath();
PackageManager pm = context.getPackageManager();
PackageInfo info = pm.getPackageArchiveInfo(apkPath, 0);
if (info != null) {
ApplicationInfo appInfo = info.applicationInfo;
appInfo.publicSourceDir=apkPath;
try {
return appInfo.loadLabel(pm).toString();
} catch (OutOfMemoryError e) {
Log.e("ApkIconLoader", e.toString());
}
}
return file.getName();
}
三。对drawable图片的缩放
static Drawable zoomDrawable(Drawable drawable, int w, int h)
{
int width = drawable.getIntrinsicWidth();
int height= drawable.getIntrinsicHeight();
Bitmap oldbmp = drawableToBitmap(drawable,width,height); // drawable转换成bitmap
Matrix matrix = new Matrix(); // 创建操作图片用的Matrix对象
float scaleWidth = ((float)w / width); // 计算缩放比例
float scaleHeight = ((float)h / height);
matrix.postScale(scaleWidth, scaleHeight); // 设置缩放比例
Bitmap newbmp = Bitmap.createBitmap(oldbmp, 0, 0, width, height, matrix, true); // 建立新的bitmap,其内容是对原bitmap的缩放后的图
return new BitmapDrawable(newbmp); // 把bitmap转换成drawable并返回
}
static Bitmap drawableToBitmap(Drawable drawable,int width, int height){
Bitmap bitmap = Bitmap.createBitmap(width, height, drawable.getOpacity() != PixelFormat.OPAQUE ? Bitmap.Config.ARGB_8888: Bitmap.Config.RGB_565);
Canvas canvas = new Canvas(bitmap);
drawable.setBounds(0,0,width,height);
drawable.draw(canvas);
return bitmap;
}
四。安装APK
Intent intent = new Intent();
intent.addFlags(Intent.FLAG_ACTIVITY_NEW_TASK);
intent.setAction(android.content.Intent.ACTION_VIEW);
intent.setDataAndType(Uri.fromFile(file),"application/vnd.android.package-archive");
startActivity(intent);
五,获取SD卡上视频文件列表
void getVideoList(){
// List<VideoItem> items=new ArrayList<VideoItem>();
ContentResolver mContentResolver = this.getContentResolver();
Cursor cursor = mContentResolver.query(MediaStore.Video.Media.EXTERNAL_CONTENT_URI, null,
null, null, MediaStore.Video.DEFAULT_SORT_ORDER);
if(cursor.moveToFirst()){
do{
VideoItem item=new VideoItem();
int id = cursor.getInt(cursor.getColumnIndexOrThrow(MediaStore.Video.Media._ID));
//名称 :MediaStore.Audio.Media.TITLE
String tilte = cursor.getString(cursor.getColumnIndexOrThrow(MediaStore.Video.Media.TITLE));
String type=cursor.getString(cursor.getColumnIndexOrThrow(MediaStore.Video.Media.MIME_TYPE));
String url = cursor.getString(cursor.getColumnIndexOrThrow(MediaStore.Video.Media.DATA));
int duration = cursor.getInt(cursor.getColumnIndexOrThrow(MediaStore.Video.Media.DURATION));
item.id=id;
item.duration=duration;
item.path=url;
item.type=type;
item.videoName=tilte;
item.bitmap=getVideoThumbnail(url, 100, 100, 1);
items.add(item);
Log.i("debug", "title"+tilte+"duration"+duration);
}while(cursor.moveToNext());
}
}
5.获取视频文件的缩略图
private Bitmap getVideoThumbnail(String videoPath, int width, int height,
int kind) {
Bitmap bitmap = null;
// 获取视频的缩略图
bitmap = ThumbnailUtils.createVideoThumbnail(videoPath, kind);
System.out.println("w"+bitmap.getWidth());
System.out.println("h"+bitmap.getHeight());
bitmap = ThumbnailUtils.extractThumbnail(bitmap, width, height,
ThumbnailUtils.OPTIONS_RECYCLE_INPUT);
return bitmap;
}
6.时间格式化
protected String stringForTime(long timeMs) {
mFormatBuilder=new StringBuilder();
mFormatter=new Formatter();
long totalSeconds = timeMs / 1000;
long seconds = totalSeconds % 60;
long minutes = (totalSeconds / 60) % 60;
long hours = totalSeconds / 3600;
mFormatBuilder.setLength(0);
if (hours > 0) {
return mFormatter.format("%d:%02d:%02d", hours, minutes, seconds).toString();
} else {
return mFormatter.format("%02d:%02d", minutes, seconds).toString();
}
}

