11.Android数据库SQLiteDatabase的使用
Android提供了三种数据存储方式:
第一种是文件存储。
第二种是SharedPreferences存储。
第三种是数据库SQLiteDatabase存储。
文件存储我就不多说了,而SharedPreferences可以存取简单的数据(int,double,float.etc),它经常用于数据缓存,因为它读取存储简单。详细可以参见本系列《Android高手进阶教程》7.Android Preferences的使用
今天我们将讲一下Android SQLiteDatabase的使用。而掌握SqliteDatabase,将会我们接下来掌握ContentProvider打下良好的基石。
为了让大家更好的掌握,我们手把手完成该节的Demo。
第一步:新建一个Android工程,命名为SQLiteDatabaseDemo
第二步:创建一个新的类BooksDB.java这个类要继承于android.database.sqlite.SQLiteOpenHelper抽象类,我们要实现其中两个方法:onCreate(),onUpdate。具体代码如下:
|
1
2
3
4
5
6
7
8
9
10
11
12
13
14
15
16
17
18
19
20
21
22
23
24
25
26
27
28
29
30
31
32
33
34
35
36
37
38
39
40
41
42
43
44
45
46
47
48
49
50
51
52
53
54
55
56
57
58
59
60
61
62
63
64
65
66
67
68
69
70
71
72
73
74
75
|
package
com.android.tutor;
import
android.content.ContentValues;
import
android.content.Context;
import
android.database.Cursor;
import
android.database.sqlite.SQLiteDatabase;
import
android.database.sqlite.SQLiteOpenHelper;
public
class
BooksDB
extends
SQLiteOpenHelper {
private
final
static
String DATABASE_NAME =
"BOOKS.db"
;
private
final
static
int
DATABASE_VERSION =
1
;
private
final
static
String TABLE_NAME =
"books_table"
;
public
final
static
String BOOK_ID =
"book_id"
;
public
final
static
String BOOK_NAME =
"book_name"
;
public
final
static
String BOOK_AUTHOR =
"book_author"
;
public
BooksDB(Context context) {
// TODO Auto-generated constructor stub
super
(context, DATABASE_NAME,
null
, DATABASE_VERSION);
}
// 创建table
@Override
public
void
onCreate(SQLiteDatabase db) {
String sql =
"CREATE TABLE "
+ TABLE_NAME +
" ("
+ BOOK_ID
+
" INTEGER primary key autoincrement, "
+ BOOK_NAME
+
" text, "
+ BOOK_AUTHOR +
" text);"
;
db.execSQL(sql);
}
@Override
public
void
onUpgrade(SQLiteDatabase db,
int
oldVersion,
int
newVersion) {
String sql =
"DROP TABLE IF EXISTS "
+ TABLE_NAME;
db.execSQL(sql);
onCreate(db);
}
public
Cursor select() {
SQLiteDatabase db =
this
.getReadableDatabase();
Cursor cursor = db
.query(TABLE_NAME,
null
,
null
,
null
,
null
,
null
,
null
);
return
cursor;
}
// 增加操作
public
long
insert(String bookname, String author) {
SQLiteDatabase db =
this
.getWritableDatabase();
/* ContentValues */
ContentValues cv =
new
ContentValues();
cv.put(BOOK_NAME, bookname);
cv.put(BOOK_AUTHOR, author);
long
row = db.insert(TABLE_NAME,
null
, cv);
return
row;
}
// 删除操作
public
void
delete(
int
id) {
SQLiteDatabase db =
this
.getWritableDatabase();
String where = BOOK_ID +
" = ?"
;
String[] whereValue = { Integer.toString(id) };
db.delete(TABLE_NAME, where, whereValue);
}
// 修改操作
public
void
update(
int
id, String bookname, String author) {
SQLiteDatabase db =
this
.getWritableDatabase();
String where = BOOK_ID +
" = ?"
;
String[] whereValue = { Integer.toString(id) };
ContentValues cv =
new
ContentValues();
cv.put(BOOK_NAME, bookname);
cv.put(BOOK_AUTHOR, author);
db.update(TABLE_NAME, cv, where, whereValue);
}
}
|
第三步:修改main.xml布局如下,由两个EditText和一个ListView组成,代码如下:
|
1
2
3
4
5
6
7
8
9
10
11
12
13
14
15
16
17
18
19
20
21
|
<?
xml
version
=
"1.0"
encoding
=
"utf-8"
?>
<
LinearLayout
xmlns:android
=
"http://schemas.android.com/apk/res/android"
android:orientation
=
"vertical"
android:layout_width
=
"fill_parent"
android:layout_height
=
"fill_parent"
>
<
EditText
android:id
=
"@+id/bookname"
android:layout_width
=
"fill_parent"
android:layout_height
=
"wrap_content"
/>
<
EditText
android:id
=
"@+id/author"
android:layout_width
=
"fill_parent"
android:layout_height
=
"wrap_content"
/>
<
ListView
android:id
=
"@+id/bookslist"
android:layout_width
=
"fill_parent"
android:layout_height
=
"wrap_content"
/>
</
LinearLayout
>
|
第四步:修改SQLiteDatabaseDemo.java代码如下:
|
1
2
3
4
5
6
7
8
9
10
11
12
13
14
15
16
17
18
19
20
21
22
23
24
25
26
27
28
29
30
31
32
33
34
35
36
37
38
39
40
41
42
43
44
45
46
47
48
49
50
51
52
53
54
55
56
57
58
59
60
61
62
63
64
65
66
67
68
69
70
71
72
73
74
75
76
77
78
79
80
81
82
83
84
85
86
87
88
89
90
91
92
93
94
95
96
97
98
99
100
101
102
103
104
105
106
107
108
109
110
111
112
113
114
115
116
117
118
119
120
121
122
123
124
125
126
127
128
129
130
131
132
133
134
135
136
137
138
139
140
141
142
143
144
145
146
147
148
149
150
151
152
153
154
155
156
157
158
159
160
161
162
163
|
package
com.android.tutor;
import
android.app.Activity;
import
android.content.Context;
import
android.database.Cursor;
import
android.os.Bundle;
import
android.view.Menu;
import
android.view.MenuItem;
import
android.view.View;
import
android.view.ViewGroup;
import
android.widget.AdapterView;
import
android.widget.BaseAdapter;
import
android.widget.EditText;
import
android.widget.ListView;
import
android.widget.TextView;
import
android.widget.Toast;
public
class
SQLiteDatabaseDemo
extends
Activity
implements
AdapterView.OnItemClickListener {
private
BooksDB mBooksDB;
private
Cursor mCursor;
private
EditText BookName;
private
EditText BookAuthor;
private
ListView BooksList;
private
int
BOOK_ID =
0
;
protected
final
static
int
MENU_ADD = Menu.FIRST;
protected
final
static
int
MENU_DELETE = Menu.FIRST +
1
;
protected
final
static
int
MENU_UPDATE = Menu.FIRST +
2
;
public
void
onCreate(Bundle savedInstanceState) {
super
.onCreate(savedInstanceState);
setContentView(R.layout.main);
setUpViews();
}
public
void
setUpViews() {
mBooksDB =
new
BooksDB(
this
);
mCursor = mBooksDB.select();
BookName = (EditText) findViewById(R.id.bookname);
BookAuthor = (EditText) findViewById(R.id.author);
BooksList = (ListView) findViewById(R.id.bookslist);
BooksList.setAdapter(
new
BooksListAdapter(
this
, mCursor));
BooksList.setOnItemClickListener(
this
);
}
@Override
public
boolean
onCreateOptionsMenu(Menu menu) {
super
.onCreateOptionsMenu(menu);
menu.add(Menu.NONE, MENU_ADD,
0
,
"ADD"
);
menu.add(Menu.NONE, MENU_DELETE,
0
,
"DELETE"
);
menu.add(Menu.NONE, MENU_DELETE,
0
,
"UPDATE"
);
return
true
;
}
public
boolean
onOptionsItemSelected(MenuItem item) {
super
.onOptionsItemSelected(item);
switch
(item.getItemId()) {
case
MENU_ADD:
add();
break
;
case
MENU_DELETE:
delete();
break
;
case
MENU_UPDATE:
update();
break
;
}
return
true
;
}
public
void
add() {
String bookname = BookName.getText().toString();
String author = BookAuthor.getText().toString();
// 书名和作者都不能为空,或者退出
if
(bookname.equals(
""
) || author.equals(
""
)) {
return
;
}
mBooksDB.insert(bookname, author);
mCursor.requery();
BooksList.invalidateViews();
BookName.setText(
""
);
BookAuthor.setText(
""
);
Toast.makeText(
this
,
"Add Successed!"
, Toast.LENGTH_SHORT).show();
}
public
void
delete() {
if
(BOOK_ID ==
0
) {
return
;
}
mBooksDB.delete(BOOK_ID);
mCursor.requery();
BooksList.invalidateViews();
BookName.setText(
""
);
BookAuthor.setText(
""
);
Toast.makeText(
this
,
"Delete Successed!"
, Toast.LENGTH_SHORT).show();
}
public
void
update() {
String bookname = BookName.getText().toString();
String author = BookAuthor.getText().toString();
// 书名和作者都不能为空,或者退出
if
(bookname.equals(
""
) || author.equals(
""
)) {
return
;
}
mBooksDB.update(BOOK_ID, bookname, author);
mCursor.requery();
BooksList.invalidateViews();
BookName.setText(
""
);
BookAuthor.setText(
""
);
Toast.makeText(
this
,
"Update Successed!"
, Toast.LENGTH_SHORT).show();
}
@Override
public
void
onItemClick(AdapterView<!--?--> parent, View view,
int
position,
long
id) {
mCursor.moveToPosition(position);
BOOK_ID = mCursor.getInt(
0
);
BookName.setText(mCursor.getString(
1
));
BookAuthor.setText(mCursor.getString(
2
));
}
public
class
BooksListAdapter
extends
BaseAdapter {
private
Context mContext;
private
Cursor mCursor;
public
BooksListAdapter(Context context, Cursor cursor) {
mContext = context;
mCursor = cursor;
}
@Override
public
int
getCount() {
return
mCursor.getCount();
}
@Override
public
Object getItem(
int
position) {
return
null
;
}
@Override
public
long
getItemId(
int
position) {
return
0
;
}
@Override
public
View getView(
int
position, View convertView, ViewGroup parent) {
TextView mTextView =
new
TextView(mContext);
mCursor.moveToPosition(position);
mTextView.setText(mCursor.getString(
1
) +
"___"
+ mCursor.getString(
2
));
return
mTextView;
}
}
}
|
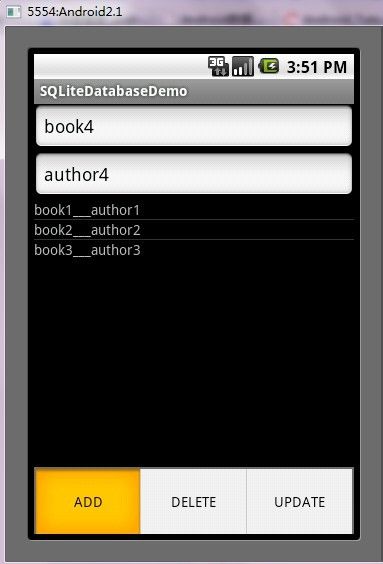
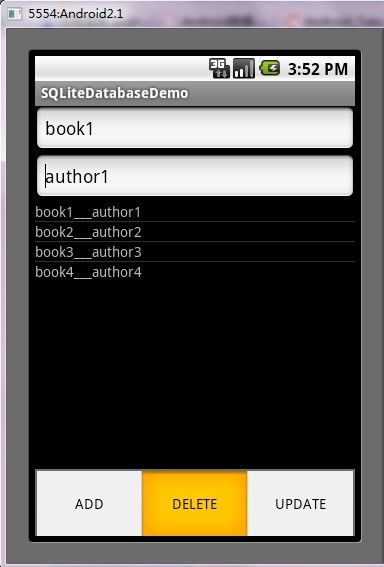
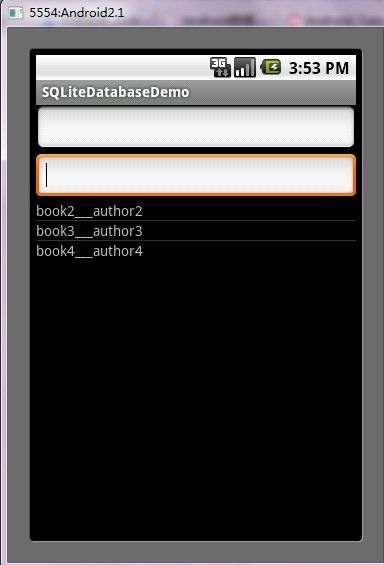
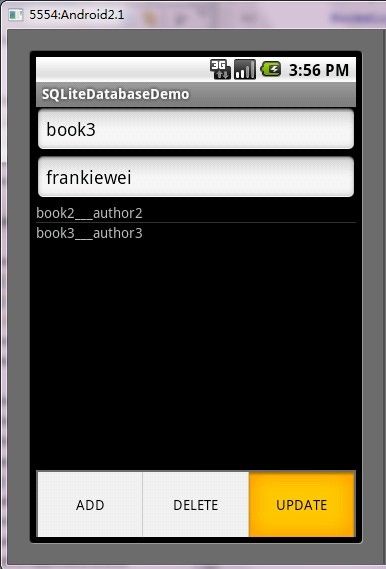
第五步:运行程序效果如下:
第六步:查看我们所建的数据库。有两种方法:第一种用命令查看:adb shell ls data/data/com.android.tutor/databases。
另一种方法是用DDMS查看,在data/data下面对应的应用程序的包名 下会有如下数据库,如图所示:


