Android单元测试 Instrumentation
我们可以用Android单元测试 Instrumentation
本篇只是入门,起到抛砖的效果
Instrumentation无界面,具有启动能力。
下面通过一个简单的例子来讲解Instrumentation的基本测试方法:
我们测试工程
AndroidManifest.xml
<?xml version="1.0" encoding="utf-8"?>
<manifest xmlns:android="http://schemas.android.com/apk/res/android"
    package="cn.hpc.assistant"
    android:versionCode="1"
    android:versionName="1.0" >


    <uses-sdk
        android:minSdkVersion="8"
        android:targetSdkVersion="14" />


     <application
        android:name=".FloatApplication"
        android:allowBackup="true"
        android:icon="@drawable/ic_launcher"
        android:label="@string/app_name"
        android:theme="@style/AppTheme" android:debuggable="true">
        <activity
            android:name="cn.hpc.assistant.MainActivity"
            android:label="@string/app_name" >
            <intent-filter>
                <action android:name="android.intent.action.MAIN" />


                <category android:name="android.intent.category.LAUNCHER" />
            </intent-filter>
        </activity>


        <uses-library android:name="android.test.runner" /><!--八股文:  引入测试库-->
    </application>
<!--  八股文:被测试的目标包与instrumentation的名称。-->
    <instrumentation
        android:name="android.test.InstrumentationTestRunner"
        android:label="Tests for My App"
        android:targetPackage="cn.hpc.assistant" />


</manifest>
Mainactivity.java
package cn.hpc.assistant;

import android.app.Activity;
import android.content.Context;
import android.graphics.PixelFormat;
import android.graphics.Point;
import android.os.Bundle;
import android.os.Handler;
import android.os.Message;
import android.view.Gravity;
import android.view.View;
import android.view.WindowManager;
import android.view.WindowManager.LayoutParams;
import android.widget.TextView;

public class MainActivity extends Activity {
	private TextView tv = null;
	@Override
	protected void onCreate(Bundle savedInstanceState) {
		super.onCreate(savedInstanceState);
		setContentView(R.layout.activity_main);
		tv = (TextView) this.findViewById(R.id.text1);
		this.findViewById(R.id.id_btn_fun).setOnClickListener(mOnClickListener);

	}


	View.OnClickListener mOnClickListener = new View.OnClickListener() {

		@Override
		public void onClick(View v) {
			switch (v.getId()) {
			case R.id.id_btn_fun:
				fun();
				break;
			default:

			}
		}
	};

	private void fun(){
		tv.setText(android.os.Build.MODEL + android.os.Build.getRadioVersion());
	}

}
布局文件:
<LinearLayout xmlns:android="http://schemas.android.com/apk/res/android"
    xmlns:tools="http://schemas.android.com/tools"
    android:layout_width="wrap_content"
    android:layout_height="wrap_content"
    android:orientation="horizontal"
    tools:context=".MainActivity" >

    <TextView
        android:id="@+id/text1"
        android:layout_width="wrap_content"
        android:layout_height="wrap_content"
        android:layout_centerHorizontal="true"
        android:layout_centerVertical="true"
        android:text="@string/hello_world" />

    <Button
        android:id="@+id/id_btn_fun"
        android:layout_width="wrap_content"
        android:layout_height="wrap_content" />

    <Button
        android:id="@+id/id_btn_day"
        android:layout_width="wrap_content"
        android:layout_height="wrap_content"
        android:text="Day"/>

    <Button
        android:id="@+id/id_btn_night"
        android:layout_width="wrap_content"
        android:layout_height="wrap_content"
        android:text="Night" />

</LinearLayout>
键的测试文件:
package cn.hpc.assistant.test;

import junit.framework.Assert;
import android.content.Intent;
import android.os.SystemClock;
import android.test.InstrumentationTestCase;
import android.widget.Button;
import android.widget.TextView;
import cn.hpc.assistant.MainActivity;
import cn.hpc.assistant.R;

public class TestMyApp extends InstrumentationTestCase {

	MainActivity mActivity = null;
	private Button button = null;

	private TextView text = null;

	public void testSample() throws Throwable {
		Assert.assertTrue(1 + 1 == 3); // 测试一个错误的结果
	}

	@Override
	protected void tearDown() throws Exception {
		// TODO Auto-generated method stub
		mActivity.finish();

		super.tearDown();
	}

	@Override
	protected void setUp() throws Exception {
		// TODO Auto-generated method stub
		super.setUp();
		Intent intent = new Intent();

		intent.setClassName("cn.hpc.assistant", MainActivity.class.getName());

		intent.setFlags(Intent.FLAG_ACTIVITY_NEW_TASK);

		mActivity = (MainActivity) getInstrumentation().startActivitySync(
				intent);

		text = (TextView) mActivity.findViewById(R.id.text1);

		button = (Button) mActivity.findViewById(R.id.id_btn_fun);

	}

	/*
	 *
	 * 活动功能测试
	 */

	public void testActivity() throws Exception {
		// 测试键壮性,连续运行某项功能100次,点击Button 100次
		for (int i = 0; i < 100; ++i) {
			getInstrumentation().runOnMainSync(new PerformClick(button));
			SystemClock.sleep(500); // 中间间隔 0.5秒
		}
		assertEquals("Android InstrumentationTestCase", text.getText().toString()); //检查运行后的输出结果

	}

	/*
	 *
	 * 模拟按钮点击的接口
	 */

	private class PerformClick implements Runnable {

		Button btn;

		public PerformClick(Button button) {
			btn = button;
		}

		public void run() {
			btn.performClick();
		}

	}

}
在android Developer中有如下的解释
protected void setUp ()
Since: API Level 3
Sets up the fixture, for example, open a network connection. This method is called before a test is executed.
setUp ()用来初始设置,如启动一个Activity,初始化资源等。
protected void tearDown ()
Since: API Level 3
Make sure all resources are cleaned up and garbage collected before moving on to the next test. Subclasses that override this method should make sure they call super.tearDown() at the end of the overriding method.
tearDown () 用来垃圾清理与资源回收。
这个测试方法中,模拟了一个按钮点击事件,检查程序运行是否预期的结果。
在这里PerformClick这个方法引入Runnable接口,通过线程来执行模拟事件。这样的好处,不阻滞UI线程。
用Eclipse集成的JUnit工具启动测试
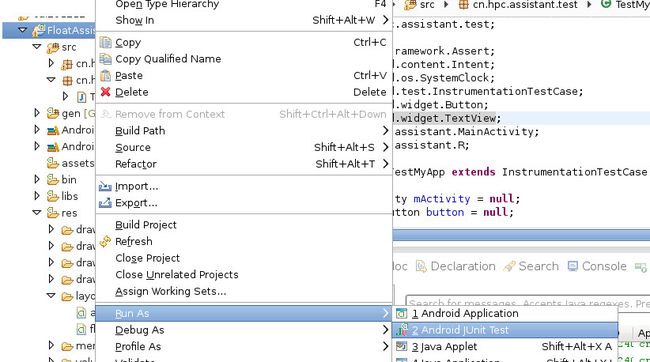
在Eclipse中选择工程Sample,单击右键,在Run as子菜单选项中选择Android JUnit Test
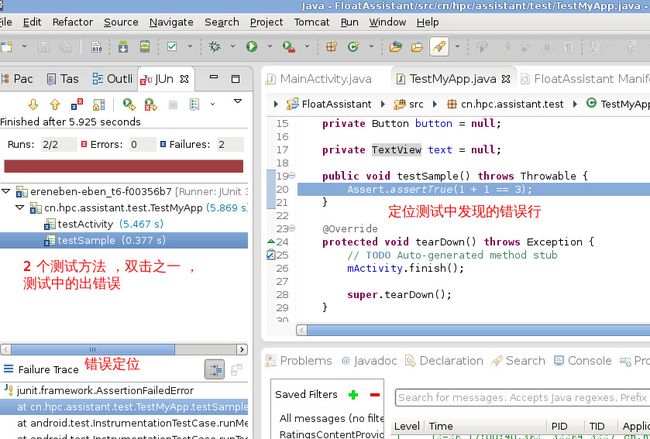
测试后,显示测试中的错误信息,
完毕,
欢迎转载,转载请注明出处。谢谢!
http://blog.csdn.net/hpccn/article/details/8439784

