android蓝牙编程资料搜集
Android平台支持蓝牙网络协议栈,实现蓝牙设备之间数据的无线传输。
本文档描述了怎样利用android平台提供的蓝牙API去实现蓝牙设备之间的通信,蓝牙设备之间的通信主要包括了四个步骤:设置蓝牙设备、寻找局域网内可能或者匹配的设备、连接设备和设备之间的数据传输。以下是建立蓝牙连接的所需要的一些基本类:
if (mBluetoothAdapter == null) {
// Device does not support Bluetooth
}
Intent enableBtIntent = newIntent(BluetoothAdapter.ACTION_REQUEST_ENABLE);
startActivityForResult(enableBtIntent, REQUEST_ENABLE_BT);
}
至此,如不出意外,恭喜你的蓝牙设备已经开启了,接下来需要查找周边可能存在的蓝牙设备了。
查找设备:
使用bluetoothadapter类里的方法,你可以查找远端设备(不过蓝牙查找的范围好像是在十米以内吧)或者查询在你手机上已经匹配(或者说绑定)的其他手机了。当然需要确定对方蓝牙设备已经开启或者已经开启了“被发现使能“功能(对方设备是可以被发现的是你能够发起连接的前提条件)。如果该设备是可以被发现的,会反馈回来一些对方的设备信息,比如名字、MAC地址等,利用这些信息,你的设备就可以选择去向对方初始化一个连接。
如果你是第一次与该设备连接,那么一个配对的请求就会自动的显示给用户。当设备配对好之后,他的一些基本信息(主要是名字和MAC)被保存下来并可以使用蓝牙的API来读取。使用已知的MAC地址就可以对远端的蓝牙设备发起连接请求。
匹配好的设备和连接上的设备的不同点:匹配好只是说明对方设备发现了你的存在,并拥有一个共同的识别码,并且可以连接。连接上:表示当前设备共享一个RFCOMM信道并且两者之间可以交换数据。也就是是说蓝牙设备在建立RFCOMM信道之前,必须是已经配对好了的。
怎么查询匹配好的设备:
在建立连接之前你必须先查询配对好了的蓝牙设备集(你周围的蓝牙设备可能不止一个),以便你选取哪一个设备进行通信,例如你可以你可以查询所有配对的蓝牙设备,并使用一个数组适配器将其打印显示出来:
|
01
02
03
04
05
06
07
|
Set<BluetoothDevice> pairedDevices = mBluetoothAdapter.getBondedDevices();<P></P>
// If there are paired devices
if
(pairedDevices.size() >
0
) {
// Loop through paired devices
for
(BluetoothDevice device : pairedDevices) {
// Add the name and address to an array adapter to show in a ListView
mArrayAdapter.add(device.getName() +
"/n"
+ device.getAddress());
}
|
建立一个蓝牙连接只需要MAC地址就已经足够了。
扫描设备:
扫描设备,只需要简单的调用startDiscovery()方法,这个扫描的过程大概持续是12秒,应用程序为了ACTION_FOUND动作需要注册一个BroadcastReceiver来接受设备扫描到的信息。对于每一个设备,系统都会广播ACTION_FOUND动作。例如:
|
01
02
03
04
05
06
07
08
09
10
11
12
13
14
15
|
// Create a BroadcastReceiver for ACTION_FOUND<P></P>private final BroadcastReceiver mReceiver = new BroadcastReceiver() {
public
void
onReceive(Context context, Intent intent) {
String action = intent.getAction();
// When discovery finds a device
if
(BluetoothDevice.ACTION_FOUND.equals(action)) {
// Get the BluetoothDevice object from the Intent
BluetoothDevice device = intent.getParcelableExtra(BluetoothDevice.EXTRA_DEVICE);
// Add the name and address to an array adapter to show in a ListView
mArrayAdapter.add(device.getName() +
"/n"
+ device.getAddress());
}
}
};
// Register the BroadcastReceiver
IntentFilter filter =
new
IntentFilter(BluetoothDevice.ACTION_FOUND);
registerReceiver(mReceiver, filter);
// Don't forget to unregister during onDestroy
|
注意:扫描的过程是一个很耗费资源的过程,一旦你找到你需要的设备之后,在发起连接请求之前,确保你的程序调用cancelDiscovery()方法停止扫描。显然,如果你已经连接上一个设备,启动扫描会减少你的通信带宽。
使能被发现:Enabling discoverability
如果你想使你的设备能够被其他设备发现,将ACTION_REQUEST_DISCOVERABLE动作封装在intent中并调用startActivityForResult(Intent, int)方法就可以了。他将在不使你应用程序退出的情况下使你的设备能够被发现。缺省情况下的使能时间是120秒,当然你可以可以通过添加EXTRA_DISCOVERABLE_DURATION字段来改变使能时间(最大不超过300秒,这是出于对你设备上的信息安全考虑)。例如:
|
01
02
03
04
|
Intent discoverableIntent =
new
Intent(BluetoothAdapter.ACTION_REQUEST_DISCOVERABLE);
discoverableIntent.putExtra(BluetoothAdapter.EXTRA_DISCOVERABLE_DURATION,
300
);
startActivity(discoverableIntent);
|
运行该段代码之后,系统会弹出一个对话框来提示你启动设备使能被发现(次过程中如果你的蓝牙功能没有开启,系统会帮你开启),并且如果你准备对该远端设备发现一个连接,你不需要开启使能设备被发现功能,以为该功能只是在你的应用程序作为服务器端的时候才需要。
连接设备:
在你的应用程序中,想建立两个蓝牙设备之间的连接,你必须实现客户端和服务器端的代码(因为任何一个设备都必须可以作为服务端或者客户端)。一个开启服务来监听,一个发起连接请求(使用服务器端设备的MAC地址)。当他们都拥有一个蓝牙套接字在同一RFECOMM信道上的时候,可以认为他们之间已经连接上了。服务端和客户端通过不同的方式或其他们的蓝牙套接字。当一个连接监听到的时候,服务端获取到蓝牙套接字。当客户可打开一个FRCOMM信道给服务器端的时候,客户端获取到蓝牙套接字。
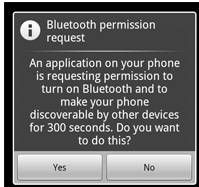
注意:在此过程中,如果两个蓝牙设备还没有配对好的,android系统会通过一个通知或者对话框的形式来通知用户。RFCOMM连接请求会在用户选择之前阻塞。如下图:
当你想要连接两台设备时,一个必须作为服务端(通过持有一个打开的bluetoothserversocket),目的是监听外来连接请求,当监听到以后提供一个连接上的bluetoothsocket给客户端,当客户端从bluetoothserversocket得到bluetoothsocket以后就可以销毁bluetoothserversocket,除非你还想监听更多的连接请求。
建立服务套接字和监听连接的基本步骤:
首先通过调用listenUsingRfcommWithServiceRecord(String, UUID)方法来获取bluetoothserversocket对象,参数string代表了该服务的名称,UUID代表了和客户端连接的一个标识(128位格式的字符串ID,相当于pin码),UUID必须双方匹配才可以建立连接。其次调用accept()方法来监听可能到来的连接请求,当监听到以后,返回一个连接上的蓝牙套接字bluetoothsocket。最后,在监听到一个连接以后,需要调用close()方法来关闭监听程序。(一般蓝牙设备之间是点对点的传输)
注意:accept()方法不应该放在主Acitvity里面,因为他是一种阻塞调用(在没有监听到连接请求之间程序就一直停在那里)。解决方法是新建一个线程来管理。例如:
|
01
02
03
04
05
06
07
08
09
10
11
12
13
14
15
16
17
18
19
20
21
22
23
24
25
26
27
28
29
30
31
32
33
34
35
36
37
38
39
40
|
private
class
AcceptThread
extends
Thread {
private
final
BluetoothServerSocket mmServerSocket;
public
AcceptThread() {
// Use a temporary object that is later assigned to mmServerSocket,
// because mmServerSocket is final
BluetoothServerSocket tmp =
null
;
try
{
// MY_UUID is the app's UUID string, also used by the client code
tmp = mAdapter.listenUsingRfcommWithServiceRecord(NAME, MY_UUID);
}
catch
(IOException e) { }
mmServerSocket = tmp;
}
public
void
run() {
BluetoothSocket socket =
null
;
// Keep listening until exception occurs or a socket is returned
while
(
true
) {
try
{
socket = mmServerSocket.accept();
}
catch
(IOException e) {
break
;
}
// If a connection was accepted
if
(socket !=
null
) {
// Do work to manage the connection (in a separate thread)
manageConnectedSocket(socket);
mmServerSocket.close();
break
;
}
}
}
/** Will cancel the listening socket, and cause the thread to finish */
public
void
cancel() {
try
{
mmServerSocket.close();
}
catch
(IOException e) { }
}
}
|
客户端的连接:
为了初始化一个与远端设备的连接,需要先获取代表该设备的一个bluetoothdevice对象。通过bluetoothdevice对象来获取bluetoothsocket并初始化连接:
具体步骤:
使用bluetoothdevice对象里的方法createRfcommSocketToServiceRecord(UUID)来获取bluetoothsocket。UUID就是匹配码。然后,调用connect()方法来。如果远端设备接收了该连接,他们将在通信过程中共享RFFCOMM信道,并且connect()方法返回。例如:
|
01
02
03
04
05
06
07
08
09
10
11
12
13
14
15
16
17
18
19
20
21
22
23
24
25
26
27
28
29
30
31
32
33
34
35
36
37
38
39
40
41
42
43
|
private
class
ConnectThread
extends
Thread {<P></P>
private
final
BluetoothSocket mmSocket;
private
final
BluetoothDevice mmDevice;
public
ConnectThread(BluetoothDevice device) {
// Use a temporary object that is later assigned to mmSocket,
// because mmSocket is final
BluetoothSocket tmp =
null
;
mmDevice = device;
// Get a BluetoothSocket to connect with the given BluetoothDevice
try
{
// MY_UUID is the app's UUID string, also used by the server code
tmp = device.createRfcommSocketToServiceRecord(MY_UUID);
}
catch
(IOException e) { }
mmSocket = tmp;
}
public
void
run() {
// Cancel discovery because it will slow down the connection
mAdapter.cancelDiscovery();
try
{
// Connect the device through the socket. This will block
// until it succeeds or throws an exception
mmSocket.connect();
}
catch
(IOException connectException) {
// Unable to connect; close the socket and get out
try
{
mmSocket.close();
}
catch
(IOException closeException) { }
return
;
}
// Do work to manage the connection (in a separate thread)
manageConnectedSocket(mmSocket);
}
/** Will cancel an in-progress connection, and close the socket */
public
void
cancel() {
try
{
mmSocket.close();
}
catch
(IOException e) { }
}
|
注意:conncet()方法也是阻塞调用,一般建立一个独立的线程中来调用该方法。在设备discover过程中不应该发起连接connect(),这样会明显减慢速度以至于连接失败。且数据传输完成只有调用close()方法来关闭连接,这样可以节省系统内部资源。
管理连接(主要涉及数据的传输):
当设备连接上以后,每个设备都拥有各自的bluetoothsocket。现在你就可以实现设备之间数据的共享了。
|
01
02
03
04
05
06
07
08
09
10
11
12
13
14
15
16
17
18
19
20
21
22
23
24
25
26
27
28
29
30
31
32
33
34
35
36
37
38
39
40
41
42
43
44
45
46
47
48
49
50
51
52
53
|
private
class
ConnectedThread
extends
Thread {
private
final
BluetoothSocket mmSocket;
private
final
InputStream mmInStream;
private
final
OutputStream mmOutStream;
public
ConnectedThread(BluetoothSocket socket) {
mmSocket = socket;
InputStream tmpIn =
null
;
OutputStream tmpOut =
null
;
// Get the input and output streams, using temp objects because
// member streams are final
try
{
tmpIn = socket.getInputStream();
tmpOut = socket.getOutputStream();
}
catch
(IOException e) { }
mmInStream = tmpIn;
mmOutStream = tmpOut;
}
public
void
run() {
byte
[] buffer =
new
byte
[
1024
];
// buffer store for the stream
int
bytes;
// bytes returned from read()
// Keep listening to the InputStream until an exception occurs
while
(
true
) {
try
{
// Read from the InputStream
bytes = mmInStream.read(buffer);
// Send the obtained bytes to the UI Activity
mHandler.obtainMessage(MESSAGE_READ, bytes, -
1
, buffer)
.sendToTarget();
}
catch
(IOException e) {
break
;
}
}
}
/* Call this from the main Activity to send data to the remote device */
public void write(byte[] bytes) {
try {
mmOutStream.write(bytes);
} catch (IOException e) { }
}
/* Call this from the main Activity to shutdown the connection */
public
void
cancel() {
try
{
mmSocket.close();
}
catch
(IOException e) { }
}
}
|
转自: http://blog.csdn.net/pwei007/article/details/6015907
android平台蓝牙编程
Android平台支持蓝牙网络协议栈,实现蓝牙设备之间数据的无线传输。
本文档描述了怎样利用android平台提供的蓝牙API去实现蓝牙设备之间的通信,蓝牙设备之间的通信主要包括了四个步骤:设置蓝牙设备、寻找局域网内可能或者匹配的设备、连接设备和设备之间的数据传输。以下是建立蓝牙连接的所需要的一些基本类:
BluetoothAdapter类:代表了一个本地的蓝牙适配器。他是所有蓝牙交互的的入口点。利用它你可以发现其他蓝牙设备,查询绑定了的设备,使用已知的MAC地址实例化一个蓝牙设备和建立一个BluetoothServerSocket(作为服务器端)来监听来自其他设备的连接。
BluetoothDevice类:代表了一个远端的蓝牙设备,使用它请求远端蓝牙设备连接或者获取远端蓝牙设备的名称、地址、种类和绑定状态。(其信息是封装在bluetoothsocket中)。
Bluetoothsocket类:代表了一个蓝牙套接字的接口(类似于tcp中的套接字),他是应用程序通过输入、输出流与其他蓝牙设备通信的连接点。
Blueboothserversocket类:代表打开服务连接来监听可能到来的连接请求(属于server端),为了连接两个蓝牙设备必须有一个设备作为服务器打开一个服务套接字。当远端设备发起连接连接请求的时候,并且已经连接到了的时候,Blueboothserversocket类将会返回一个bluetoothsocket。
Bluetoothclass类:描述了一个蓝牙设备的一般特点和能力。他的只读属性集定义了设备的主、次设备类和一些相关服务。然而,他并没有准确的描述所有该设备所支持的蓝牙文件和服务,而是作为对设备种类来说的一个小小暗示。
必须确定你的设备支持蓝牙,并保证他可以用。如果你的设备支持蓝牙,将它使能。当然,有两种方法,一种是在你的系统设置里开启蓝牙,另外一中是在你的应用程序里启动蓝牙功能,第一种方法就不讲了,具体讲一个第二种方法:
首先通过调用静态方法getDefaultAdapter()获取蓝牙适配器bluetoothadapter,以后你就可以使用该对象了。如果返回为空,the story is over。
Eg:BluetoothAdapter mBluetoothAdapter=BluetoothAdapter.getDefaultAdapter();
if(mBluetoothAdapter==null){
// Device does not support Bluetooth
}
其次,调用isEnabled()来查询当前蓝牙设备的状态,如果返回为false,则表示蓝牙设备没有开启,接下来你需要封装一个ACTION_REQUEST_ENABLE请求到intent里面,调用startActivityForResult()方法使能蓝牙设备,例如:
if (!mBluetoothAdapter.isEnabled()){
Intent enableBtIntent= new Intent(BluetoothAdapter.ACTION_REQUEST_ENABLE);
startActivityForResult(enableBtIntent, REQUEST_ENABLE_BT);
}
至此,如不出意外,恭喜你的蓝牙设备已经开启了,接下来需要查找周边可能存在的蓝牙设备了。
查找设备:
使用bluetoothadapter类里的方法,你可以查找远端设备(不过蓝牙查找的范围好像是在十米以内吧)或者查询在你手机上已经匹配(或者说绑定)的其他手机了。当然需要确定对方蓝牙设备已经开启或者已经开启了“被发现使能“功能(对方设备是可以被发现的是你能够发起连接的前提条件)。如果该设备是可以被发现的,会反馈回来一些对方的设备信息,比如名字、MAC地址等,利用这些信息,你的设备就可以选择去向对方初始化一个连接。
如果你是第一次与该设备连接,那么一个配对的请求就会自动的显示给用户。当设备配对好之后,他的一些基本信息(主要是名字和MAC)被保存下来并可以使用蓝牙的API来读取。使用已知的MAC地址就可以对远端的蓝牙设备发起连接请求。
匹配好的设备和连接上的设备的不同点:匹配好只是说明对方设备发现了你的存在,并拥有一个共同的识别码,并且可以连接。连接上:表示当前设备共享一个RFCOMM信道并且两者之间可以交换数据。也就是是说蓝牙设备在建立RFCOMM信道之前,必须是已经配对好了的。
怎么查询匹配好的设备:
在建立连接之前你必须先查询配对好了的蓝牙设备集(你周围的蓝牙设备可能不止一个),以便你选取哪一个设备进行通信,例如你可以你可以查询所有配对的蓝牙设备,并使用一个数组适配器将其打印显示出来:
Set<BluetoothDevice> pairedDevices= mBluetoothAdapter.getBondedDevices();
// If there are paired devices
if (pairedDevices.size()> 0){
// Loop through paired devices
for(BluetoothDevice device: pairedDevices){
// Add the name and address to an array adapter to show in a ListView
mArrayAdapter.add(device.getName()+ "/n" + device.getAddress());
}
建立一个蓝牙连接只需要MAC地址就已经足够了。
扫描设备:
扫描设备,只需要简单的调用startDiscovery()方法,这个扫描的过程大概持续是12秒,应用程序为了ACTION_FOUND动作需要注册一个BroadcastReceiver来接受设备扫描到的信息。对于每一个设备,系统都会广播ACTION_FOUND动作。例如:
// Create a BroadcastReceiver for ACTION_FOUND
private final BroadcastReceiver mReceiver = new BroadcastReceiver(){
publicvoid onReceive(Context context,Intent intent){
String action= intent.getAction();
// When discovery finds a device
if(BluetoothDevice.ACTION_FOUND.equals(action)){
// Get the BluetoothDevice object from the Intent
BluetoothDevice device= intent.getParcelableExtra(BluetoothDevice.EXTRA_DEVICE);
// Add the name and address to an array adapter to show in a ListView
mArrayAdapter.add(device.getName()+ "/n" + device.getAddress());
}
}
};
// Register the BroadcastReceiver
IntentFilter filter= new IntentFilter(BluetoothDevice.ACTION_FOUND);
registerReceiver(mReceiver, filter);// Don't forget to unregister during onDestroy
注意:扫描的过程是一个很耗费资源的过程,一旦你找到你需要的设备之后,在发起连接请求之前,确保你的程序调用cancelDiscovery()方法停止扫描。显然,如果你已经连接上一个设备,启动扫描会减少你的通信带宽。
使能被发现:Enabling discoverability
如果你想使你的设备能够被其他设备发现,将ACTION_REQUEST_DISCOVERABLE动作封装在intent中并调用startActivityForResult(Intent, int)方法就可以了。他将在不使你应用程序退出的情况下使你的设备能够被发现。缺省情况下的使能时间是120秒,当然你可以可以通过添加EXTRA_DISCOVERABLE_DURATION字段来改变使能时间(最大不超过300秒,这是出于对你设备上的信息安全考虑)。例如:
Intent discoverableIntent= new
Intent(BluetoothAdapter.ACTION_REQUEST_DISCOVERABLE);
discoverableIntent.putExtra(BluetoothAdapter.EXTRA_DISCOVERABLE_DURATION,300);
startActivity(discoverableIntent);
运行该段代码之后,系统会弹出一个对话框来提示你启动设备使能被发现(次过程中如果你的蓝牙功能没有开启,系统会帮你开启),并且如果你准备对该远端设备发现一个连接,你不需要开启使能设备被发现功能,以为该功能只是在你的应用程序作为服务器端的时候才需要。
连接设备:
在你的应用程序中,想建立两个蓝牙设备之间的连接,你必须实现客户端和服务器端的代码(因为任何一个设备都必须可以作为服务端或者客户端)。一个开启服务来监听,一个发起连接请求(使用服务器端设备的MAC地址)。当他们都拥有一个蓝牙套接字在同一RFECOMM信道上的时候,可以认为他们之间已经连接上了。服务端和客户端通过不同的方式或其他们的蓝牙套接字。当一个连接监听到的时候,服务端获取到蓝牙套接字。当客户可打开一个FRCOMM信道给服务器端的时候,客户端获取到蓝牙套接字。
注意:在此过程中,如果两个蓝牙设备还没有配对好的,android系统会通过一个通知或者对话框的形式来通知用户。RFCOMM连接请求会在用户选择之前阻塞。如下图:
当你想要连接两台设备时,一个必须作为服务端(通过持有一个打开的bluetoothserversocket),目的是监听外来连接请求,当监听到以后提供一个连接上的bluetoothsocket给客户端,当客户端从bluetoothserversocket得到bluetoothsocket以后就可以销毁bluetoothserversocket,除非你还想监听更多的连接请求。
建立服务套接字和监听连接的基本步骤:
首先通过调用listenUsingRfcommWithServiceRecord(String, UUID)方法来获取bluetoothserversocket对象,参数string代表了该服务的名称,UUID代表了和客户端连接的一个标识(128位格式的字符串ID,相当于pin码),UUID必须双方匹配才可以建立连接。其次调用accept()方法来监听可能到来的连接请求,当监听到以后,返回一个连接上的蓝牙套接字bluetoothsocket。最后,在监听到一个连接以后,需要调用close()方法来关闭监听程序。(一般蓝牙设备之间是点对点的传输)
注意:accept()方法不应该放在主Acitvity里面,因为他是一种阻塞调用(在没有监听到连接请求之间程序就一直停在那里)。解决方法是新建一个线程来管理。例如:
privateclass AcceptThreadextends Thread{
privatefinal BluetoothServerSocket mmServerSocket;
publicAcceptThread(){
// Use a temporary object that is later assigned to mmServerSocket,
// because mmServerSocket is final
BluetoothServerSocket tmp= null;
try{
// MY_UUID is the app's UUID string, also used by the client code
tmp = mAdapter.listenUsingRfcommWithServiceRecord(NAME, MY_UUID);
}catch (IOException e){ }
mmServerSocket = tmp;
}
publicvoid run() {
BluetoothSocket socket= null;
// Keep listening until exception occurs or a socket is returned
while(true){
try{
socket = mmServerSocket.accept();
}catch (IOException e){
break;
}
// If a connection was accepted
if(socket != null) {
// Do work to manage the connection (in a separate thread)
manageConnectedSocket(socket);
mmServerSocket.close();
break;
}
}
}
/** Will cancel the listening socket, and cause the thread to finish */
publicvoid cancel(){
try{
mmServerSocket.close();
}catch (IOException e){ }
}
}
客户端的连接:
为了初始化一个与远端设备的连接,需要先获取代表该设备的一个bluetoothdevice对象。通过bluetoothdevice对象来获取bluetoothsocket并初始化连接:
具体步骤:
使用bluetoothdevice对象里的方法createRfcommSocketToServiceRecord(UUID)来获取bluetoothsocket。UUID就是匹配码。然后,调用connect()方法来。如果远端设备接收了该连接,他们将在通信过程中共享RFFCOMM信道,并且connect()方法返回。例如:
privateclass ConnectThreadextends Thread{
privatefinal BluetoothSocket mmSocket;
privatefinal BluetoothDevice mmDevice;
publicConnectThread(BluetoothDevice device){
// Use a temporary object that is later assigned to mmSocket,
// because mmSocket is final
BluetoothSocket tmp= null;
mmDevice = device;
// Get a BluetoothSocket to connect with the given BluetoothDevice
try{
// MY_UUID is the app's UUID string, also used by the server code
tmp = device.createRfcommSocketToServiceRecord(MY_UUID);
}catch (IOException e){ }
mmSocket = tmp;
}
publicvoid run() {
// Cancel discovery because it will slow down the connection
mAdapter.cancelDiscovery();
try{
// Connect the device through the socket. This will block
// until it succeeds or throws an exception
mmSocket.connect();
}catch (IOException connectException){
// Unable to connect; close the socket and get out
try{
mmSocket.close();
}catch (IOException closeException){ }
return;
}
// Do work to manage the connection (in a separate thread)
manageConnectedSocket(mmSocket);
}
/** Will cancel an in-progress connection, and close the socket */
publicvoid cancel(){
try{
mmSocket.close();
}catch (IOException e){ }
}
注意:conncet()方法也是阻塞调用,一般建立一个独立的线程中来调用该方法。在设备discover过程中不应该发起连接connect(),这样会明显减慢速度以至于连接失败。且数据传输完成只有调用close()方法来关闭连接,这样可以节省系统内部资源。
管理连接(主要涉及数据的传输):
当设备连接上以后,每个设备都拥有各自的bluetoothsocket。现在你就可以实现设备之间数据的共享了。
1. 首先通过调用getInputStream()和getOutputStream()方法来获取输入输出流。然后通过调用read(byte[])和write(byte[]).方法来读取或者写数据。
2. 实现细节:以为读取和写操作都是阻塞调用,需要建立一个专用现成来管理。
3. private class ConnectedThread extends Thread {
privatefinal BluetoothSocket mmSocket;
privatefinal InputStream mmInStream;
privatefinal OutputStream mmOutStream;
publicConnectedThread(BluetoothSocket socket){
mmSocket = socket;
InputStream tmpIn= null;
OutputStream tmpOut= null;
// Get the input and output streams, using temp objects because
// member streams are final
try{
tmpIn = socket.getInputStream();
tmpOut = socket.getOutputStream();
}catch (IOException e){ }
mmInStream = tmpIn;
mmOutStream = tmpOut;
}
publicvoid run() {
byte[] buffer= new byte[1024]; // buffer store for the stream
int bytes;// bytes returned from read()
// Keep listening to the InputStream until an exception occurs
while(true){
try{
// Read from the InputStream
bytes = mmInStream.read(buffer);
// Send the obtained bytes to the UI Activity
mHandler.obtainMessage(MESSAGE_READ, bytes,-1, buffer)
.sendToTarget();
}catch (IOException e){
break;
}
}
}
/* Call this from the main Activity to send data to the remote device */
publicvoid write(byte[] bytes){
try{
mmOutStream.write(bytes);
}catch (IOException e){ }
}
/* Call this from the main Activity to shutdown the connection */
publicvoid cancel(){
try{
mmSocket.close();
}catch (IOException e){ }
}
}
Android手机蓝牙实现多人即时聊天
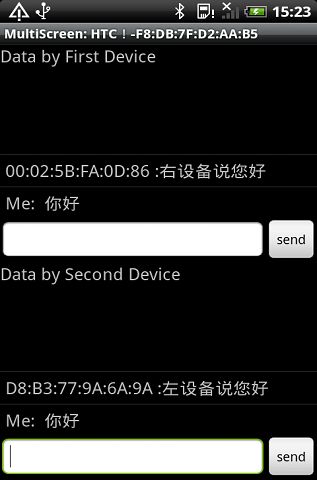
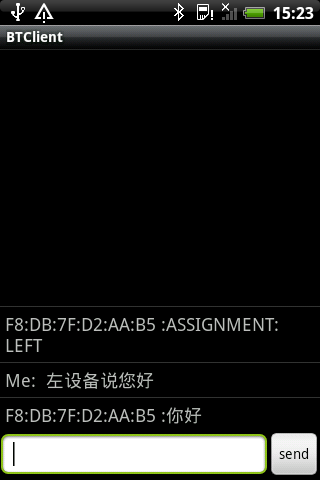
Android手机蓝牙实现多人聊天,基本原理是一台手机蓝牙作为服务器,其他手机蓝牙作为客户端。客户端与服务器配对好后,服务器分别建立连接,实现通信。
服务器最多能实现一对七个客户端。目前我实现了一对二的即时聊天。
http://niweiwei.iteye.com/blog/1013013
首先看下效果图:
服务器端:
客户端:
服务器手机型号:htc G12
客户端手机型号:左设备:htc G13;右设备:天语W606
*************************************************************************************************************************************
什么是蓝牙?
蓝牙,是一种支持设备短距离通信(一般10m内)的无线电技术。能在包括移动电话、PDA、无线耳机、笔记本电脑、相关外设等众多设备之间进行无线信息交换。利用“蓝牙”技术,能够有效地简化移动通信终端设备之间的通信,也能够成功地简化设备与Internet之间的通信,从而数据传输变得更加迅速高效,为无线通信拓宽道路。蓝牙采用分散式网络结构以及快跳频和短包技术,支持点对点及点对多点通信,工作在全球通用的2.4GHz ISM(即工业、科学、医学)频段。其数据速率为1Mbps。采用时分双工传输方案实现全双工传输。
蓝牙这个名称来自于第十世纪的一位丹麦国王 Harald Blatand , Blatand 在英文里的意思可以被解释为 Bluetooth( 蓝牙 )。因为国王喜欢吃蓝梅,牙龈每天都是蓝色的所以叫蓝牙。现取其“统一”的含义,用来命名意在统一无线局域网通讯标准的蓝牙技术。
蓝牙起源
蓝牙的创始人是瑞典爱立信公司,爱立信早在1994年就已进行研发。1997年,爱立信与其他设备生产商联系,并激发了他们对该项技术的浓厚兴趣。 1998年2月,5个跨国大公司,包括爱立信、诺基亚、IBM、东芝及Intel组成了一个特殊兴趣小组(SIG),他们共同的目标是建立一个全球性的小范围无线通信技术,即现在的蓝牙。
而蓝牙这个标志的设计:它取自 Harald Bluetooth 名字中的「H」和「B」两 个字母,用古北欧字母来表示,将这两者结合起来,就成为了蓝牙的 logo(见图)。
谈谈几个月以来开发android蓝牙4.0 BLE低功耗应用的感受
android的就蛋痛了,各个厂商的都定制成不一样的,各个系统版本上也有差异,兼容性很难保证,屏幕大小也差别非常大,开发广泛使用的应用在兼容性上就浪费了很多精力,而需要根据各个厂商提供的不同sdk开发的应用就只能适应某一类手机了,不同厂商的基本上都不兼容得重新开发了。
另外iPhone手机的蓝牙是不能够和android手机的蓝牙通信的,而且iPhone除了蓝牙4.0以外其他版本的蓝牙外设需要通过苹果的认证才能使用的,除非大厂商大批量生产否则不可能通过认证的。所以很多小公司,解决方案的公司做iPhone的应用只能做蓝牙4.0的,android的则没有这个限制。
另外当初就搜索到健康类的应用有人做出产品的 但不是基于蓝牙4.0低功耗的 还是用蓝牙2.1的spp协议来做的,蓝牙2.1或者3.0的耗电是个比较大的问题,一些小外设,需要用纽扣电池的应用就无法真正使用,对一些创意产品如果需要经常换电池或充电对用户体验都会大打折扣,成本也会大大提高。
相对wifi和zigbee无线方案,蓝牙和无线射频模块nRF24l01成本会低很多,wifi的好处是可以比较方便实现远程控制,距离比较远,信号也相对比较稳定。
补充内容:
经过不断努力终于可以让三星的支持BLE了,HTC1X,moto这几个主流蓝牙4.0的android都可以开发了,但估计以后只会先开发三星销量大的了,不同厂商底层差别太大了。
ios6.0的问题也解决了,解决办法暂时保密。 三星的解决办法之前在博客里公开过一段时间现在公司也要设为保密了。
另外ios6.0可以把iPhone手机当从设备了,可以两台iPhone通过蓝牙通信传数据了,有点类似spp协议,但android的蓝牙4.0的没有看到相关的api。
现在LG出的google nexus 4 也支持ble蓝牙4.0了,但目前也没有对应的api和sdk ,小米2也支持BLE 蓝牙4.0了,由于小米的rom是开源的研究起来估计轻松点,只是用户量太小的话就没必要花精力专门搞了。
ble的发展变化比较快,之前收藏的很多网址现在都访问不了了,更新或者作废了
-------------------------------------------------------------------------
补充内容2:
http://processors.wiki.ti.com/index.php/Category:BluetoothLE
这个是TI的wiki上的文章,上面有moto和HTC的例子程序的,但支持不全面,之前的描述是
MotoRAZRAndroidBLEDemo Obsolete. Updated Motorola BLE SDK with new API is not compatible.
HTC1X BLE API - Complete BLE API for HTC1X (European version only!) NEW!
现在有变成下面的了
MotoRAZRAndroidBLEDemo Obsolete. Updated Motorola BLE SDK with new API is not compatible.
HTC1X BLE API - Complete BLE API for HTC1X (European version only!) Obsolete. Updated Android SDK is not 100% compatible.
三星4.0.4可以搜索到ble设备,但连接有问题,需要升级到android4.1.1以后才行
nordic 发布了两个版本的nRF的app在google play上的(心率计和防丢器在一个应用里),一个摩托罗拉的,一个三星gs3的,可以下载了反编译参考下。
请不要问我怎么下载apk、怎么反编译和怎么用这个的,直接下载连接不是nordic的产品不一定能成功,我自己的xt910和gs3手机连接自己公司开发的csr1000做的蓝牙4.0的产品就都没成功过,听说TI的可以直接连接上,但也读不到数据。
但由于他没有混淆,写法还是值得参考的。给出Samsung Galaxy S3 and Samsung Note 2 app的连接地址,再多的细节就不要问我了:
https://play.google.com/store/apps/details?id=com.nordic.nordicbleapp&feature=search_result#?t=W251bGwsMSwyLDEsImNvbS5ub3JkaWMubm9yZGljYmxlYXBwIl0.
The nRF Utility App is a tool to demonstrate Bluetooth Smart connection to Samsung Galaxy S3. The App enables you to connect to different Bluetooth Smart accessories such as wireless heart rate monitors and proximity tags. This app complements Nordic Semiconductor’s nRF8000 and nRF518 Series Bluetooth® Smart solutions, compatible with Bluetooth v4.0.
Bluetooth® Smart support for:
- Heart rate monitor
- Proximity tag
Note:
Samsung Galaxy S3 and Samsung Note 2 are currently supported handsets.
Miminum Supported Android Version is Jelly Bean
摩托罗拉现在能访问的心率计sdk网址:
http://www.motorola.com/sites/motodev/library/bluetooth_apis.html
------------------------------------------------------------------------------
Open Bluetooth Low Energy API
http://android-btle.github.com/framework/
这个是博通的开源的api 需要root权限才能用的,用户需要像精简版rom增加google maps的add-on那样增加相关文件到手机系统里面后才能用,除了需要root外对用户要求也比较高。
最近发现三星 Galaxy S3 4.1.1底层ble api的问题也很多,蓝牙硬件很不稳定,连接失败后用系统设置里面关闭开启蓝牙都经常会导致手机重启,用代码延迟重启蓝牙几乎都是导致手机重启的,这种情况在连接异常后让人措手无策,需要用各种延时处理来避免异常和手机重启也导致了自动连接延时缓慢也很无奈。摩托罗拉的虽然问题多但用TI的蓝牙硬件倒还稳定些,可以用代码重启蓝牙来解决各种异常。另外蓝牙硬件也还不成熟,比如用csr1.3 1.4和csr2.0 sdk开发出来的产品就不一样,1.3的摩托罗拉可以连接,1.4的摩托罗拉配对不上,2.0的三星的可以用,2.0之前的都无法配对上,用到TI和nordic的芯片上可能又不一样,csr的产品可以用的app换到其他芯片估计也用不了。总体感觉现在搞android的ble开发还不是时候,浪费精力时间和生命,有机会还是先搞ios版本的或者搞其他的吧,等google统一了ble底层api再搞省点力气。
手机蓝牙各类服务对应的UUID
原文链接: http://www.douban.com/group/topic/20009323/
ServiceDiscoveryServerServiceClassID_UUID = '{00001000-0000-1000-8000-00805F9B34FB}'
BrowseGroupDescriptorServiceClassID_UUID = '{00001001-0000-1000-8000-00805F9B34FB}'
PublicBrowseGroupServiceClass_UUID = '{00001002-0000-1000-8000-00805F9B34FB}'
#蓝牙串口服务
SerialPortServiceClass_UUID = '{00001101-0000-1000-8000-00805F9B34FB}'
LANAccessUsingPPPServiceClass_UUID = '{00001102-0000-1000-8000-00805F9B34FB}'
#拨号网络服务
DialupNetworkingServiceClass_UUID = '{00001103-0000-1000-8000-00805F9B34FB}'
#信息同步服务
IrMCSyncServiceClass_UUID = '{00001104-0000-1000-8000-00805F9B34FB}'
SDP_OBEXObjectPushServiceClass_UUID = '{00001105-0000-1000-8000-00805F9B34FB}'
#文件传输服务
OBEXFileTransferServiceClass_UUID = '{00001106-0000-1000-8000-00805F9B34FB}'
IrMCSyncCommandServiceClass_UUID = '{00001107-0000-1000-8000-00805F9B34FB}'
SDP_HeadsetServiceClass_UUID = '{00001108-0000-1000-8000-00805F9B34FB}'
CordlessTelephonyServiceClass_UUID = '{00001109-0000-1000-8000-00805F9B34FB}'
SDP_AudioSourceServiceClass_UUID = '{0000110A-0000-1000-8000-00805F9B34FB}'
SDP_AudioSinkServiceClass_UUID = '{0000110B-0000-1000-8000-00805F9B34FB}'
SDP_AVRemoteControlTargetServiceClass_UUID = '{0000110C-0000-1000-8000-00805F9B34FB}'
SDP_AdvancedAudioDistributionServiceClass_UUID = '{0000110D-0000-1000-8000-00805F9B34FB}'
SDP_AVRemoteControlServiceClass_UUID = '{0000110E-0000-1000-8000-00805F9B34FB}'
VideoConferencingServiceClass_UUID = '{0000110F-0000-1000-8000-00805F9B34FB}'
IntercomServiceClass_UUID = '{00001110-0000-1000-8000-00805F9B34FB}'
#蓝牙传真服务
FaxServiceClass_UUID = '{00001111-0000-1000-8000-00805F9B34FB}'
HeadsetAudioGatewayServiceClass_UUID = '{00001112-0000-1000-8000-00805F9B34FB}'
WAPServiceClass_UUID = '{00001113-0000-1000-8000-00805F9B34FB}'
WAPClientServiceClass_UUID = '{00001114-0000-1000-8000-00805F9B34FB}'
#个人局域网服务
PANUServiceClass_UUID = '{00001115-0000-1000-8000-00805F9B34FB}'
#个人局域网服务
NAPServiceClass_UUID = '{00001116-0000-1000-8000-00805F9B34FB}'
#个人局域网服务
GNServiceClass_UUID = '{00001117-0000-1000-8000-00805F9B34FB}'
DirectPrintingServiceClass_UUID = '{00001118-0000-1000-8000-00805F9B34FB}'
ReferencePrintingServiceClass_UUID = '{00001119-0000-1000-8000-00805F9B34FB}'
ImagingServiceClass_UUID = '{0000111A-0000-1000-8000-00805F9B34FB}'
ImagingResponderServiceClass_UUID = '{0000111B-0000-1000-8000-00805F9B34FB}'
ImagingAutomaticArchiveServiceClass_UUID = '{0000111C-0000-1000-8000-00805F9B34FB}'
ImagingReferenceObjectsServiceClass_UUID = '{0000111D-0000-1000-8000-00805F9B34FB}'
SDP_HandsfreeServiceClass_UUID = '{0000111E-0000-1000-8000-00805F9B34FB}'
HandsfreeAudioGatewayServiceClass_UUID = '{0000111F-0000-1000-8000-00805F9B34FB}'
DirectPrintingReferenceObjectsServiceClass_UUID = '{00001120-0000-1000-8000-00805F9B34FB}'
ReflectedUIServiceClass_UUID = '{00001121-0000-1000-8000-00805F9B34FB}'
BasicPringingServiceClass_UUID = '{00001122-0000-1000-8000-00805F9B34FB}'
PrintingStatusServiceClass_UUID = '{00001123-0000-1000-8000-00805F9B34FB}'
#人机输入服务
HumanInterfaceDeviceServiceClass_UUID = '{00001124-0000-1000-8000-00805F9B34FB}'
HardcopyCableReplacementServiceClass_UUID = '{00001125-0000-1000-8000-00805F9B34FB}'
#蓝牙打印服务
HCRPrintServiceClass_UUID = '{00001126-0000-1000-8000-00805F9B34FB}'
HCRScanServiceClass_UUID = '{00001127-0000-1000-8000-00805F9B34FB}'
CommonISDNAccessServiceClass_UUID = '{00001128-0000-1000-8000-00805F9B34FB}'
VideoConferencingGWServiceClass_UUID = '{00001129-0000-1000-8000-00805F9B34FB}'
UDIMTServiceClass_UUID = '{0000112A-0000-1000-8000-00805F9B34FB}'
UDITAServiceClass_UUID = '{0000112B-0000-1000-8000-00805F9B34FB}'
AudioVideoServiceClass_UUID = '{0000112C-0000-1000-8000-00805F9B34FB}'
SIMAccessServiceClass_UUID = '{0000112D-0000-1000-8000-00805F9B34FB}'
PnPInformationServiceClass_UUID = '{00001200-0000-1000-8000-00805F9B34FB}'
GenericNetworkingServiceClass_UUID = '{00001201-0000-1000-8000-00805F9B34FB}'
GenericFileTransferServiceClass_UUID = '{00001202-0000-1000-8000-00805F9B34FB}'
GenericAudioServiceClass_UUID = '{00001203-0000-1000-8000-00805F9B34FB}'
GenericTelephonyServiceClass_UUID = '{00001204-0000-1000-8000-00805F9B34FB}'


