11.Spring + Hibernate + JPA
1.配置JPA
在类路径(src)下,创建一个“META-INF”文件夹,再建立一个persistence.xml:
<?xml version="1.0" encoding="UTF-8"?>
<persistence xmlns="http://java.sun.com/xml/ns/persistence"
             xmlns:xsi="http://www.w3.org/2001/XMLSchema-instance"
             xsi:schemaLocation="http://java.sun.com/xml/ns/persistence
                                http://java.sun.com/xml/ns/persistence/persistence_1_0.xsd"
             version="1.0">
    <persistence-unit name="ceshi_1" transaction-type="RESOURCE_LOCAL">
        <properties>
            <property name="hibernate.dialect" value="org.hibernate.dialect.MySQL5Dialect"/>
            <property name="hibernate.connection.driver_class" value="org.gjt.mm.mysql.Driver"/>
            <property name="hibernate.connection.username" value="root"/>
            <property name="hibernate.connection.password" value="root"/>
            <property name="hibernate.connection.url"
                      value="jdbc:mysql://localhost:3306/ceshi_1?useUnicode=true&characterEncoding=UTF-8"/>
            <property name="hibernate.max_fetch_depth" value="3"/>
            <property name="hibernate.hbm2ddl.auto" value="update"/>
        </properties>
    </persistence-unit>
</persistence>
该文件就代替了( JDBC -> Hibernate二级缓存 )-> Spring 的配置了。
这里就 JPA -> Spring 代替了上述配置。
然后在beans.xml修改:
<?xml version="1.0" encoding="UTF-8"?>
<beans
        xmlns="http://www.springframework.org/schema/beans"
        xmlns:xsi="http://www.w3.org/2001/XMLSchema-instance"
        xmlns:context="http://www.springframework.org/schema/context"
        xmlns:aop="http://www.springframework.org/schema/aop"
        xmlns:tx="http://www.springframework.org/schema/tx"
        xsi:schemaLocation="http://www.springframework.org/schema/beans
           http://www.springframework.org/schema/beans/spring-beans-2.5.xsd
           http://www.springframework.org/schema/context
           http://www.springframework.org/schema/context/spring-context-2.5.xsd
           http://www.springframework.org/schema/aop
           http://www.springframework.org/schema/aop/spring-aop-2.5.xsd
           http://www.springframework.org/schema/tx
           http://www.springframework.org/schema/tx/spring-tx-2.5.xsd">

    <!-- 配置自动扫描bean 包含注解 -->
    <context:component-scan base-package="com.zyy.service"></context:component-scan>

    <!-- 在spring中配置EntityManagerFactory -->
    <bean id="entityManagerFactory" class="org.springframework.orm.jpa.LocalEntityManagerFactoryBean">
        <property name="persistenceUnitName" value="ceshi_1"/>
    </bean>


    <!-- 配置JPA事务 -->
    <bean id="txManager" class="org.springframework.orm.jpa.JpaTransactionManager">
        <property name="entityManagerFactory" ref="entityManagerFactory"/>
    </bean>

    <!-- 打开事务注解的支持 -->
    <tx:annotation-driven transaction-manager="txManager"/>


</beans>
以上:
1.spring中配置EntityManagerFactory
2.配置JPA事务
3.打开事务注解的支持
4.配置自动扫描bean 包含注解
同样修改web.xml文件:
<?xml version="1.0" encoding="UTF-8"?>
<web-app xmlns:xsi="http://www.w3.org/2001/XMLSchema-instance" xmlns="http://java.sun.com/xml/ns/javaee"
         xsi:schemaLocation="http://java.sun.com/xml/ns/javaee http://java.sun.com/xml/ns/javaee/web-app_2_5.xsd
        http://java.sun.com/xml/ns/javaee/jsp " version="2.5">

    <!-- 指定spring的配置文件,默认从web根目录寻找配置文件,我们可以通过spring提供的classpath:前缀指定从类路径下寻找 -->
    <context-param>
        <param-name>contextConfigLocation</param-name>
        <param-value>classpath:beans.xml</param-value>
    </context-param>


    <!-- 对Spring容器进行实例化 -->
    <listener>
        <listener-class>org.springframework.web.context.ContextLoaderListener</listener-class>
    </listener>

    <!-- 使用spring解决struts1.3乱码问题 -->

    <filter>
        <filter-name>encoding</filter-name>
        <filter-class>org.springframework.web.filter.CharacterEncodingFilter</filter-class>
        <init-param>
            <param-name>encoding</param-name>
            <param-value>UTF-8</param-value>
        </init-param>
    </filter>
    <filter-mapping>
        <filter-name>encoding</filter-name>
        <url-pattern>/*</url-pattern>
    </filter-mapping>

    <!-- 配置struts -->
    <servlet>
        <servlet-name>struts</servlet-name>
        <servlet-class>org.apache.struts.action.ActionServlet</servlet-class>
        <init-param>
            <param-name>config</param-name>
            <param-value>/WEB-INF/struts-config.xml</param-value>
        </init-param>
        <load-on-startup>0</load-on-startup>
    </servlet>
    <servlet-mapping>
        <servlet-name>struts</servlet-name>
        <url-pattern>*.do</url-pattern>
    </servlet-mapping>

    <!-- 使用spring解决JPA因EntityManager关闭导致的延迟加载例外问题 -->
    <filter>
        <filter-name>Spring OpenEntityManagerInViewFilter</filter-name>
        <filter-class>org.springframework.orm.jpa.support.OpenEntityManagerInViewFilter</filter-class>
    </filter>
    <filter-mapping>
        <filter-name>Spring OpenEntityManagerInViewFilter</filter-name>
        <url-pattern>/*</url-pattern>
    </filter-mapping>

</web-app>
新添加了 JPA的配置 和 spring解决JPA因EntityManager关闭导致的延迟加载例外问题。
创建一个实体类(表)Person:
package com.zyy.bean;

import javax.persistence.Column;
import javax.persistence.Entity;
import javax.persistence.GeneratedValue;
import javax.persistence.Id;
import java.io.Serializable;

/**
 * Created by CaMnter on 2014/8/26.
 */

/**
 * JPA注解 标注 @Entity 指明这个类是一个实体类
 * 说明该类会生成表
 */
@Entity
public class Person implements Serializable{

    private Integer id ;

    private String name ;

    public Person() {
    }

    public Person(String name) {
        this.name = name;
    }

    /**
     * JPA注解 标注 @Id 说明属性为Id
     * JPA注解 标注 @GeneratedValue 说明属性为主键
     * JPA注解 标注 @GeneratedValue 主键生成策略。
     *
     * @GeneratedValue(strategy=GenerationType.UUID)
     * 表示 主键 生成为 16位随机乱码
     *
     * GeneratorType.AUTO表示实体标识由 OpenJPA 容器自动生成,
     * 这也是 Strategy 属性的默认值。
     * 自动的话 和hibernate的native生成策略相似
     */
    @Id
    @GeneratedValue
    public Integer getId() {
        return id;
    }

    public void setId(Integer id) {
        this.id = id;
    }

    /**
     * @Column(length = 10,nullable = false) 指定
     *
     * 长度为10 不为空
     *
     * @return
     */
    @Column(length = 10,nullable = false)
    public String getName() {
        return name;
    }

    public void setName(String name) {
        this.name = name;
    }

    @Override
    public boolean equals(Object o) {
        if (this == o) return true;
        if (o == null || getClass() != o.getClass()) return false;

        Person person = (Person) o;

        if (!id.equals(person.id)) return false;
        if (!name.equals(person.name)) return false;

        return true;
    }

    @Override
    public int hashCode() {
        int result = id.hashCode();
        result = 31 * result + name.hashCode();
        return result;
    }
}
关于实体类(表)中的的JPA注解的解释和说明都写到了/**/注释里。
数据库操作的PersonServiceBean:
package com.zyy.service.impl;

import com.zyy.bean.Person;
import com.zyy.service.PersonService;
import org.springframework.stereotype.Service;
import org.springframework.transaction.annotation.Propagation;
import org.springframework.transaction.annotation.Transactional;

import javax.persistence.EntityManager;
import javax.persistence.PersistenceContext;
import java.util.List;

/**
 * Created by CaMnter on 2014/8/22.
 */


@Service("personService")
@Transactional
public class PersonServiceBean implements PersonService {

    /**
     * JPA提供的 @PersistenceContext 注入EntityManager
     * <p/>
     * Spring中也有配置了
     * <p/>
     * org.springframework.orm.jpa.LocalEntityManagerFactoryBean
     * <p/>
     * 中得到 EntityManager 对象
     */
    @PersistenceContext
    EntityManager entityManager;

    public void save(Person peroson) {

        entityManager.persist(peroson);

    }

    public void update(Person peroson) {

        entityManager.merge(peroson);

    }

    public void delete(Integer personId) {

        entityManager.remove(entityManager.getReference(Person.class, personId));

    }

    @Override
    @Transactional(propagation = Propagation.NOT_SUPPORTED, readOnly = true)
    public Person getPerson(Integer personId) {

        return entityManager.find(Person.class, personId);

    }

    @Override
    @SuppressWarnings("unchecked")
    @Transactional(propagation = Propagation.NOT_SUPPORTED, readOnly = true)
    public List<Person> getPersons() {

        return entityManager.createQuery("select o from Person o").getResultList();

    }
}
这里采用了 JPA 提供的 entityManager。当然,这需要Spring对JPA的支持配置,所以
在beans.xml中配置了JPA。
从上面代码可以看出 使用 JPA 代替 Hibernate的 SessionFactory.getCurrentSession()
查询方便得多了。
方便程度: JPA 的 entityManager > SessionFactory.getCurrentSession()
> JDBC 的 JdbcTemplate
Struts1.x配置文件修剪如下:
<?xml version="1.0" encoding="UTF-8" ?>

<!DOCTYPE struts-config PUBLIC
        "-//Apache Software Foundation//DTD Struts Configuration 1.3//EN"
        "http://jakarta.apache.org/struts/dtds/struts-config_1_3.dtd">


<struts-config>


    <form-beans>


    </form-beans>

    <global-exceptions>
    </global-exceptions>

    <global-forwards>
    </global-forwards>


    <action-mappings>

        <action path="/persons" type="com.zyy.service.action.PersonAction">

            <forward name="list" path="/WEB-INF/jsp/personlist.jsp"></forward>

        </action>

    </action-mappings>


    <!--在struts配置文件中添加进spring的请求控制器
    该请法语控制器会先根据action的path属性值到spring
    容器中寻找跟该属性值同名的bean。如果寻找到即使用该bean处理用户请求
    -->
    <controller>
        <set-property property="processorClass" value="org.springframework.web.struts.DelegatingRequestProcessor"/>
    </controller>


    <!-- Struts资源文件配置 -->
    <!--<message-resources parameter="resource.MessageResources"/>-->


</struts-config>
这是编写 配置文件需要的PersonAction:
package com.zyy.service.action;

import com.zyy.service.PersonService;
import org.apache.struts.action.Action;
import org.apache.struts.action.ActionForm;
import org.apache.struts.action.ActionForward;
import org.apache.struts.action.ActionMapping;
import org.springframework.beans.factory.annotation.Autowired;
import org.springframework.beans.factory.annotation.Qualifier;
import org.springframework.context.annotation.Scope;
import org.springframework.stereotype.Service;

import javax.servlet.http.HttpServletRequest;
import javax.servlet.http.HttpServletResponse;

/**
 * Created by CaMnter on 2014/8/26.
 */

/*
 * Struts1.x 系列 不是线程安全的 因为每个请求都由同一个Action处理
 *
 * 可以利用Spring bean 的属性scope=“prototype” 每次取得bean都是新的bean
 *
 * 当Struts 的Action 交给Spring处理的时候 可以采用bean 的属性scope=“prototype” 实现每个请求对应不同的Action
 *
 * @Scope("prototype")
 *
 */

@Service("/persons")
@Scope("prototype")
public class PersonAction extends Action {

    @Autowired
    @Qualifier("personService")
    private PersonService personService;


    public ActionForward execute(ActionMapping mapping, ActionForm form, HttpServletRequest request, HttpServletResponse response) throws Exception {

        request.setAttribute("persons", this.personService.getPersons());

        return mapping.findForward("list");
    }
}
同样,这个Action交给Spring管理的时候,注解命名@Service("/persons")必须和
<action path="/persons" type="com.zyy.service.action.PersonAction">
中的path对应一致。@Scope("prototype"):Struts1.x 系列 不是线程安全的 因为
每个请求都由同一个Action处理,可以利用Spring bean 的属性scope=“prototype”
每次取得bean都是新的bean,当Struts 的Action 交给Spring处理的时候 可以采用
bean 的属性scope=“prototype” 实现每个请求对应不同的Action
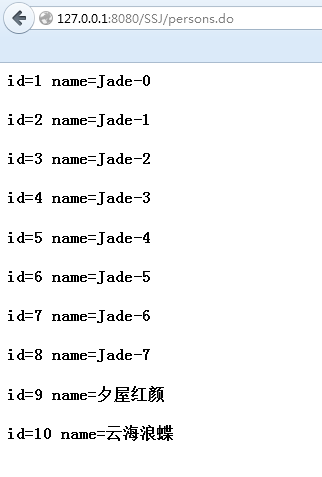
二.测试
输入:http://127.0.0.1:8080/SSJ/persons.do
