cocos2d-x学习笔记(23)--地图的使用3--CCTMXLayer
cocos2d-x学习笔记(23)--地图的使用3--CCTMXLayer
本文出自http://www.wenbanana.com稻草人博客,欢迎访问!
注意:从cocos2d-x学习笔记(21)开始我使用的cocos2d-x版本是2.0.2,而之前一直使用的版本是1.0。2.0.2版本修复了很多的bug,(其中包括CCTMXLayer使用addChild函数时出问题的bug)。由于两版本之间有一些差异,这可能会造成大家阅读上的一些不便,在这里我向各位道歉,希望大家能多留意一下不同点,之后我会对之前的文章进行修改,批注上2.0.2版本的使用方法...........................
在cocos2d-x学习笔记(15)--地图的使用1(TMX)这一节中,我主要讲了tmx地主的基本使用方法:包括tiled工具的使用、载入tmx地图和获取地图中的objectGroup。后来我实际地尝试做一些小游戏,发觉这些知识还远远不够,很有必要对地图的使用进行更多的学习,于是就打算写多几篇关于地图使用的的文章来介绍更多tmx地图的用法,希望这对大家之后开发游戏时有帮助。现在,就开始切入主题,不过在开始前,建议大家先可以看看《cocos2d-x学习笔记(22)--地图的使用2(TMX) --Z-Order、AnchorPoin、抗锯齿》这一节的内容,先对一些概念进行了解。
step1:首先创建一个cocos2d-win32工程,并命名为MapTest2。
step2:在HelloWorldScene.h中添加一个类:
class MapTest2:public CCLayer
{
protected:
	CCSprite* m_player;
public:
	MapTest2();
	~MapTest2();
	void repositionSprite(float dt);
};
在HelloWorldScene.cpp中添加下面代码:
/************************************************************************/
/* MapTest2                                                                     */
/************************************************************************/
MapTest2::MapTest2()
{
	CCTMXTiledMap* map = CCTMXTiledMap::create("map.tmx");
	addChild(map, 0, kTagMap);
	CCSize s = map->getContentSize();
	CCSize winSize = CCDirector::sharedDirector()->getWinSize();
	map->setAnchorPoint(ccp(0.5, 0.5));
	//如果不设置AnchorPoint,那么map默认的AnchorPoint是(0, 0),即左下角,就不是我们想要的地图中心
	map->setPosition(ccp(winSize.width / 2, winSize.height / 2));

	m_player = CCSprite::create("player.png");

	map->addChild(m_player, map->getChildren()->count() );
	m_player->retain();
	map->reorderChild(m_player, 0);
	int mapWidth = map->getMapSize().width * map->getTileSize().width;
	int mapHeight = map->getMapSize().height * map->getTileSize().height;
	m_player->setPosition( ccp(mapWidth / 2, mapHeight / 2) );
	//由于m_player是添加在map中,那么setPosition是相对于map这一父坐标系,
	//所以我们设置ccp(mapWidth / 2, mapHeight / 2),而不是屏幕坐标系的中心
	map->reorderChild(m_player, 0);
	//设置精灵对象的Zorder值,让精灵穿梭在草丛中

	//CCArray* array = map->getChildren();
	//CCObject* object = NULL;
	// CCSpriteBatchNode* child = NULL;
	//CCARRAY_FOREACH(array, object)
	//{
	//	child = (CCSpriteBatchNode*)object;
	//	if(!child)
	//		return;
	//	child->getTexture()->setAntiAliasTexParameters();
	//}//设置抗锯齿,如果需要对地图进行放大或缩小时,就可以使用

	CCActionInterval* move = CCMoveBy::create(10, ccp(300,250));
	CCActionInterval* back = move->reverse();
	CCFiniteTimeAction* seq = CCSequence::create(move, back,NULL);
	m_player->runAction( CCRepeatForever::create((CCActionInterval*) seq) );
}

MapTest2::~MapTest2()
{
	m_player->release();
}
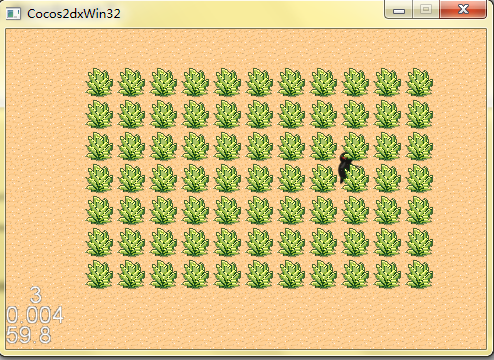
这时候,运行程序,就可以看到精灵在地图中穿梭的效果,显得有层次感些。
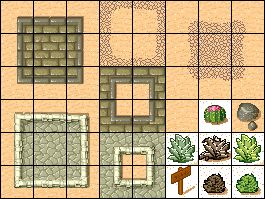
地图中空白的地方是我自己做的背景透明处理。在创建地图时,我创建了两个地图层,一个是ground层,用来摆设地表,另一个是grass层,用来摆设草。
// returns the delta position between the current location and the previous location in OpenGL coordinates
CCPoint CCTouch::getDelta() const
{
    return ccpSub(getLocation(), getPreviousLocation());
}
void MapTest2::registerWithTouchDispatcher()
{
	CCDirector* pDirector = CCDirector::sharedDirector();
	pDirector->getTouchDispatcher()->addTargetedDelegate(this, 0, true);
}
bool MapTest2::ccTouchBegan(CCTouch* touch, CCEvent* event)
{
	return true;
}

void MapTest2::ccTouchMoved(CCTouch *pTouch, CCEvent *pEvent)
{
	CCPoint diff = pTouch->getDelta();
	CCTMXTiledMap *map = (CCTMXTiledMap*)getChildByTag(kTagMap);
	CCPoint currentPos = map->getPosition();
	map->setPosition( ccpAdd(currentPos, diff) );
}
再次编译运行程序,这次就可以拖动地图,看到地图的全貌了。

在构造函数的尾部,我们添加 schedule(schedule_selector(MapTest2::update), 1.0f)函数,并在类中添加void update(float dt)成员函数。
void MapTest2::update(float dt)
{
	CCTMXTiledMap* map = (CCTMXTiledMap*)getChildByTag(kTagMap);
	CCTMXLayer* layer = map->layerNamed("grass");//获取图层

	CCPoint coordinate = ccp(10, 22);//这里是tmx地图中的坐标,一个tile的大小就是地图的基本单位
	//int flags;
	//unsigned int GID = layer->tileGIDAt(coordinate, (ccTMXTileFlags*)&flags);//第三个参数是ccTMXTileFlags指针类型
	//if( flags == kCCTMXTileVerticalFlag )
	//	flags &= ~kCCTMXTileVerticalFlag;
	//else
	//	flags |= kCCTMXTileVerticalFlag;
	//layer->setTileGID(GID ,coordinate, (ccTMXTileFlags)flags);

	CCSprite* sprite = layer->tileAt(coordinate);
	sprite->runAction(CCRotateBy::create(1,45));
}
让我们看看ccTMXTileFlags的定义:
typedef enum ccTMXTileFlags_ {
kCCTMXTileHorizontalFlag = 0x80000000,
kCCTMXTileVerticalFlag = 0x40000000,
kCCTMXTileDiagonalFlag = 0x20000000,
kCCFlipedAll = (kCCTMXTileHorizontalFlag|kCCTMXTileVerticalFlag|kCCTMXTileDiagonalFlag),
kCCFlippedMask = ~(kCCFlipedAll)
} ccTMXTileFlags;
unsigned int GID = layer->tileGIDAt(coordinate, (ccTMXTileFlags*)&flags); 就是将获取的coordinate坐标下的tile的ccTMXTileFlags常量值保存在flags中。
至于
if( flags == kCCTMXTileVerticalFlag )
flags &= ~kCCTMXTileVerticalFlag;
else
flags |= kCCTMXTileVerticalFlag;
flags &= ~kCCTMXTileVerticalFlag;
else
flags |= kCCTMXTileVerticalFlag;
这部分代码,我还没有弄懂其中的原理,如果有那位网友知道的话,希望指点指点,大家一起分享。
作为弥补,我们可以通过下面的代码实现相似的效果:
CCSprite* sprite = layer->tileAt(coordinate);
sprite->runAction(CCRotateBy::create(1,45));
sprite->runAction(CCRotateBy::create(1,45));
在tmx地图中,每一个tile其实就是一个CCSprite,我们都可以通过CCTMXLayer根据tile的坐标获取它的CCSprite,并对tile进行调整。
再次运行程序,拖动地图,可以发现有一个地方的栅栏在不停旋转。
再次运行程序,拖动地图,可以发现有一个地方的栅栏在不停旋转。
源代码地址:http://download.csdn.net/download/wen294299195/4563809


