spring集成cxf简单案例
一、spring集成cxf简单案例
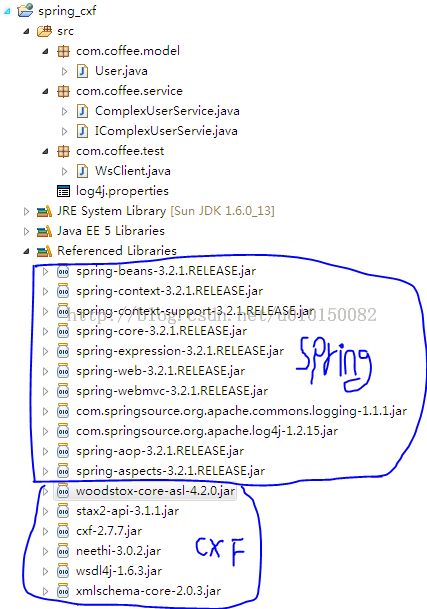
1、 查看该项目的一个基本构成如图所示( 这里用的是spring3.2.1与CXF2.7.7的集成)
2、定义webservice接口 以及实现服务接口类
package com.coffee.service;

import javax.jws.WebParam;
import javax.jws.WebService;
import javax.jws.soap.SOAPBinding;
import javax.jws.soap.SOAPBinding.Style;

import com.coffee.model.User;

@WebService
@SOAPBinding(style = Style.RPC)
public interface IComplexUserServie
{
	public User getUserByName(@WebParam(name = "name") String name);

	public void setUser(User user);
}
package com.coffee.service;

import javax.jws.WebService;
import javax.jws.soap.SOAPBinding;
import javax.jws.soap.SOAPBinding.Style;

import com.coffee.model.User;

@WebService
@SOAPBinding(style = Style.RPC)
public class ComplexUserService implements IComplexUserServie
{

	public User getUserByName(String name)
	{
		System.out.println("------------- getUserByName-------name : "+ name);
		return new User();
	}

	public void setUser(User user)
	{
		System.out.println("--------setUser-------name : "+ user.getName());
	}
}
3、发布webservice服务(applicationContext.xml)
<?xml version="1.0" encoding="UTF-8"?>
<beans xmlns="http://www.springframework.org/schema/beans"
	xmlns:xsi="http://www.w3.org/2001/XMLSchema-instance"
	xmlns:p="http://www.springframework.org/schema/p"
	xmlns:context="http://www.springframework.org/schema/context"
	xmlns:jaxws="http://cxf.apache.org/jaxws"
	xsi:schemaLocation="
         http://www.springframework.org/schema/beans
         http://www.springframework.org/schema/beans/spring-beans.xsd
         http://www.springframework.org/schema/context
         http://www.springframework.org/schema/context/spring-context.xsd
         http://cxf.apache.org/jaxws
         http://cxf.apache.org/schemas/jaxws.xsd">

    <!-- 配置CXF -->
    <import resource="classpath:META-INF/cxf/cxf.xml" />
    <import resource="classpath:META-INF/cxf/cxf-extension-soap.xml"  />
	<import resource="classpath:META-INF/cxf/cxf-servlet.xml" />

    <!-- 注意配置address的名称就是访问WebService的name,暴露服务接口-->
     <bean id = "csi" class="com.coffee.service.ComplexUserService"></bean>
    <jaxws:server id="userService" serviceClass="com.coffee.service.IComplexUserServie"
        address="/ws">
        <jaxws:serviceBean>
           <ref bean="csi"/>
        </jaxws:serviceBean>
    </jaxws:server>
</beans>
4、当然我们也需要将cxf配置到web.xml中
<?xml version="1.0" encoding="UTF-8"?>
<web-app version="2.5" xmlns="http://java.sun.com/xml/ns/javaee"
	xmlns:xsi="http://www.w3.org/2001/XMLSchema-instance"
	xsi:schemaLocation="http://java.sun.com/xml/ns/javaee
	http://java.sun.com/xml/ns/javaee/web-app_2_5.xsd">

	<!-- 加载Spring容器配置 -->
	<listener>
		<listener-class>org.springframework.web.context.ContextLoaderListener</listener-class>
	</listener>

	<!-- 防止内存泄露 -->
	<listener>
		<listener-class>org.springframework.web.util.IntrospectorCleanupListener</listener-class>
	</listener>

	<servlet>
		<servlet-name>CXFService</servlet-name>
		<servlet-class>org.apache.cxf.transport.servlet.CXFServlet</servlet-class>
		<load-on-startup>1</load-on-startup>
	</servlet>
	<servlet-mapping>
		<servlet-name>CXFService</servlet-name>
		<url-pattern>/service/*</url-pattern>
	</servlet-mapping>
</web-app>
完成以上步骤之后就可以启动Tomcat了
通过浏览器访问:http://localhost:8080/spring_cxf/service
5、编写测试客户端
package com.coffee.test;

import org.apache.cxf.jaxws.JaxWsProxyFactoryBean;

import com.coffee.model.User;
import com.coffee.service.IComplexUserServie;

public class WsClient
{
	public static void main(String[] args)
	{
		//调用WebService
		JaxWsProxyFactoryBean factory = new JaxWsProxyFactoryBean();

		factory.setServiceClass(IComplexUserServie.class);

		factory.setAddress("http://localhost:8080/spring_cxf/service/ws");

		IComplexUserServie service = (IComplexUserServie)factory.create();

		User user = service.getUserByName("zhangsan");

		user.setName("lisi");

		service.setUser(user);
	}
}
