Qt网络TCP
TCP即Transmission Control Protocol,传输控制协议。与UDP不同,它是面向连接和数据流的可靠传输协议。也就是说,它能使一台计算机上的数据无差错的发往网络上的其他计算机,所以当要传输大量数据时,我们选用TCP协议。
TCP协议的程序使用的是客户端/服务器模式,在Qt中提供了QTcpSocket类来编写客户端程序,使用QTcpServer类编写服务器端程序。我们在服务器端进行端口的监听,一旦发现客户端的连接请求,就会发出newConnection()信号,我们可以关联这个信号到我们自己的槽函数,进行数据的发送。而在客户端,一旦有数据到来就会发出readyRead()信号,我们可以关联此信号,进行数据的接收。其实,在程序中最难理解的地方就是程序的发送和接收了,为了让大家更好的理解,我们在这一节只是讲述一个传输简单的字符串的例子,在下一节再进行扩展,实现任意文件的传输。
tcpClient- private:
- QTcpSocket *tcpSocket;
- QString message; //存放从服务器接收到的字符串
- quint16 blockSize; //存放文件的大小信息
- QString str;
- private slots:
- void newConnect(); //连接服务器
- void readMessage(); //接收数
- void displayError(QAbstractSocket::SocketError); //显示错误
- Widget::Widget(QWidget *parent) :
- QWidget(parent),
- ui(new Ui::Widget)
- {
- ui->setupUi(this);
- tcpSocket = new QTcpSocket(this);
- connect(tcpSocket,SIGNAL(readyRead()),this,SLOT(readMessage()));
- connect(tcpSocket,SIGNAL(error(QAbstractSocket::SocketError)),this,SLOT(displayError(QAbstractSocket::SocketError)));
- //ui->hostLineEdit->setText("localhost");
- ui->hostLineEdit->setText("192.168.1.100");
- ui->portLineEdit->setText("6666");
- }
- void Widget::newConnect()
- {
- blockSize = 0; //初始化其为0
- tcpSocket->abort(); //取消已有的连
- //tcpSocket->connectToHost(ui->hostLineEdit->text(),ui->portLineEdit->text().toInt());
- //tcpSocket->connectToHost(QHostAddress("192.168.1.100"),ui->portLineEdit->text().toInt());
- //tcpSocket->connectToHost(QHostAddress::LocalHost,ui->portLineEdit->text().toInt());
- tcpSocket->connectToHost(QHostAddress(ui->hostLineEdit->text()),ui->portLineEdit->text().toInt());
- //连接到主机,这里从界面获取主机地址和端口号
- }
- void Widget::on_pushButton_clicked() //连接按钮
- {
- newConnect(); //请求连接
- }
- void Widget::readMessage()
- {
- QDataStream in(tcpSocket);
- in.setVersion(QDataStream::Qt_4_6);
- //设置数据流版本,这里要和服务器端相同
- if(blockSize==0) //如果是刚开始接收数据
- {
- //判断接收的数据是否有两字节,也就是文件的大小信息
- //如果有则保存到blockSize变量中,没有则返回,继续接收数据
- if(tcpSocket->bytesAvailable() < (int)sizeof(quint16)) return;
- in >> blockSize;
- }
- if(tcpSocket->bytesAvailable() < blockSize) return;
- //如果没有得到全部的数据,则返回,继续接收数据
- in >> message;
- //将接收到的数据存放到变量中
- ui->messageLabel->setText(message);
- //显示接收到的数据
- }
- void Widget::displayError(QAbstractSocket::SocketError)
- {
- qDebug() << tcpSocket->errorString(); //输出错误信息
- }
1创建tcpSocket ,tcpSocket = new QTcpSocket(this);
2.关联信号readyRead和槽函数readMessage,connect(tcpSocket,SIGNAL(readyRead()),this,SLOT( readMessage ()));其中信号readyRead在有新的数据到达时发射
3.连接到某个ip的某个端口, tcpSocket->connectToHost(QHostAddress(ui->hostLineEdit->text()),ui->portLineEdit->text().toInt());
4.实现槽函数 readMessage ,读取数据
QDataStream in(tcpSocket);
in >> message;
tcpServer
- private:
- QTcpServer *tcpServer;
- private slots:
- void sendMessage();
- Widget::Widget(QWidget *parent) :
- QWidget(parent),
- ui(new Ui::Widget)
- {
- ui->setupUi(this);
- tcpServer = new QTcpServer(this);
- //if(!tcpServer->listen(QHostAddress::LocalHost,6666))
- if(!tcpServer->listen(QHostAddress("192.168.1.100"),6666))
- { //监听本地主机的6666端口,如果出错就输出错误信息,并关闭
- qDebug() << tcpServer->errorString();
- close();
- }
- connect(tcpServer,SIGNAL(newConnection()),this,SLOT(sendMessage()));
- }
- void Widget::sendMessage()
- {
- QByteArray block; //用于暂存我们要发送的数据
- QDataStream out(&block,QIODevice::WriteOnly);
- //使用数据流写入数据
- out.setVersion(QDataStream::Qt_4_6);
- //设置数据流的版本,客户端和服务器端使用的版本要相同
- out<<(quint16) 0;
- //要发送的数据放到out
- out<<tr("hello Tcp!!!");
- //要发送的数据放到out
- out.device()->seek(0);
- out<<(quint16)(block.size()-sizeof(quint16));
- //要发送的数据放到out
- QTcpSocket *clientConnection = tcpServer->nextPendingConnection();
- //我们获取已经建立的连接的子套接字
- connect(clientConnection,SIGNAL(disconnected()),clientConnection,SLOT(deleteLater()));
- clientConnection->write(block);
- clientConnection->disconnectFromHost();
- ui->statusLabel->setText("send message successful!!!");
- //发送数据成功后,显示提示
- }
1.创建tcpServer ,tcpServer = new QTcpServer(this);使之监听本机的某个端口,tcpServer->listen(QHostAddress("192.168.1.100"),6666)
2,关联信号newConnection和槽函数sendMessage, connect(tcpServer,SIGNAL(newConnection()),this,SLOT( sendMessage ()));其中信号newConnection在有客户端的连接请求(即客户端执行tcpSocket->connectToHost)时发射
3.实现槽函数 sendMessage ,在里面从tcpServer取得已经建立但挂起的QTcpSocket连接
QTcpSocket *clientConnection = tcpServer->nextPendingConnection();
用clientConnection 传输数据给客户
QByteArray block;
clientConnection->write(block);
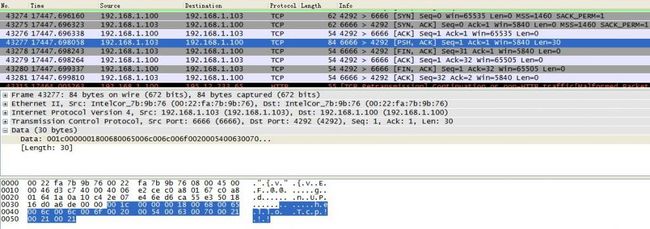
用wireshark监听xp 192.168.1.100和虚拟机fedora 192.168.1.103之间的tcp数据包,如下
xp 192.168.1.100作为客户端发送连接请求,fedora 192.168.1.103 作为服务器端发送回数据 ,即上面代码所述
out<<(quint16)(block.size()-sizeof(quint16));
out<<tr("hello Tcp!!!");
可以看到用tcp发送一次数据,会有多个tcp Frame产生,下面显示是8个。而第4个Frame中才真正包含要传输的数据。这点和udp传输不一样,udp每次传输数据时仅有一个udp Frame产生。 这是由于tcp传输是面向连接的, 每次传输后对方要有一个ack信号返回。现还不清楚这个ack发送是否在tcp协议代码里实现的?
而每个tcp Frame和udp Frame类似,都是层层包装。
第1层EtherNet II包,记录源MAC和目的MAC等
第2层是IPv4包,记录源ip和目的ip等
第3层是tcp包,记录端口等
第4层才是真正的数据,"xxhello Tcp!!!"
