Windows8 Metro开发 (02) : AppBar控件之TopAppBar
Josè Mourinho的专栏 http://blog.csdn.net/zyc13701469860
转载请注明原作者和出处。
Appbar分为2种:
- 显示在页面顶部的TopAppBar
- 显示在页面底部的BottomAppBar
TopAppBar一般用于页面导航,BottomAppBar则用来处理一些用户事件。
本文仅介绍TopAppBar,BottomAppBar会在下一篇文章中进行介绍。
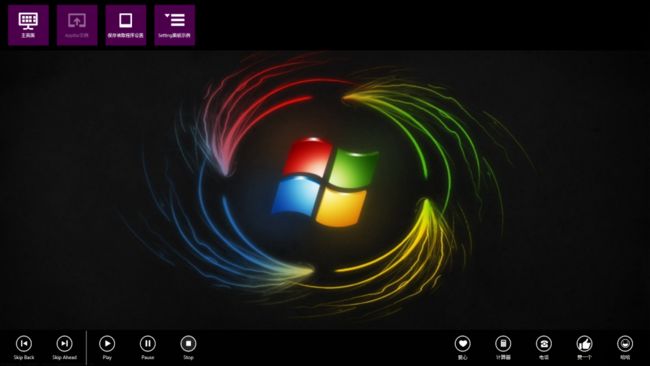
在分析代码之前先上一张程序运行效果图(全屏模式):
TopAppBar
一般来说,TopAppBar是为所有页面服务的。因此只需要创建1个TopAppBar,然后在每个页面调用即可。
创建TopAppbar
1.创建一个基本页面GlobalPage.xaml
这个不用我教你了吧。
注意:在Metro程序中不要创建空白页面。
2.在GlobalPage.xaml里创建1个TopAppbar,并添加几个Button.
    <Page.TopAppBar>
        <AppBar x:Name="globalAppbar" Padding="10,0,10,0" Loaded="OnAppbarLoaded">
            <Grid Background="Black">
                <StackPanel Orientation="Horizontal" HorizontalAlignment="Left" ScrollViewer.HorizontalScrollBarVisibility="Auto">
                    <Button x:Name="homeAppbarButton" Style="{StaticResource GlobalPageHomeAppBarButtonStyle}" Click="OnHomeAppbarButtonClicked"></Button>
                    <Button x:Name="appbarPageAppbarButton" Style="{StaticResource GlobalPageAppBarPageAppBarButtonStyle}" Click="OnAppbarPageAppbarButtonClicked"></Button>
                    <Button x:Name="localDataPageAppbarButton" Style="{StaticResource GlobalPageLocalDataPageAppBarButtonStyle}" Click="OnLocalDataPageAppbarButtonClicked"></Button>
                    <Button x:Name="settingPanelPageAppbarButton" Style="{StaticResource GlobalPageSettingPanelPageAppBarButtonStyle}" Click="OnSettingPanelPageAppbarButtonClicked"></Button>
                </StackPanel>
            </Grid>
        </AppBar>
    </Page.TopAppBar>
你会注意到Style="{StaticResource GlobalPageHomeAppBarButtonStyle}"。GlobalPageHomeAppBarButtonStyle是什么东东?Button上面的那些”图片“是怎么来的?
故名思义,GlobalPageHomeAppBarButtonStyle只是Button的一种样式而已,你可以在common文件夹下的StandardStyles.xaml里找到很多类型的样式.
为了以后维护方便,我会在一个新的xaml文件定义这些控件的样式(以后也会这样).
创建文件GlobalPageStyle.xaml,在StandardStyles.xaml里找到AppBarButtonStyle,将其复制到GlobalPageStyle.xaml中,并更名为GlobalPageAppBarButtonStyle,然后我们就可以开始修改了!
修改Button基本属性
        <Setter Property="Foreground" Value="{StaticResource AppBarItemForegroundThemeBrush}"/>
        <Setter Property="VerticalAlignment" Value="Stretch"/>
        <Setter Property="FontFamily" Value="Segoe UI Symbol"/>
        <Setter Property="FontWeight" Value="Normal"/>
        <Setter Property="FontSize" Value="40"/>
        <Setter Property="AutomationProperties.ItemType" Value="App Bar Button"/>
其中字体必须为Segoe UI Symbol.后面会讲到原因。
修改Button基本布局
<ControlTemplate TargetType="ButtonBase">
<Grid x:Name="RootGrid" Width="100" Height="100" Margin="10">
<Grid x:Name="BackgroundGrid" Width="100" Height="100" Background="Purple" Opacity=".6"></Grid>
<StackPanel VerticalAlignment="Top" Margin="0,12,0,11" >
<Grid Width="100" Height="50" Margin="0,0,0,5" HorizontalAlignment="Center">
<TextBlock x:Name="BackgroundGlyph" Text="" FontFamily="Segoe UI Symbol" FontSize="53.333" Margin="-4,-19,0,0" Foreground="{StaticResource AppBarItemBackgroundThemeBrush}"/>
<ContentPresenter x:Name="Content" HorizontalAlignment="Center" Margin="-1,-1,0,0" VerticalAlignment="Center"/>
</Grid>
<TextBlock
x:Name="TextLabel"
Text="{TemplateBinding AutomationProperties.Name}"
Foreground="{StaticResource AppBarItemForegroundThemeBrush}"
Margin="0,0,2,0"
FontSize="11"
TextAlignment="Center"
Width="88"
MaxHeight="32"
TextTrimming="WordEllipsis"
HorizontalAlignment="Center"
Style="{StaticResource BasicTextStyle}"/>
</StackPanel>
...
</Grid>
</ControlTemplate>
下面为每一个Button设计不同的样式,以AppBar Button为例
<Style x:Key="GlobalPageAppBarPageAppBarButtonStyle" TargetType="ButtonBase" BasedOn="{StaticResource GlobalPageAppBarButtonStyle}">
<Setter Property="AutomationProperties.AutomationId" Value="GlobalPageAppBarPageAppBarButton"/>
<Setter Property="AutomationProperties.Name" Value="AppBar示例"/>
<Setter Property="Content" Value=""/>
</Style>
可以看到,我们只需要引用之前的基本属性和布局,再根据Button的类型修改和添加相应的属性就可以了。
AutomationProperties.Name 就是Button下方显示的文字。
等一下,Content的Value怎么是空的?上面的那幅"图片"又是什么?
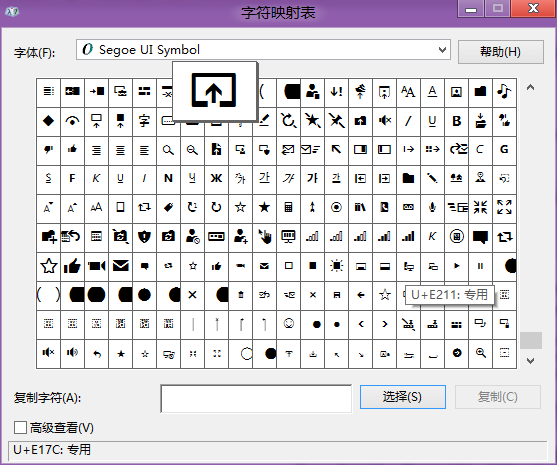
其实上面的"图片"是特殊字符,你可以在字符映射表里找到它们。Value里面的空白部分就是字符的值。
其实上面的"图片"是特殊字符,你可以在字符映射表里找到它们。Value里面的空白部分就是字符的值。
你也可以用类似“”这样的字串来表示。
注意:字体必须为Segoe UI Symbol
至此,TopAppBar就创建完成了。
3.创建全局Frame
在GlobalPage.xaml里创建1个包含Frame的Grid,很简单。
        <Grid x:Name="rootGrid">
            <Frame x:Name="globalFrame"></Frame>
        </Grid>
后面就用这个Frame来进行页面的导航。
下面来实现UI逻辑部分
我们程序的主页面是HomePage,GlobalPage只是其中的一个桥梁。
1.当程序从App.xaml.cs启动时,将页面首先定位到GlobalPage
                if (!rootFrame.Navigate(typeof(GlobalPage)))
                {
                    throw new Exception("Failed to create initial page");
                }
2.加载完GlobalPage页面时,再跳到HomePage。
NavigateToPage(typeof(HomePage), globalFrame);这样就可以在各个页面调用TopAppBar了.
点击下鼠标右键,看到TopAppBar了吧。
3.下面处理Button事件
很简单,跳转到不同的页面即可。
        private void OnSettingPanelPageAppbarButtonClicked(object sender, RoutedEventArgs e)
        {
            NavigateToPage(typeof(SettingPanelPage));
        }

        private void NavigateToPage(Type type)
        {
            NavigateToPage(type, null);
        }

        private void NavigateToPage(Type type,object obj)
        {
            globalFrame.Navigate(type, obj);
            globalAppbar.IsOpen = false;
        }
最后别忘记关闭AppBar.
4.特殊效果
4.1当前页面的对应的按钮不可用
从当前页面跳转到自己本身的行为是没有必要的,因此在显示AppBar的时候将该Button设置为不可用。
你可能会问:Button是在GlobalPage中定义的,我们在HomePage怎样去调用它,况且我怎么知道我现在在哪个页面?
别忘了,TopAppBar是在GlobalPage定义的,并且我们设置了Loaded事件,当TopAppBar加载完毕时,会调用该方法。
我们可以通过GlobalPage中定义的Frame来获取当前页面,并通过当前页面来获取对应的Button。
DisableButton = GetDisableButton(globalFrame.CurrentSourcePageType);
private Button GetDisableButton(Type type)
        {
            Button button = null;
            if(type.Equals(typeof(HomePage)))
            {
                button = homeAppbarButton;
            }
            else if (type.Equals(typeof(AppBarPage)))
            {
                button = appbarPageAppbarButton;
            }
            else if (type.Equals(typeof(LocalDataPage)))
            {
                button = localDataPageAppbarButton;
            }
            else if (type.Equals(typeof(SettingPanelPage)))
            {
                button = settingPanelPageAppbarButton;
            }
            return button;
        }
不能简单的将该Button设置为不可用,因为下一次在其他页面调出AppBar的时候,该Button就不能用了!
可以所有的Button设置为可用,然后再将该Button设置为不可用。那么怎样去获取所有Button呢?一个一个写?
当然不是。虽然不能直接调用Button,但是我们可以遍历TopAppBar中的元素来找到Button,毕竟Button是在AppBar中定义的。
Grid grid = (sender as AppBar).Content as Grid;
            foreach (var element in grid.Children)
            {
                if (element is StackPanel)
                {
                    StackPanel panel = element as StackPanel;
                    foreach (var subElement in panel.Children)
                    {
                        Button button = subElement as Button;
                        button.IsEnabled = true;
                    }
                }
            }
            DisableButton.IsEnabled = false;
OK,完事了。
4.2把鼠标移到Button上时,Button会高亮。
效果图:
很简单,注意到之前Style里中的Opacity=".6"吗?Button默认的透明度为60%,把鼠标移上去的时候将透明度设置为100%就OK啦。
Button基本布局省略的代码片段。
                                <VisualState x:Name="PointerOver">
                                    <Storyboard>
                                        <ObjectAnimationUsingKeyFrames Storyboard.TargetName="BackgroundGrid" Storyboard.TargetProperty="Opacity">
                                            <DiscreteObjectKeyFrame KeyTime="0" Value="1"/>
                                        </ObjectAnimationUsingKeyFrames>
                                        <ObjectAnimationUsingKeyFrames Storyboard.TargetName="Content" Storyboard.TargetProperty="Foreground">
                                            <DiscreteObjectKeyFrame KeyTime="0" Value="{StaticResource AppBarItemPointerOverForegroundThemeBrush}"/>
                                        </ObjectAnimationUsingKeyFrames>
                                    </Storyboard>
                                </VisualState>
5.Snap模式处理
Snap模式是什么?我们暂时先不去管它。后面会详细介绍。
调出TopAppBar试着把程序拖到边上,你会发现TopAppBar有一大块没了。
废话,当前窗体就这么大,TopAppBar显示不下了。
针对这种情况,可以让TopAppBar换种风格显示,或者干脆不显示。
对于后者可以在Loaded里加入如下代码
            if (ApplicationView.Value == ApplicationViewState.Snapped)
            {
                globalAppbar.IsOpen = false;
                return;
            }
呼呼,一个小小的TopAppBar就写了那么多。下篇文章将介绍TopAppBar的兄弟BottomAppBar.


