J2SE知识点归纳笔记(七)---Java IO Part 3:基本字节流
J2SE知识点归纳笔记(七)---Java IO Part 3:基本字节流
——转载请注明出处:coder-pig
本节引言:
在上一节中我们学习了控制台输入数据的方法以及对Java IO流体系图进行了初步的了解,
在本节中我们针对性地学习一些基本字节流与字符流的使用~开始本节内容:
1.InputStream与OutputStream的相关方法:
首先要说一点的是:这两个类是抽象类,通过子类来实现各种功能;
数据单位为字节(1 byte = 8bit);下面是相关的方法:
1)InputStream的相关方法:
①public abstract int read( ):读取一个byte的数据,返回值是高位补0的int类型值;
若返回值=-1说明没有读取到任何字节读取工作结束。
②public int read(byte b[ ]):读取b.length个字节的数据放到b数组中。返回值是读取的字节数。
如果流位于文件末尾不在有数据可用,返回-1;等同于read(b,0,b.length)
③public int read(byte b[ ], int off, int len):从输入流中最多读取len个字节的数据,存放到偏移量为off的b数组中,
如果流位于文件末尾不在有数据可用,返回-1;
④public int available( ):返回输入流中可以读取的字节数
ps:若输入阻塞,当前线程将被挂起,如果InputStream对象调用这个方法的话,它只会返回0,
这个方法必须由继承InputStream类的子类对象调用才有用
⑤public int close( ):使用完毕后,关闭流
⑥public long skip(long n):忽略输入流中的n个字节,返回值是实际忽略的字节数,跳过一些字节来读取
⑦public void mark(int readlimit):在此输入流中标记当前位置,如果后续调用reset方法会在最后标记的位置重新定位
此流,以便后续读取重新读取相同的字节,另外参数:readlimit代表:标记失效钱允许读取的字节数
ps:jdk 1.6后貌似没限制多少个字节~
⑧public void reset( ):将流重新定位到最后一次调用mark方法的位置!
⑨public boolean markSupported( ):判断该输入流是否支持mark和reset方法
ps:这里的mark和reset方法,你们可能不是很明白,后面学习BufferedInputStream的时候,
会给大家写个例子,到时你就知道这两个玩意的作用了...![]()
还有,虽然read有三种不同的构造方法,但是建议使用后面两个,第一个少用!!!
2)OutputStream的相关方法:
①public void close( ):关闭此输出流并释放与此流有关的所有系统资源
②public void flush( ):刷新此输出流并强制写出所有缓冲的输出字节
③public abstract void write(int b):将指定的字节写入此输出流
④public void write(byte[] b):将 b.length个字节从指定的byte数组写入此输出流
⑤public void write(byte[] b,int off,int len):将指定 byte 数组中从偏移量 off 开始的 len 个字节写入此输出流
ps:其实这些方法,直接查文档都可以查出来的,笔者也是贴的api上的解析而已~
所以遇到不会用,没见过的方法,先查文档~
2.FileInputStream与FileOutputStream类的使用:
先来介绍字节流的第一个子类:ileInputStream与FileOutputStream类吧!
见名知意:就是以字节的形式对文件进行读写操作;
这里就不贴相关方法了,自行查阅API文档吧,直接上实例:
代码实例:实现文件复制
/*
	 * 该方法用于复制文件,是最简单的,没有加入缓冲机制,所以很垃圾~只是方便读者理解
	 * 参数以此是:被复制文件的完整路径,以及复制后生成的文件的完整路径
	 * */
	public static void copyFile1(String file1,String file2) throws IOException
	{
		File file = new File(file1);
		File outfile = new File(file2);
		FileInputStream inputStream = new FileInputStream(file);
		FileOutputStream outputStream = new FileOutputStream(outfile);
		int i = 0;
		while(i != -1) {
			i = inputStream.read();
			outputStream.write(i);
		}
		//记得关闭流
		inputStream.close();
		outputStream.close();
	}
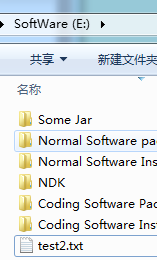
运行截图:
好了,上述的代码,如果复制的是大文件,就呵呵了,等死你...所以我们需要加入缓冲区,
以便提高文件的复制速度,就是添加一个字节缓冲数组而已~
代码也很简单:
/*
	 * 该方法在1的基础上,添加了byte[]数组缓冲机制,复制大文件的时候,他的优势就显现出来了~
	 */
	public static void copyFile2(String file1, String file2) throws IOException {
		File file = new File(file1);
		File outfile = new File(file2);
		FileInputStream inputStream = new FileInputStream(file);
		FileOutputStream outputStream = new FileOutputStream(outfile);
		int i = 0;
		//设置缓冲的字节数组为缓冲512 byte
		byte[] buffer = new byte[512];
		while (true) {
			if (inputStream.available() < 512) {
				while (i != -1) {
					i = inputStream.read();
					outputStream.write(i);
				}
				break;
			} else {
				// 当文件的大小大于512 byte时
				inputStream.read(buffer);
				outputStream.write(buffer);
			}
		}
		// 记得关闭流
		inputStream.close();
		outputStream.close();
	}
代码解析:
就是添加一个512byte的字符数组,但是速度却明显提高了,不信么?
你可以找个大文件试试,比如笔者这里用的美图秀秀,差不多30M,用1中的
方法,过了差不多1分多钟才复制完毕,而用加了缓冲的几秒钟就复制好了~
3)ByteArrayInputStream与ByteArrayOutputStream类的使用:
见名知意:字节数组的字节流,创建实例是程序内部会创建一个byte型数组的缓冲区,
在网络传输的时候用的比较多,这里给获得某个页面的网页源代码~
ByteArrayOutputStream用得比较多,另外toByteArray( )方法很常用
你也可以自行扩展,比如,访问的url是图片,然后把图片保存到本地~
代码实例:
/*
	 * 获得某个网页源代码:
	 * 参数是一个网页的链接:
	 * */
	public static String getHtml(String path)throws Exception
	{
		URL url = new URL(path);
		HttpURLConnection conn = (HttpURLConnection) url.openConnection();
		conn.setConnectTimeout(5000);
		conn.setRequestMethod("GET");
		if(conn.getResponseCode() == 200)
		{
			InputStream in = conn.getInputStream();
			ByteArrayOutputStream out = new ByteArrayOutputStream();
			byte[] buffer = new byte[1024];
			int len = 0;
			while((len = in.read(buffer)) != -1)
			{
				out.write(buffer,0,len);
			}
			in.close();
			byte[] data = out.toByteArray();
			String html = new String(data,"UTF-8");
			return html;
		}
		return null;
	}
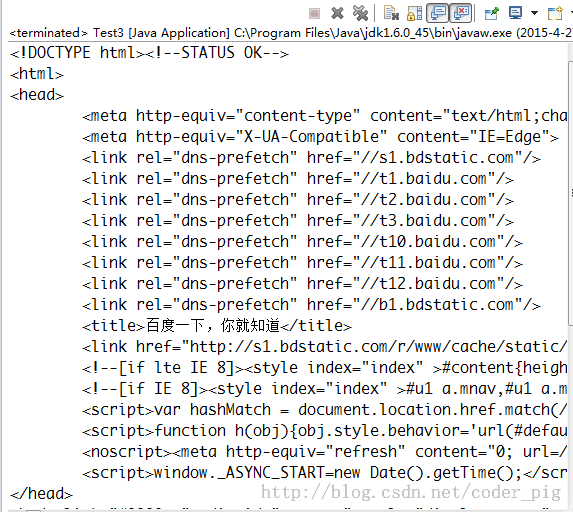
运行截图:
好了,这样就读取到一个网页的源代码了~
4)ObjectInputStream与ObjectOutputStream类
见名知意,对象字节流,就是可以直接把对象转换为流,另外,转换的对象对应的类,
需要实现Serializable接口,另外对象中的transient和static类型成员变量不会被读取和写入
下面我们来写个简单的代码示例:
step 1:定义一个业务Bean:
import java.io.Serializable;

public class Book implements Serializable {
	private String bName;
	private String bReporter;

	public Book(String bName, String bReporter) {
		super();
		this.bName = bName;
		this.bReporter = bReporter;
	}

	public String getbName() {
		return bName;
	}

	public void setbName(String bName) {
		this.bName = bName;
	}

	public String getbReporter() {
		return bReporter;
	}

	public void setbReporter(String bReporter) {
		this.bReporter = bReporter;
	}

}
step 2:先构造低级流FileOutputStream和FileInputStream,然后才能使用
ObjectOutputStream与ObjectInputStream:
public static void main(String[] args) throws Exception {
		Book b1 = new Book("《如何与傻B相处》", "猪小猪");
		Book b2 = new Book("《逗比的自我修养》", "猫小猫");
		Book b3,b4;
		//注意:使用高级流需要先构造低级流
		//①把对象直接写入到文件中
		FileOutputStream fout = new FileOutputStream("D:/books.txt");
		ObjectOutputStream out = new ObjectOutputStream(fout);
		out.writeObject(b1);
		out.writeObject(b2);
		//关闭输出流
		out.close();
		//②读取文件中的对象:
		FileInputStream fin=new FileInputStream("D:/books.txt");
		ObjectInputStream in=new ObjectInputStream(fin);
	    b3=(Book) in.readObject();
	    b4=(Book) in.readObject();
	    //关闭输入流
	    in.close();
	    System.out.println(b3.getbName() + " 作者: "+ b3.getbReporter());
	    System.out.println(b4.getbName() + " 作者: "+ b4.getbReporter());
	}
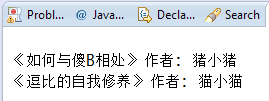
运行截图:
同时,我们可以在D盘下看到这个book.txt的文件,但是打开后是乱码,
这是因为,我们写入的是字节流~中文就会出现乱码,如果想解决这种情况,
可以使用后面会说的FileWriter和FileReader~
5)PipedOutputStream与PipedInputStream类
这个是管道流,相比起前面的介绍的几个流,这个就稍微复杂点了,
通过这两个流可以让多线程通过管道进行线程间的通讯,两者需要搭配使用哦!
不同于Linux和Unix系统中的管道,他们是不同地址空间空间的两个进程可以通过管道通信,
而Java中则是运行在同一进程中的不同线程!
原理:PipedInputStream内部有一个Buffer,使用InputStream的方法读取其Buffer中的字节;
而Buffer中的字节是PipedOutputStream调用PipedInputStream的方法放入的;
另外,不建议把这两个流对应的对象写在同一线程中,不然很容易引起死锁,
使用connect( )方法可以将这个管道搭建起来,再进行数据传输~
这里找了个简单的小例子给大家体会下吧~
1)SendThread.java:(输出流)
import java.io.IOException;
import java.io.PipedOutputStream;


public class SendThread extends Thread{
	private PipedOutputStream out = new PipedOutputStream();
	public PipedOutputStream getOutputStream(){
        return out;
    }
	public void run(){
	        String strInfo = "我是PipedOutputStream写入的东西" ;
	        try {
	            out.write(strInfo.getBytes());
	            out.close();
	        } catch (IOException e) {
	            e.printStackTrace();
	        }
	    }
}
2)ReceiverThread.java:(输入流)
import java.io.IOException;
import java.io.PipedInputStream;

public class ReceiverThread extends Thread {
	private PipedInputStream in = new PipedInputStream();

	public PipedInputStream getInputStream() {
		return in;
	}

	public void run() {
		byte[] buf = new byte[1024];
		try {
			int len = in.read(buf);
			System.out.println(new String(buf, 0, len));
			in.close();
		} catch (IOException e) {
			e.printStackTrace();
		}
	}
}
测试类:Test5.java:
import java.io.IOException;
import java.io.PipedInputStream;
import java.io.PipedOutputStream;

public class Test5 {
	public static void main(String[] args) {
		ReceiverThread rThread = new ReceiverThread();
		SendThread sThread = new SendThread();
		// 获取对应流:
		PipedOutputStream out = sThread.getOutputStream();
		PipedInputStream in = rThread.getInputStream();
		try {
			// 管道链接
			out.connect(in);
			sThread.start();
			rThread.start();
		} catch (IOException e) {
			e.printStackTrace();
		}
	}
}
运行截图:
6)SequenceInputStream合并流:
见名知意,就是合并多个输入流.即当我们需要从多个输入流中向程序读入数据的时候可以考虑使用合并流,
SequenceInputStream会将与之相连接的流集组合成一个输入流并从第一个输入流开始读取,
直到到达文件末尾,接着从第二个输入流读取,依次类推,直到到达包含的最后一个输入流的文件末尾为止;
合并流的作用是将多个源合并合一个源!
要注意的地方:(构造方法)
SequenceInputStream为我们提供了两个不同的构造方法:
1~SequenceInputStream(Enumeration<? extends InputStream> e)
2~SequenceInputStream(InputStream s1, InputStream s2)
PS:这个Enumertaion是一个接口,Enumeration接口定义了从一个数据结构得到连续数据的手段
该接口提供的两个方法:
boolean hasMoreElements():测试此枚举是否包含更多的元素。
nextElement( ):如果此枚举对象至少还有一个可提供的元素,则返回此枚举的下一个元素.
这里并不详细介绍Enumertaion了,想了解的自行查阅文档~
那么接下来我们来写两个简单的小程序方便我们理解:
①使用两个流作为参数的构造方法:
	public static void main(String[] args) throws IOException {
        InputStream s1 = new ByteArrayInputStream("ABC".getBytes());
        InputStream s2 = new ByteArrayInputStream("abc".getBytes());
        InputStream in = new SequenceInputStream(s1, s2);
        int data;
        while ((data = in.read()) != -1) {
            System.out.println(data);
        }
        in.close();
    }
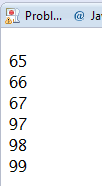
运行结果:(对应ABCabc的ASCII码值,别问我为什么不用汉字,因为本节讲的是字节流,一个汉字两个字节~)
②使用Enumeration作为参数的那个构造方法:
public static void main(String[] args) throws IOException {
		 //创建合并流
        SequenceInputStream sin = null;
        //创建输出流
        BufferedOutputStream bout = null;
        try {
            //构建流集合
            Vector<InputStream> vector = new Vector<InputStream>();
            vector.addElement(new FileInputStream("D:\\test1.txt"));
            vector.addElement(new FileInputStream("D:\\test2.txt"));
            vector.addElement(new FileInputStream("D:\\test3.txt"));
            vector.addElement(new FileInputStream("D:\\test4.txt"));
            Enumeration<InputStream> e = vector.elements();

            sin = new SequenceInputStream(e);
            bout = new BufferedOutputStream(
                    new FileOutputStream("D:\\textUnion.txt"));

            //读写数据
            byte[] buf = new byte[1024];
            int len = 0;
            while ((len = sin.read(buf)) != -1) {
                bout.write(buf, 0, len);
                bout.flush();
            }
        } catch (FileNotFoundException e1) {
            e1.printStackTrace();
        } catch (IOException e1) {
            e1.printStackTrace();
        } finally {
            try {
                if (sin != null)
                    sin.close();
            } catch (IOException e) {
                e.printStackTrace();
            }
            try {
                if (bout != null)
                    bout.close();
            } catch (IOException e) {
                e.printStackTrace();
            }
        }
    }
接着我们在D盘目录下创建:test1, test2,test3,test4四个txt文件,内容依次为:
逗A,逗B,逗C,逗D
运行截图:
会在D盘下生产testUnion.txt的文件,打开文件后可以看到:
最后说两句:
好的,关于Java IO中的基本字节流就讲到这里了,现在我们来回顾下本节讲解的东东:
①InputStream和OutputStream两个父类的相关方法
②FileInputStream与FileOutputStream类文件读写类的使用,加入了缓冲数组提高了读写效率~
③ByteArrayInputStream与ByteArrayOutputStream类字节数组类,我们写了个获取网页源码的例子:
④ObjectInputStream与ObjectOutputStream类对象读写类,我们通过这两个类可以很方便地完成
从对象到流,流到对象的转化,另外要注意一点,这个对象所属的类要继承Serializable接口!
⑤PipedOutputStream与PipedInputStream类管道输入输出类,这两个是用于线程间进行通信的,
一般避免把这两个写到同一个线程中,不然很容易引起死锁,本节只是给出一个简单的应用例子,后续有
需要再进行深入研究~
⑥SequenceInputStream合并流,就是可以将多个输入流合并成一个输入流,有两种构造形式:
分别是两个输入流,或者一个Enumeration参数,也很简单,大家看懂例子即可~
那么,关于本节的基本字节流就到这里,谢谢你的阅读~![]()
如果你觉得本文可以的话,可花1s点个赞,让更多的朋友可以看到这篇文章~万分感谢![]() ~
~


