iOS的事件分发
iOS的事件分发
移动平台上的开发主要关注数据以及数据的处理,事件的处理以及UI。所以事件的分发处理是很重要的一个环节,对于一个平台的优劣来说也是一项重要的参数。如果事件的分发设计的不好,一些复杂的UI场景就会变得很难写甚至没法写。从小屏没有触摸的功能机开始到现在大屏多点触摸的智能机,对于事件的分发处理基本思路都是一样的——链(设计模式中有个模式就是职责链chain of responsibility),只是判定的复杂程度不同。
iOS中的事件有3类,触摸事件(单点,多点,手势)、传感器事件(加速度传感器)和远程控制事件,这里我介绍的是第一种事件的分发处理。
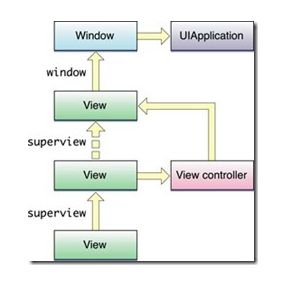
上面的这张图来自苹果的官方。描述了Responder的链,同时也是事件处理的顺序。通过这两张图,我们可以发现:
1. 事件顺着responder chain传递,如果一环不处理,则传递到下一环,如果都没有处理,最后回到UIApplication,再不处理就会抛弃
2. view的下一级是包含它的viewController,如果没有viewController则是它的superView
3. viewController的下一级是它的view的superView
4. view之后是window,最后传给application,这点iOS会比OS X简单(application就一个,window也一个)
总结出来传递规则是这样的:
这样事件就会从first responder逐级传递过来,直到被处理或者被抛弃。
由于UI的复杂,这个responder chain是需要根据事件来计算的。比如,我现在在一个view内加入了2个Button,先点击了一个,则first responder肯定是这个点击过的button,但我下面可以去点击另一个button,所以显然,当触摸事件来时,这个chain是需要重新计算更新的,这个计算的顺序是事件分发的顺序,基本上是分发的反过来。
无论是哪种事件,都是系统本身先获得,是iOS系统来传给UIApplication的,由Application再决定交给谁去处理,所以如果我们要拦截事件,可以在UIApplication层面或者UIWindow层面去拦截。
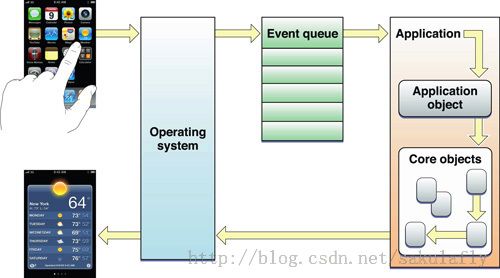
UIView是如何判定这个事件是否是自己应该处理的呢?iOS系统检测到一个触摸操作时会打包一个UIEvent对象,并放入Application的队列,Application从队列中取出事件后交给UIWindow来处理,UIWindow会使用hitTest:withEvent:方法来递归的寻找操作初始点所在的view,这个过程成为hit-test view。
hitTest:withEvent:方法的处理流程如下:调用当前view的pointInside:withEvent:方法来判定触摸点是否在当前view内部,如果返回NO,则hitTest:withEvent:返回nil;如果返回YES,则向当前view内的subViews发送hitTest:withEvent:消息,所有subView的遍历顺序是从数组的末尾向前遍历,直到有subView返回非空对象或遍历完成。如果有subView返回非空对象,hitTest方法会返回这个对象,如果每个subView返回都是nil,则返回自己。
好了,我们还是看个例子:
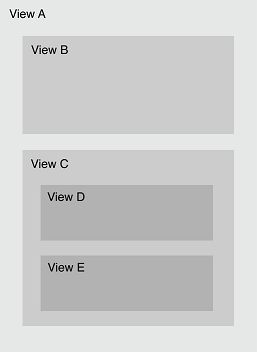
这里ViewA包含ViewB和ViewC,ViewC中继续包含ViewD和ViewE。假设我们点击了viewE区域,则hit-test View判定过程如下:
1. 触摸在A内部,所以需要检查B和C
2. 触摸不在B内部,在C内部,所以需要检查D和E
3. 触摸不在D内部,但在E内部,由于E已经是叶子了,所以判定到此结束
我们可以运行一段代码来验证,首先从UIView继承一个类myView,重写里面的
- - (UIView *)hitTest:(CGPoint)point withEvent:(UIEvent *)event
- {
- UIView *retView = nil;
- NSLog(@"hitTest %@ Entry! event=%@", self.name, event);
- retView = [super hitTest:point withEvent:event];
- NSLog(@"hitTest %@ Exit! view = %@", self.name, retView);
- return retView;
- }
- - (BOOL)pointInside:(CGPoint)point withEvent:(UIEvent *)event
- {
- BOOL ret = [super pointInside:point withEvent:event];
- // if ([self.name isEqualToString:@"viewD"]) {
- // ret = YES;
- // }
- if (ret) {
- NSLog(@"pointInside %@ = YES", self.name);
- } else {
- NSLog(@"pointInside %@ = NO", self.name);
- }
- return ret;
- }
- - (void)viewDidLoad
- {
- [super viewDidLoad];
- _viewA = [[myView alloc] initWithFrame:CGRectMake(10, 10, 300, 200) Color:[UIColor blackColor] andName:@"viewA"];
- [self.view addSubview:_viewA];
- [_viewA release];
- _viewB = [[myView alloc] initWithFrame:CGRectMake(10, 240, 300, 200) Color:[UIColor blackColor] andName:@"viewB"];
- [self.view addSubview:_viewB];
- [_viewB release];
- _viewC = [[myView alloc] initWithFrame:CGRectMake(10, 10, 120, 180) Color:[UIColor blueColor] andName:@"viewC"];
- [_viewB addSubview:_viewC];
- [_viewC release];
- _viewD = [[myView alloc] initWithFrame:CGRectMake(170, 10, 120, 180) Color:[UIColor blueColor] andName:@"viewD"];
- [_viewB addSubview:_viewD];
- [_viewD release];
- _viewE = [[myView alloc] initWithFrame:CGRectMake(30, 40, 60, 100) Color:[UIColor redColor] andName:@"viewE"];
- [_viewD addSubview:_viewE];
- [_viewE release];
- }
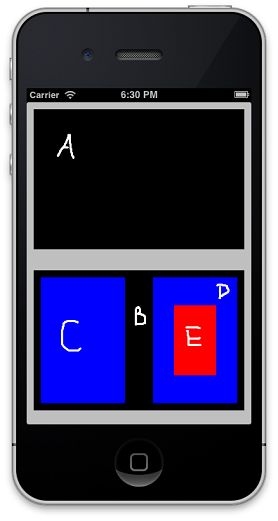
当我点击viewE的时候,打印信息如下:
2014-01-25 18:32:46.538 eventDemo[1091:c07] hitTest viewB Entry! event=<UITouchesEvent: 0x8d0cae0> timestamp: 6671.26 touches: {(
)}
2014-01-25 18:32:46.538 eventDemo[1091:c07] pointInside viewB = YES
2014-01-25 18:32:46.539 eventDemo[1091:c07] hitTest viewD Entry! event=<UITouchesEvent: 0x8d0cae0> timestamp: 6671.26 touches: {(
)}
2014-01-25 18:32:46.539 eventDemo[1091:c07] pointInside viewD = YES
2014-01-25 18:32:46.539 eventDemo[1091:c07] hitTest viewE Entry! event=<UITouchesEvent: 0x8d0cae0> timestamp: 6671.26 touches: {(
)}
2014-01-25 18:32:46.540 eventDemo[1091:c07] pointInside viewE = YES
2014-01-25 18:32:46.540 eventDemo[1091:c07] hitTest viewE Exit! view = <myView: 0x8c409f0; frame = (30 40; 60 100); layer = <CALayer: 0x8c40a90>>
2014-01-25 18:32:46.540 eventDemo[1091:c07] hitTest viewD Exit! view = <myView: 0x8c409f0; frame = (30 40; 60 100); layer = <CALayer: 0x8c40a90>>
2014-01-25 18:32:46.541 eventDemo[1091:c07] hitTest viewB Exit! view = <myView: 0x8c409f0; frame = (30 40; 60 100); layer = <CALayer: 0x8c40a90>>
2014-01-25 18:32:46.541 eventDemo[1091:c07] touchesBegan viewE
2014-01-25 18:32:46.624 eventDemo[1091:c07] touchesEnded viewE
从打印信息可以看到,先判断了viewB,然后是viewD,最后是viewE,但事件就是直接传给了viewE。


