深入解析AsyncTask
AsyncTask的介绍及基本使用方法
关于AsyncTask的介绍和基本使用方法可以参考官方文档和Android实战技巧:多线程AsyncTask这里就不重复。
AsyncTask引发的一个问题
上周遇到了一个极其诡异的问题,一个小功能从网络上下载一个图片,然后放到ImageView中,是用AsyncTask来实现的,本身逻辑也很简单,仅是在doInBackground中用HTTP请求把图片的输入流取出,然后用BitmapFactory去解析,然后再把得到的Bitmap放到ImageView中。这个应用是用4.0的SDK开发的,也是运行在4.0上面的。但是有时候下载这张图片去要用很久很久,甚至要等上几分钟。通过调试发现一个令人难以接受的事实:竟然是doInBackground()未及时执行,也就是它并没有在#execute()调用之后马上执行,而是等待了很久才得以执行。
神马情况,难道AsyncTask不是线程,难道不是异步,难道AsyncTask另有内幕?
AsyncTask的内幕
AsyncTask主要有二个部分:一个是与主线各的交互,另一个就是线程的管理调度。虽然可能多个AsyncTask的子类的实例,但是AsyncTask的内部Handler和ThreadPoolExecutor都是进程范围内共享的,其都是static的,也即属于类的,类的属性的作用范围是CLASSPATH,因为一个进程一个VM,所以是AsyncTask控制着进程范围内所有的子类实例。
与主线程交互
与主线程交互是通过Handler来进行的,因为本文主要探讨AsyncTask在任务调度方面的,所以对于这部分不做细致介绍,感兴趣的朋友可以去看AsyncTask的源码
线程任务的调度
内部会创建一个进程作用域的线程池来管理要运行的任务,也就就是说当你调用了AsyncTask#execute()后,AsyncTask会把任务交给线程池,由线程池来管理创建Thread和运行Therad。对于内部的线程池不同版本的Android的实现方式是不一样的:
Android2.3以前的版本,也即SDK/API 10和以前的版本
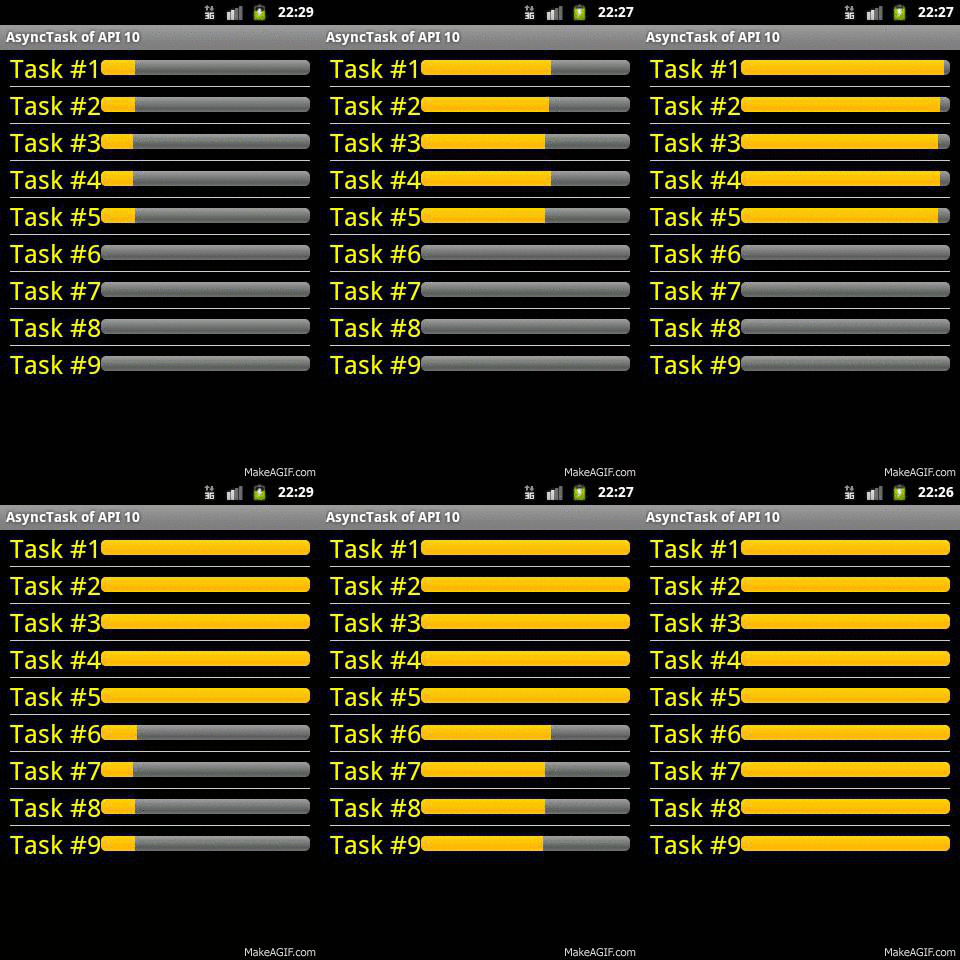
内部的线程池限制是5个,也就是说同时只能有5个线程运行,超过的线程只能等待,等待前面的线程某个执行完了才被调度和运行。换句话说,如果一个进程中的AsyncTask实例个数超过5个,那么假如前5个都运行很长时间的话,那么第6个只能等待机会了。这是AsyncTask的一个限制,而且对于2.3以前的版本无法解决。如果你的应用需要大量的后台线程去执行任务,那么你只能放弃使用AsyncTask,自己创建线程池来管理Thread,或者干脆不用线程池直接使用Thread也无妨。不得不说,虽然AsyncTask较Thread使用起来比较方便,但是它最多只能同时运行5个线程,这也大大局限了它的实力,你必须要小心的设计你的应用,错开使用AsyncTask的时间,尽力做到分时,或者保证数量不会大于5个,否则就可能遇到上面提到的问题。要不然就只能使用JavaSE中的API了。
Android 3.0以后,也即SDK/API 11和以后的版本
可能是Google意识到了AsyncTask的局限性了,从Android 3.0开始对AsyncTask的API做出了一些调整:
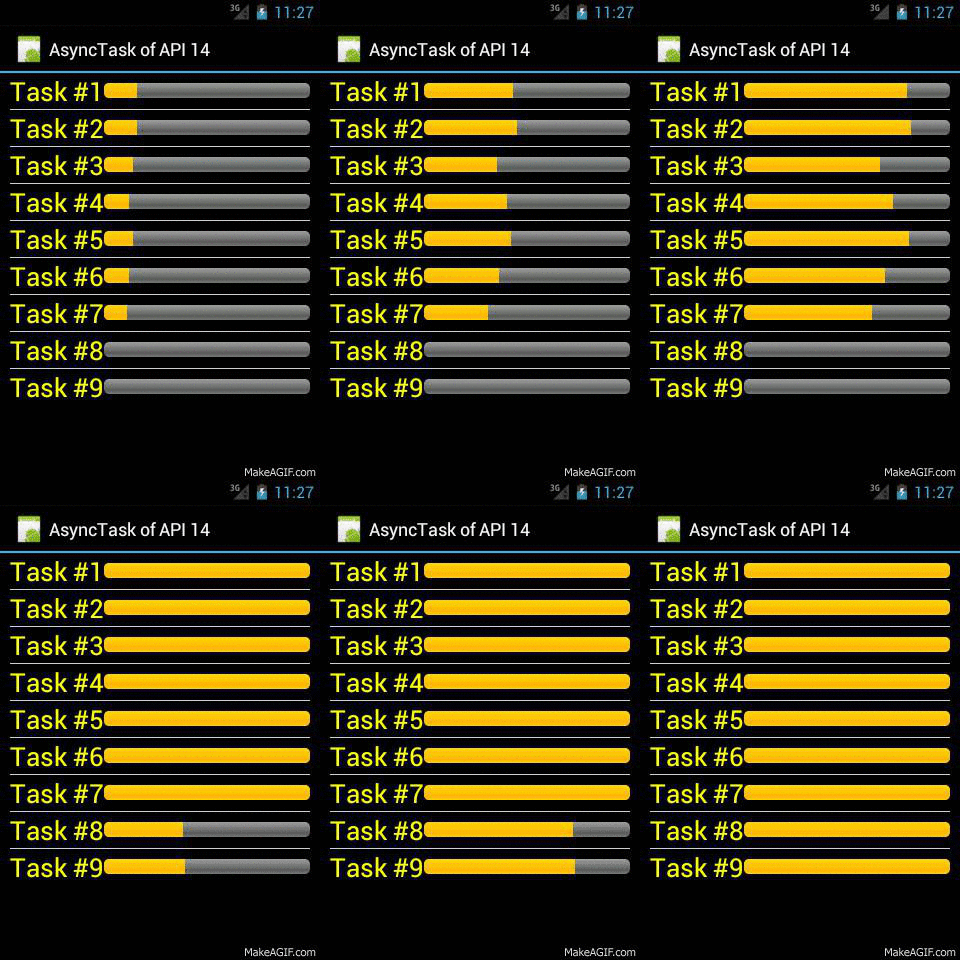
- #execute()提交的任务,按先后顺序每次只运行一个
也就是说它是按提交的次序,每次只启动一个线程执行一个任务,完成之后再执行第二个任务,也就是相当于只有一个后台线程在执行所提交的任务(Executors.newSingleThreadPool())。
2.新增了接口#executeOnExecutor()
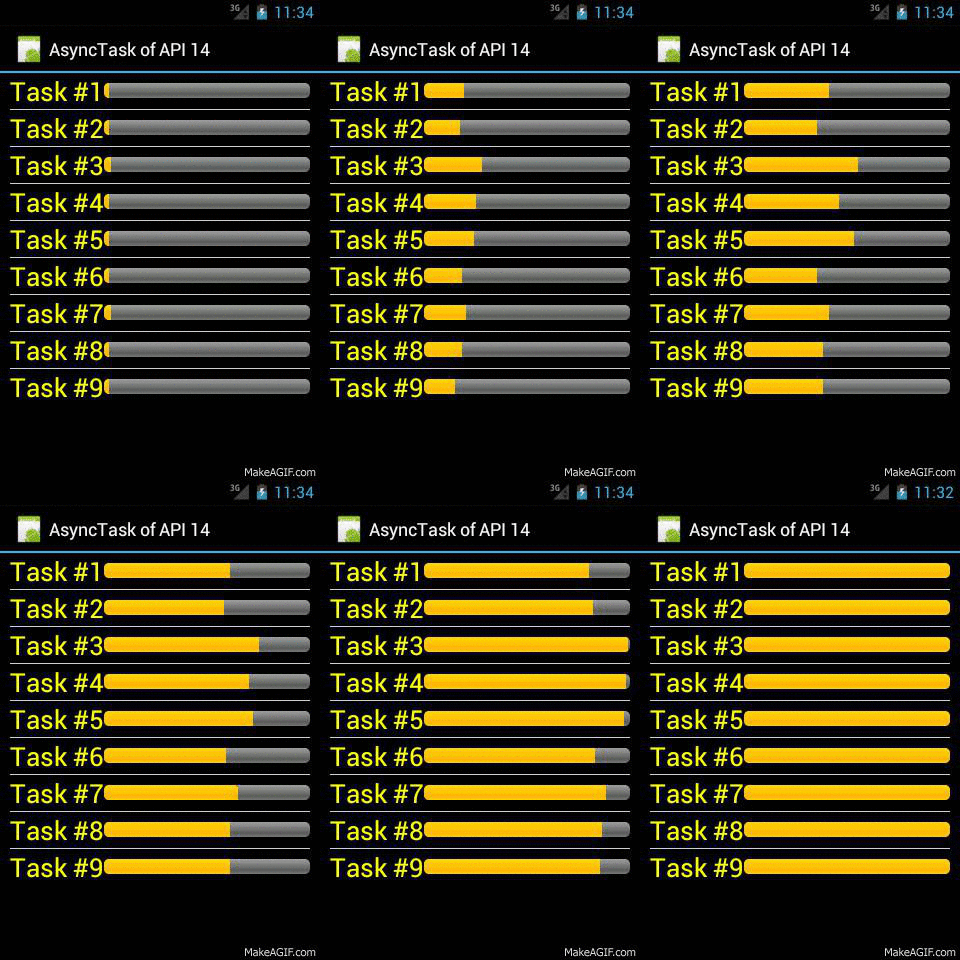
这个接口允许开发者提供自定义的线程池来运行和调度Thread,如果你想让所有的任务都能并发同时运行,那就创建一个没有限制的线程池(Executors.newCachedThreadPool()),并提供给AsyncTask。这样这个AsyncTask实例就有了自己的线程池而不必使用AsyncTask默认的。
3.新增了二个预定义的线程池SERIAL_EXECUTOR和THREAD_POOL_EXECUTOR
其实THREAD_POOL_EXECUTOR并不是新增的,之前的就有,只不过之前(Android 2.3)它是AsyncTask私有的,未公开而已。THREAD_POOL_EXECUTOR是一个corePoolSize为5的线程池,也就是说最多只有5个线程同时运行,超过5个的就要等待。所以如果使用executeOnExecutor(AsyncTask.THREAD_POOL_EXECUTOR)就跟2.3版本的AsyncTask.execute()效果是一样的。
而SERIAL_EXECUTOR是新增的,它的作用是保证任务执行的顺序,也就是它可以保证提交的任务确实是按照先后顺序执行的。它的内部有一个队列用来保存所提交的任务,保证当前只运行一个,这样就可以保证任务是完全按照顺序执行的,默认的execute()使用的就是这个,也就是executeOnExecutor(AsyncTask.SERIAL_EXECUTOR)与execute()是一样的。
前面问题的解法
了解了AsyncTask的内幕就知道了前面问题的原因:因为是4.0平台,所以所有的AsyncTask并不都会运行在单独的线程中,而是被SERIAL_EXECUTOR顺序的使用线程执行。因为应用中可能还有其他地方使用AsyncTask,所以到网络取图片的AsyncTask也许会等待到其他任务都完成时才得以执行而不是调用executor()之后马上执行。
那么解决方法其实很简单,要么直接使用Thread,要么创建一个单独的线程池(Executors.newCachedThreadPool())。或者最简单的解法就是使用executeOnExecutor(AsyncTask.THREAD_POOL_EXECUTOR),这样起码不用等到前面的都结束了再执行。
AsyncTask的使用注意事项
前面的文章曾建议使用AsyncTask而不是使用Thread,但是AsyncTask似乎又有它的限制,这就要根据具体的需求情况而选择合适的工具,No Silver Bullet。下面是一些建议:
- 改善你的设计,少用异步处理
线程的开销是非常大的,同时异步处理也容易出错,难调试,难维护,所以改善你的设计,尽可能的少用异步。对于一般性的数据库查询,少量的I/O操作是没有必要启动线程的。
- 与主线程有交互时用AsyncTask,否则就用Thread
AsyncTask被设计出来的目的就是为了满足Android的特殊需求:非主线程不能操作(UI)组件,所以AsyncTask扩展Thread增强了与主线程的交互的能力。如果你的应用没有与主线程交互,那么就直接使用Thread就好了。
- 当有需要大量线程执行任务时,一定要创建线程池
线程的开销是非常大的,特别是创建一个新线程,否则就不必设计线程池之类的工具了。当需要大量线程执行任务时,一定要创建线程池,无论是使用AsyncTask还是Thread,因为使用AsyncTask它内部的线程池有数量限制,可能无法满足需求;使用Thread更是要线程池来管理,避免虚拟机创建大量的线程。比如从网络上批量下载图片,你不想一个一个的下,或者5个5个的下载,那么就创建一个CorePoolSize为10或者20的线程池,每次10个或者20个这样的下载,即满足了速度,又不至于耗费无用的性能开销去无限制的创建线程。
- 对于想要立即开始执行的异步任务,要么直接使用Thread,要么单独创建线程池提供给AsyncTask
默认的AsyncTask不一定会立即执行你的任务,除非你提供给他一个单独的线程池。如果不与主线程交互,直接创建一个Thread就可以了,虽然创建线程开销比较大,但如果这不是批量操作就没有问题。
- Android的开发没有想像中那样简单,要多花心思和时间在代码上和测试上面,以确信程序是优质的
附上相关资源:
使用自定义的CorePoolSize为7的Executor(Executors.newFixedThreadPool(7)):

使用未设限制的Executor(Executors.newCachedThreadPool()):
这些例子所用的代码
public class AsyncTaskDemoActivity extends Activity {
    private static int ID = 0;
    private static final int TASK_COUNT = 9;
    private static ExecutorService SINGLE_TASK_EXECUTOR;
    private static ExecutorService LIMITED_TASK_EXECUTOR;
    private static ExecutorService FULL_TASK_EXECUTOR;

    static {
        SINGLE_TASK_EXECUTOR = (ExecutorService) Executors.newSingleThreadExecutor();
        LIMITED_TASK_EXECUTOR = (ExecutorService) Executors.newFixedThreadPool(7);
        FULL_TASK_EXECUTOR = (ExecutorService) Executors.newCachedThreadPool();
    };

    @Override
    public void onCreate(Bundle icicle) {
        super.onCreate(icicle);
        setContentView(R.layout.asynctask_demo_activity);
        String title = "AsyncTask of API " + VERSION.SDK_INT;
        setTitle(title);
        final ListView taskList = (ListView) findViewById(R.id.task_list);
        taskList.setAdapter(new AsyncTaskAdapter(getApplication(), TASK_COUNT));
    }

    private class AsyncTaskAdapter extends BaseAdapter {
        private Context mContext;
        private LayoutInflater mFactory;
        private int mTaskCount;
        List<SimpleAsyncTask> mTaskList;

        public AsyncTaskAdapter(Context context, int taskCount) {
            mContext = context;
            mFactory = LayoutInflater.from(mContext);
            mTaskCount = taskCount;
            mTaskList = new ArrayList<SimpleAsyncTask>(taskCount);
        }

        @Override
        public int getCount() {
            return mTaskCount;
        }

        @Override
        public Object getItem(int position) {
            return mTaskList.get(position);
        }

        @Override
        public long getItemId(int position) {
            return position;
        }

        @Override
        public View getView(int position, View convertView, ViewGroup parent) {
            if (convertView == null) {
                convertView = mFactory.inflate(R.layout.asynctask_demo_item, null);
                SimpleAsyncTask task = new SimpleAsyncTask((TaskItem) convertView);
                /*
                 * It only supports five tasks at most. More tasks will be scheduled only after
                 * first five finish. In all, the pool size of AsyncTask is 5, at any time it only
                 * has 5 threads running.
                 */
//                task.execute();
                // use AsyncTask#SERIAL_EXECUTOR is the same to #execute();
//                task.executeOnExecutor(AsyncTask.SERIAL_EXECUTOR);
                // use AsyncTask#THREAD_POOL_EXECUTOR is the same to older version #execute() (less than API 11)
                // but different from newer version of #execute()
//                task.executeOnExecutor(AsyncTask.THREAD_POOL_EXECUTOR);
                // one by one, same to newer version of #execute()
//                task.executeOnExecutor(SINGLE_TASK_EXECUTOR);
                // execute tasks at some limit which can be customized
//                task.executeOnExecutor(LIMITED_TASK_EXECUTOR);
                // no limit to thread pool size, all tasks run simultaneously
                task.executeOnExecutor(FULL_TASK_EXECUTOR);

                mTaskList.add(task);
            }
            return convertView;
        }
    }

    private class SimpleAsyncTask extends AsyncTask<Void, Integer, Void> {
        private TaskItem mTaskItem;
        private String mName;

        public SimpleAsyncTask(TaskItem item) {
            mTaskItem = item;
            mName = "Task #" + String.valueOf(++ID);
        }

        @Override
        protected Void doInBackground(Void... params) {
            int prog = 1;
            while (prog < 101) {
                SystemClock.sleep(100);
                publishProgress(prog);
                prog++;
            }
            return null;
        }

        @Override
        protected void onPostExecute(Void result) {
        }

        @Override
        protected void onPreExecute() {
            mTaskItem.setTitle(mName);
        }

        @Override
        protected void onProgressUpdate(Integer... values) {
            mTaskItem.setProgress(values[0]);
        }
    }
}

class TaskItem extends LinearLayout {
    private TextView mTitle;
    private ProgressBar mProgress;

    public TaskItem(Context context, AttributeSet attrs) {
        super(context, attrs);
    }

    public TaskItem(Context context) {
        super(context);
    }

    public void setTitle(String title) {
        if (mTitle == null) {
            mTitle = (TextView) findViewById(R.id.task_name);
        }
        mTitle.setText(title);
    }

    public void setProgress(int prog) {
        if (mProgress == null) {
            mProgress = (ProgressBar) findViewById(R.id.task_progress);
        }
        mProgress.setProgress(prog);
    }
}
<?xml version="1.0" encoding="utf-8"?>
<LinearLayout xmlns:android="http://schemas.android.com/apk/res/android"
    android:layout_width="match_parent"
    android:layout_height="match_parent"
    android:paddingLeft="10dip"
    android:paddingRight="10dip"
    android:orientation="vertical" >
    <ListView android:id="@+id/task_list"
        android:layout_width="fill_parent"
        android:layout_height="wrap_content"
        android:divider="#cccccc"
        android:dividerHeight="0.6dip"
        android:footerDividersEnabled="true"
        android:headerDividersEnabled="true" />
</LinearLayout>
<?xml version="1.0" encoding="utf-8"?>
<com.hilton.effectiveandroid.os.TaskItem xmlns:android="http://schemas.android.com/apk/res/android"
    android:layout_width="match_parent"
    android:layout_height="50dip"
    android:gravity="center_vertical"
    android:layout_gravity="center_vertical"
    android:orientation="horizontal" >
    <TextView android:id="@+id/task_name"
        android:layout_width="wrap_content"
        android:layout_height="wrap_content"
        android:textColor="#ffff00"
        android:textSize="26sp" />
    <ProgressBar android:id="@+id/task_progress"
        android:layout_width="fill_parent"
        android:layout_height="15dip"
        android:max="100"
        style="@android:style/Widget.ProgressBar.Horizontal" />
</com.hilton.effectiveandroid.os.TaskItem >
原文链接: http://blog.csdn.net/hitlion2008/article/details/7983449

