iOS开发之主题皮肤
转自:http://blog.csdn.net/yanghua_kobe/article/details/9555575
最近在开发一款【公交应用】,里面有个模块涉及到主题设置,这篇文章主要谈一下个人的做法。
大概的步骤如下:
(1):整个应用依赖于一个主题管理器,主题管理器根据当前的主题配置,加载不同主题文件夹下的主题
(2):在应用的各个Controller中,涉及到需要更换主题图片或颜色的地方,由原来的硬编码方式改为从主题管理器获取(此处可以看到,虽然.xib配置UI会比编码渲染UI效率来得高,但在灵活性以及协同开发方面还是有些弱了)
(3):在主题设置Controller中,一旦切换主题,则需要像系统的通知中心发送消息(这一步的目的,主要是为了让那些已经存在的并且UI已构建完成的对象修改他们的主题)
最终的效果图见:
https://github.com/yanghua/iBus#version-102preview
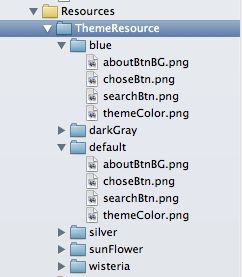
首先来看看主题文件夹的目录结构:
可以看到,通常情况下主题都是预先做好的,当然了,这里因为我没有后端server,如果你的应用是拥有后端server的,那么可以做得更加强大,比如不将主题文件存储在Bundle中,而是存储在应用sandBox的Document中。这样你在应用启动的时候就可以check server 是否有新的主题包,如果有就download下来,释放到Document,这样会方便许多,而不需要在升级之后才能够使用新主题。扯远了,这里可以看到这些文件夹是蓝颜色的,而非黄颜色,可见它不是xcode project的Group,它们都是真实存储的文件夹(它们也是app的bundle的一部分,只是获取的方式有些不同罢了,这样做的目的就是为了方便组织各个主题的文件、目录结构)。
看看获取主题文件夹路径的方式:
- #define Bundle_Of_ThemeResource @"ThemeResource"
- //the path in the bundle
- #define Bundle_Path_Of_ThemeResource \
- [[[NSBundle mainBundle] resourcePath] stringByAppendingPathComponent:Bundle_Of_ThemeResource]
ThemeManager:
- @interface ThemeManager : NSObject
- @property (nonatomic,copy) NSString *themeName;
- @property (nonatomic,copy) NSString *themePath;
- @property (nonatomic,retain) UIColor *themeColor;
- + (ThemeManager*)sharedInstance;
- - (NSString *)changeTheme:(NSString*)themeName;
- - (UIImage*)themedImageWithName:(NSString*)imgName;
- @end
可以看到,ThemeManager对外开放了三个属性以及两个实例方法,并且ThemeManager被构建为是单例的(Single)
- - (id)init{
- if (self=[super init]) {
- [self initCurrentTheme];
- }
- return self;
- }
initCurrentTheme定义:
- - (void)initCurrentTheme{
- self.themeName=[ConfigItemDao get:@"主题设置"];
- NSString *themeColorStr=[ConfigItemDao get:self.themeName];
- self.themeColor=[UIColor parseColorFromStr:themeColorStr];
- self.themePath=[Bundle_Path_Of_ThemeResource stringByAppendingPathComponent:self.themeName];
- //init UI
- UIImage *navBarBackgroundImg=[[self themedImageWithName:@"themeColor.png"]
- resizableImageWithCapInsets:UIEdgeInsetsMake(0.0f, 0.0f, 1.0f, 1.0f)
- resizingMode:UIImageResizingModeTile];
- [[UINavigationBar appearance] setBackgroundImage:navBarBackgroundImg
- forBarMetrics:UIBarMetricsDefault];
- }
这里从sqlite中获取了主题类型、主题颜色,然后配置了主题属性,同时初始化了一致的UINavigationBar。
- UIImage *img=[UIImage imageNamed:@"img.png"];
取而代之的是:
- UIImage *img=[[ThemeManager sharedInstance] themedImageWithName@"img.png"];
- - (UIImage*)themedImageWithName:(NSString*)imgName{
- if (!imgName || [imgName isEqualToString:@""]) {
- return nil;
- }
- NSString *imgPath=[self.themePath stringByAppendingPathComponent:imgName];
- return [UIImage imageWithContentsOfFile:imgPath];
- }
到主题设置界面,选择一个新主题,会调用changeTheme方法:
- - (NSString *)changeTheme:(NSString*)themeName{
- if (!themeName || [themeName isEqualToString:@""]) {
- return nil;
- }
- NSString *themePath=[Bundle_Path_Of_ThemeResource stringByAppendingPathComponent:themeName];
- if (dirExistsAtPath(themePath)) {
- self.themePath=themePath;
- //update to db
- [ConfigItemDao set:[NSMutableDictionary dictionaryWithObjects:@[@"主题设置",themeName]
- forKeys:@[@"itemKey",@"itemValue"]]];
- //init again
- [self initCurrentTheme];
- }
- return themeName;
- }
这是一个简单的ThemeManager,通常有可能会有更多的配置,比如: themedFontWithName:(NSString *)fontName 等,当然方式都是一样的。
- - (void)configUIAppearance{
- NSLog(@"base config ui ");
- }
该类默认没有实现,主要用于供sub class去 override。
- - (void)configUIAppearance{
- self.appNameLbl.strokeColor=[[ThemeManager sharedInstance] themeColor];
- [self.commentBtn setBackgroundImage:[[ThemeManager sharedInstance] themedImageWithName:@"aboutBtnBG.png"]
- forState:UIControlStateNormal];
- [self.shareBtn setBackgroundImage:[[ThemeManager sharedInstance] themedImageWithName:@"aboutBtnBG.png"]
- forState:UIControlStateNormal];
- [self.developerBtn setBackgroundImage:[[ThemeManager sharedInstance] themedImageWithName:@"aboutBtnBG.png"] forState:UIControlStateNormal];
- [super configUIAppearance];
- }
可以看到,所有需要使用主题的UI控件的相关设置,都抽取出来放到了configUIAppearance中。
该方法,在所有子controller中都不会显式调用,因为在BaseController的viewDidLoad方法中以及调用了。这样,如果子类override了它,就会调用子类的,如果没有override,则调用BaseController的默认实现。
- - (void)registerThemeChangedNotification{
- [Default_Notification_Center addObserver:self
- selector:@selector(handleThemeChangedNotification:)
- name:Notification_For_ThemeChanged
- object:nil];
- }
同时给出消息处理的逻辑:
- - (void)handleThemeChangedNotification:(NSNotification*)notification{
- UIImage *navBarBackgroundImg=[[[ThemeManager sharedInstance] themedImageWithName:@"themeColor.png"]
- resizableImageWithCapInsets:UIEdgeInsetsMake(0.0f, 0.0f, 1.0f, 1.0f)
- resizingMode:UIImageResizingModeTile];
- [self.navigationController.navigationBar setBackgroundImage:navBarBackgroundImg
- forBarMetrics:UIBarMetricsDefault];
- <pre name="code" class="cpp"> [self configUIAppearance];</pre>}
可以看到这里又调用了configUIAppearance,由于继承关系,这里的self指针指向的并非BaseController实例(而是sub controller的实例),所以调用的也是sub controller的方法。所以,虽然可能还停留在“主题设置的界面”,但其他已存活的controller已经接受到了切换主题的Notification,并悄悄完成了切换。
- - (void)themeButton_touchUpIndise:(id)sender{
- //unselect
- UIButton *lastSelectedBtn=(UIButton*)[self.view viewWithTag:(Tag_Start_Index + self.currentSelectedIndex)];
- lastSelectedBtn.selected=NO;
- //select
- UIButton *selectedBtn=(UIButton*)sender;
- self.currentSelectedIndex=selectedBtn.tag - Tag_Start_Index;
- selectedBtn.selected=YES;
- [[ThemeManager sharedInstance] changeTheme:((NSDictionary*)self.themeArr[self.currentSelectedIndex]).allKeys[0]];
- //post themechanged notification
- [Default_Notification_Center postNotificationName:Notification_For_ThemeChanged
- object:nil];
- }
大致的流程就是这样~
