crossapp CANavigationController使用
CANavigationController官方给出的名字是 导航控制器,具体可以看一下 官方文档解释 ,简单的解释就是 通过某种触发,需要创建一个新的视图,覆盖之前的视图。使用完新的视图之后,继续显示之前的视图。
使用步骤:
1. 创建项目, 在rootwindow里面修改下面函数 ,至于为什么一定需要在这里修改以后再说,修改之后的代码如下:
<pre name="code" class="cpp">bool RootWindow::init()
{
    if (!CAWindow::init())
    {
        return false;
    }

    FirstViewController* _viewController = new FirstViewController();
    _viewController->init();

	CANavigationController *pnavigation = new CANavigationController();
	pnavigation->initWithRootViewController(_viewController);

	this->setRootViewController(pnavigation);
	_viewController->release();

    return true;
}
添加之后视图根管理器就是 导航控制器了 。这里讲FirstViewController添加成第一个视图。
2.修改
FirstViewController类,目的在FirstViewController里面的 button控件按下之后,新的视图会显示出来。
<pre name="code" class="cpp">#ifndef __HelloCpp__ViewController__
#define __HelloCpp__ViewController__

#include <iostream>
#include "CrossApp.h"

USING_NS_CC;

class FirstViewController: public CAViewController
{

public:

	FirstViewController();

	virtual ~FirstViewController();

	void Btn_Callback(CAControl*, CCPoint);  //btn   回调函数

protected:

    void viewDidLoad();

    void viewDidUnload();


};


#endif /* defined(__HelloCpp__ViewController__) */
cpp文件代码:
<pre name="code" class="cpp">#include "FirstViewController.h"


FirstViewController::FirstViewController()
{

}

FirstViewController::~FirstViewController()
{

}

void FirstViewController::viewDidLoad()
{
    // Do any additional setup after loading the view from its nib.
	CCRect winRect = this->getView()->getBounds();
    CAImageView* imageView = CAImageView::createWithImage(CAImage::create("r/HelloWorld.png"));
    imageView->setImageViewScaleType(CAImageViewScaleTypeFitImageCrop);
    imageView->setFrame(winRect);
    this->getView()->addSubview(imageView);

	CALabel* label = CALabel::createWithFrame(CCRect(0, winRect.size.height*0.2, winRect.size.width, 200));
    label->setTextAlignment(CATextAlignmentCenter);
    label->setVerticalTextAlignmet(CAVerticalTextAlignmentCenter);
    label->setFontSize(_px(60));

	static int Index = 1;
	char data[30];
	sprintf(data, "hello word %d   ", Index++);


	label->setText(data);
    label->setColor(CAColor_white);
    this->getView()->insertSubview(label, 1);

    CCLog("%f", CAApplication::getApplication()->getWinSize().width);


	//add by test

	CAButton *btn = CAButton::createWithFrame(CCRect(0, winRect.size.height / 2, 200, 100), CAButtonTypeRoundedRect);
	btn->setImageColorForState(CAControlStateHighlighted, CAColor_blue);
	btn->setImageColorForState(CAControlStateNormal, CAColor_white);
	btn->addTarget(this, CAControl_selector(FirstViewController::Btn_Callback), CAControlEventTouchDown);
	this->getView()->addSubview(btn);

	//end add


}

void FirstViewController::viewDidUnload()
{
    // Release any retained subviews of the main view.
    // e.g. self.myOutlet = nil;
}


void FirstViewController::Btn_Callback(CAControl*, CCPoint)
{

	FirstViewController *newfirst = new FirstViewController();
	newfirst->init();

	this->getNavigationController()->pushViewController(newfirst, 1);


	CALabel* label = CALabel::createWithFrame(CCRect(  0 , 0 , 400 , 200));
	label->setTextAlignment(CATextAlignmentLeft);
	label->setVerticalTextAlignmet(CAVerticalTextAlignmentCenter);
	label->setFontSize(_px(40));

	label->setText("lable");
	label->setColor(CAColor_orange);
	CANavigationBarItem *pbar = CANavigationBarItem::create("");
	pbar->setTitleView(label);
	label->release();

	newfirst->setNavigationBarItem(pbar);
	newfirst->release();

}
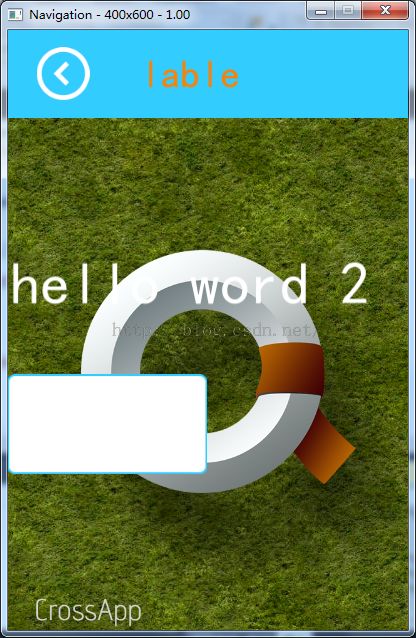
没有 写第二个 ViewController ,循环使用FirstViewContoller创建一样的视图 ,helloword后面的Index标记不同的视图。
效果如下:
吐槽一下 当前crossapp状况:
1 大半年就做了一个 Ui编辑器,还只是美工版 , 现在开源那么多pc端界面编辑器,开源界面库,可以借鉴,不需要造轮子。
2 文档跟不上api的改动
3 入门视频比较少,只看到了一个 无脑码农的视频
4. 行动不够效率,微软苹果现在也在搞跨平台的,如果不能抢先抢占用户,然后就没有然后了