unity3d 分享文字,图片,链接,文件到Facebook, twitter, delicious, tumblr, google reader
ShareKit is incredibly easy to add to any existing project. Follow the steps below and you can be up and running in under 15 minutes.
ShareKit 是iPhone中一键分享文字,图片,链接,文件到Facebook, twitter, delicious, tumblr, google reader等第三方网站的objc库
Step 1: Download
Download ShareKitVersion 0.2.1 - Download includes ShareKit and an example project.
Step 2: Adding ShareKit to your Project
Copy Files from Example Project

Open both the example project (that you downloaded in step 1 above) and your app's project in XCode.
Drag the ShareKit Group from the example project into your project's Groups & Files.
Make sure the "Copy items into destination group's folder (if needed)" checkbox is checked.
Add Frameworks

Expand the 'Frameworks' group in your project's file list. Make sure you have the following frameworks:
- SystemConfiguration.framework
- Security.framework
- MessageUI.framework
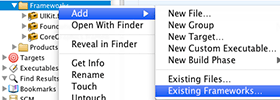
If you are missing any frameworks, right click the 'Frameworks' group and select Add -> Existing Frameworks. Select the framework you are missing and add it to your project.
Base SDK and Deployment Targets
If you aren't already, you'll want to make sure your base SDK is at least iOS 4. You can still support older versions (back to 3.*) by setting your deployment target.
This is an easy process, a good walk-through of this process is detailed here: Developing iPhone Apps with iOS4, deploying to 3.x devices.
Step 3: Filling in API Keys
Most of the web services that ShareKit integrates require you to use an API key when connecting. An API key is a unique identifer that tells the service what app is making the request.
You have to sign up for each api key, but they are all free and sign-ups are quick.
Locate and open the file SHKConfig.h, just inside the ShareKit group in your project's file list.
At the top you'll find a list of services that require api keys. Each service has a link next to it. Follow the link for each service to get an api key. Fill in the api key for each corresponding service within SHKConfig.h.
Note: Follow the comments within the SHKConfig file, they provide additional steps and possible customizations for each service.
Step 4: Calling ShareKit
Import the ShareKit Header
In any class where you call ShareKit, you'll need to include the ShareKit header at the top. At the top of your class you'll probably see other imports already. Add ShareKit to list like:
#import "SHK.h"
Add a Share Button
This section is subjective and entirely depends on how you design your app. It assumes you know how to create a button that performs an action. If you'd like more guidance, take a look a the example project (included in the ShareKit download). It has a separate example for sharing links, images, text, and files.
You need to add a way to allow the user to say 'hey, I want to share this!'. It is up to you where to place this button and even what it looks like. If your app has a UIToolbar or UINavigationBar, a common practice is adding a UIBarButtonItem with theUIBarButtonSystemItemAction system item style.
This icon has become the standard for sharing amongst iOS apps.
An example may look like:
[[UIBarButtonItem alloc] initWithBarButtonSystemItem:UIBarButtonSystemItemAction target:self action:@selector(share)]
Handling the Button Action
After you've added a button and set a target action to call when it's pushed, it's finally time to call ShareKit.
A user's entry point into ShareKit is an actionsheet. This actionsheet displays the user's most used services and a more button for additional options.
The actionsheet will only display services that can respond to the item you want to share. So the first step is to create an object (SHKItem) that describes what you want to share (a url, image, text, or file). With that item, you create an actionsheet and display it to the user.
Here are the 3 steps together. In this example we'll share a URL:
- (void)myButtonHandlerAction { // Create the item to share (in this example, a url) NSURL *url = [NSURL URLWithString:@"http://getsharekit.com"]; SHKItem *item = [SHKItem URL:url title:@"ShareKit is Awesome!"]; // Get the ShareKit action sheet SHKActionSheet *actionSheet = [SHKActionSheet actionSheetForItem:item]; // Display the action sheet [actionSheet showFromToolbar:navigationController.toolbar]; }
That's it! ShareKit will take over from there and handle everything else. This includes logging the user in to their selected service, allowing them to edit the share item, displaying activity indicators, and even sharing offline.
Note: How/Where you display the action sheet is up to you. On an iPad you may want to display this as a popover from your share button. For all possible options, take a look at the UIActionSheetdocumentation.
To see examples sharing other types of content (images, text, or files) check out the complete documentation or example project included in the ShareKit download.
Step 5: Offline Sharing
If your app can be used without an internet connection, you should support offline sharing. Luckily, this means only adding one additional line of code.
Most ShareKit services support offline sharing. This means when a user shares something while they are disconnected, ShareKit will store it and wait to send until they are connected again.
You just need to tell ShareKit when to retry these offline items. A good time to do this is when the app is opened. Simply add this line when you want ShareKit to try resending the items: