【整合篇】JBPM4.4与Spring整合
我们大家都知道容器的好处,那么工作流也提供了与spring整合的方式,将工作流引擎由spring容器统一管理起来,共同拥有容器的特性。下面来从代码的角度来看看整合与不整合的对比:
未整合:
引入相应的jar包,使用hibernate来持久化
配置文件:
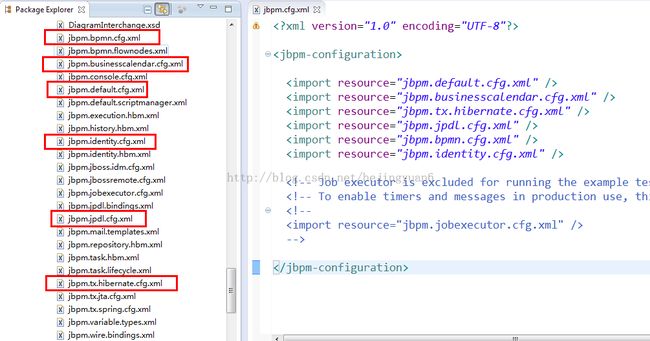
jbpm.cfg.xml:
<?xml version="1.0" encoding="UTF-8"?>

<jbpm-configuration>

  <import resource="jbpm.default.cfg.xml" />
  <import resource="jbpm.businesscalendar.cfg.xml" />
  <import resource="jbpm.tx.hibernate.cfg.xml" />
  <import resource="jbpm.jpdl.cfg.xml" />
  <import resource="jbpm.bpmn.cfg.xml" />
  <import resource="jbpm.identity.cfg.xml" />

  <!-- Job executor is excluded for running the example test cases. -->
  <!-- To enable timers and messages in production use, this should be included. -->
  <!--
  <import resource="jbpm.jobexecutor.cfg.xml" />
  -->

</jbpm-configuration>
<?xml version="1.0" encoding="utf-8"?>

<!DOCTYPE hibernate-configuration PUBLIC
          "-//Hibernate/Hibernate Configuration DTD 3.0//EN"
          "http://hibernate.sourceforge.net/hibernate-configuration-3.0.dtd">

<hibernate-configuration>
  <session-factory>

     <property name="hibernate.dialect">org.hibernate.dialect.MySQL5InnoDBDialect</property>
     <property name="hibernate.connection.driver_class">com.mysql.jdbc.Driver</property>
     <property name="hibernate.connection.url">jdbc:mysql://127.0.0.1/jbpm</property>
     <property name="hibernate.connection.username">root</property>
     <property name="hibernate.connection.password">hejingyuan</property>
    <!--  <property name="hibernate.dialect">org.hibernate.dialect.HSQLDialect</property>
     <property name="hibernate.connection.driver_class">org.hsqldb.jdbcDriver</property>
     <property name="hibernate.connection.url">jdbc:hsqldb:mem:.</property>
     <property name="hibernate.connection.username">sa</property>
     <property name="hibernate.connection.password"></property> -->
     <property name="hibernate.hbm2ddl.auto">update</property>
     <property name="hibernate.format_sql">true</property>

     <mapping resource="jbpm.repository.hbm.xml" />
     <mapping resource="jbpm.execution.hbm.xml" />
     <mapping resource="jbpm.history.hbm.xml" />
     <mapping resource="jbpm.task.hbm.xml" />
     <mapping resource="jbpm.identity.hbm.xml" />

  </session-factory>
</hibernate-configuration>
申请时应用:
 ProcessEngine pe = Configuration.getProcessEngine();
	TaskService ts = pe.getTaskService();

	String taskId = request.getParameter("taskId");
	String owner = request.getParameter("owner");
	int day = Integer.parseInt(request.getParameter("day"));
	String reason = request.getParameter("reason");

	Map map = new HashMap();
	map.put("day", day);
	map.put("reason", reason);
	map.put("msg", "<hr>申请人:"+owner+"<br>请假天数:"+day+"<br>请假原因:"+reason);

	ts.setVariables(taskId,map);
	ts.completeTask(taskId);

	response.sendRedirect("index.jsp");
对应的源码:
 /** singletone instance */
  private static ProcessEngine singleton;

  /** get the singleton ProcessEngine that is created from the default
   * configuration file 'jbpm.cfg.xml'. */
  public static ProcessEngine getProcessEngine() {
    if (singleton == null) {
      synchronized (Configuration.class) {
        if (singleton == null) {
          singleton = new Configuration().setResource("jbpm.cfg.xml").buildProcessEngine();
        }
      }
    }
    return Configuration.singleton;
  }
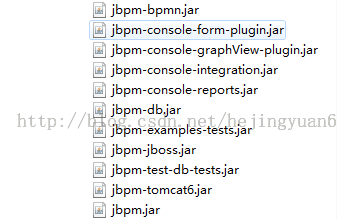
在jbpm的jar包下,我们可以看到:
这些是jbpm.cfg.xml文件中引入的文件

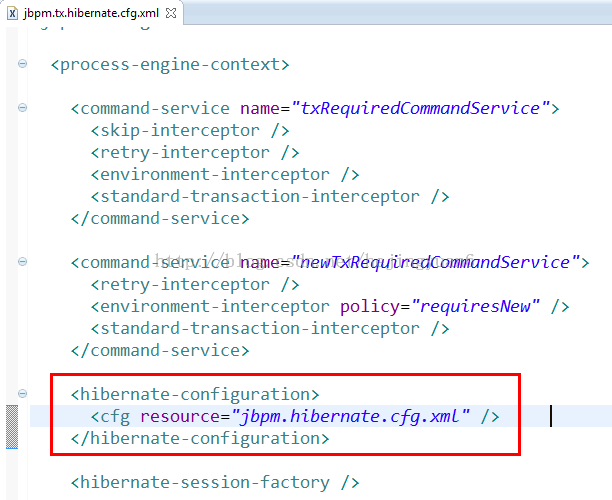
如何识别的hibernate的配置文件:
整合后:
使用ssh架构:
web.xml文件:
http://java.sun.com/xml/ns/javaee/web-app_2_5.xsd" id="WebApp_ID" version="2.5">
  <display-name>SSH</display-name>

  <listener>
        <listener-class>org.springframework.web.context.ContextLoaderListener</listener-class>
  </listener>
 <context-param>
		<param-name>contextConfigLocation</param-name>
		<param-value>classpath:applicationContext.xml</param-value>
  </context-param>

 <!-- 配置Spring的OpenSessionInViewFilter,以解决懒加载异常的问题 -->
	<filter>
		<filter-name>OpenSessionInViewFilter</filter-name>
		<filter-class>org.springframework.orm.hibernate3.support.OpenSessionInViewFilter</filter-class>
	</filter>
	<filter-mapping>
		<filter-name>OpenSessionInViewFilter</filter-name>
		<url-pattern>*.action</url-pattern>
	</filter-mapping>

 <!--  hejingyuan添加 -->
   <filter>
        <filter-name>SSH</filter-name>
        <filter-class>org.apache.struts2.dispatcher.ng.filter.StrutsPrepareAndExecuteFilter</filter-class>
    </filter>

    <filter-mapping>
        <filter-name>SSH</filter-name>
        <url-pattern>/*</url-pattern>
    </filter-mapping>

    <welcome-file-list>
        <welcome-file>index.html</welcome-file>
    </welcome-file-list>
  <!-- 结束 -->

  <!-- open session in view 的配置-->
 <!--  <filter>
 <filter-name>openSessionInView</filter-name>
 <filter-class>org.springframework.orm.hibernate3.support.OpenSessionInViewFilter</filter-class>
 <init-param>
 <param-name>sessionFactoryBeanName</param-name>
 <param-value>sessionFactory</param-value>
 </init-param>
 </filter>

 <filter-mapping>
 <filter-name>openSessionInView</filter-name>
 <url-pattern>/*</url-pattern>
 </filter-mapping> -->


</web-app>
struts.xml配置文件:
<?xml version="1.0" encoding="UTF-8" ?>
<!DOCTYPE struts PUBLIC "-//Apache Software Foundation//DTD Struts Configuration 2.1//EN" "http://struts.apache.org/dtds/struts-2.1.dtd">
<struts>

<!-- 问题一: namespace="/" 错误,找不到返回值 -->

	<!-- 配置为开发模式 -->
	<constant name="struts.devMode" value="true" />

	<include file="struts-default.xml" />
    <package name="hjy" extends="struts-default"  namespace="/">


        <!-- 审批流转:审批流程管理 -->
		<action name="processDefinitionAction_*" class="com.hjy.ssh.action.ProcessDefinitionAction" method="{1}">
			<result name="list">/WEB-INF/jsp/definitionFlow/list.jsp</result>
			<result name="addUI">/WEB-INF/jsp/definitionFlow/addUI.jsp</result>
			<result name="toList" type="redirectAction">processDefinitionAction_list</result>
			<!-- 下载专用的结果配置 -->
			<result name="downloadProcessImage" type="stream">
				<param name="contentType">image/png</param>
				<param name="inputName">inputStream</param>
			</result>
		</action>


		<!-- 审批流转:申请流转 -->
		<action name="flowAction_*" class="com.hjy.ssh.action.FlowAction" method="{1}">
			<result name="submitUI">/WEB-INF/jsp/flowAction/submitUI.jsp</result>
			<result name="myApplicationList">/WEB-INF/jsp/flowAction/myApplicationList.jsp</result>
			<result name="toMyApplicationList" type="redirectAction">flowAction_myApplicationList</result>
			<result name="myTaskList">/WEB-INF/jsp/flowAction/myTaskList.jsp</result>
			<result name="approveUI">/WEB-INF/jsp/flowAction/approveUI.jsp</result>
			<result name="approveHistory">/WEB-INF/jsp/flowAction/approveHistory.jsp</result>
			<result name="toMyTaskList" type="redirectAction">flowAction_myTaskList</result>

			<result name="showProcessImageUI"> /WEB-INF/jsp/flowAction/showProcessImageUI.jsp</result>
		</action>

		<!-- 用户管理 -->
		<action name="userAction_*" class="com.hjy.ssh.action.UserAction" method="{1}">
			<result name="toIndex" type="redirect">/index.jsp</result>
			<result name="loginUI">/WEB-INF/jsp/user/loginUI.jsp</result>
		</action>
		<!-- 首页 -->
		<action name="homeAction_*" class="com.hjy.ssh.action.HomeAction" method="{1}">
			<result name="{1}">/WEB-INF/jsp/homeAction/{1}.jsp</result>
		</action>

    </package>
</struts>
sring的配置文件:applicationContext.xml
<?xml version="1.0" encoding="UTF-8"?>
<beans xmlns="http://www.springframework.org/schema/beans" xmlns:xsi="http://www.w3.org/2001/XMLSchema-instance" xmlns:context="http://www.springframework.org/schema/context"
	xmlns:tx="http://www.springframework.org/schema/tx"
	xsi:schemaLocation="http://www.springframework.org/schema/beans http://www.springframework.org/schema/beans/spring-beans-2.5.xsd
				http://www.springframework.org/schema/context http://www.springframework.org/schema/context/spring-context-2.5.xsd
				http://www.springframework.org/schema/tx http://www.springframework.org/schema/tx/spring-tx-2.5.xsd">


      <!-- 自动扫描与装配bean -->
	<context:component-scan base-package="com.hjy.ssh"></context:component-scan>

    <bean id="dataSource" class="org.apache.commons.dbcp.BasicDataSource" destroy-method="close">
        <property name="driverClassName" value="com.mysql.jdbc.Driver"></property>
        <property name="url" value="jdbc:mysql://127.0.0.1/ssh"></property>
        <property name="username" value="root"></property>
        <property name="password" value="hejingyuan"></property>
    </bean>

    <!--定义Hibernate的SessionFactory -->
    <!-- SessionFactory使用的数据源为上面的数据源 -->
    <!-- 指定了Hibernate的映射文件和配置信息 -->

	<!-- 配置SessionFactory -->
	<bean id="sessionFactory" class="org.springframework.orm.hibernate3.LocalSessionFactoryBean">
		<property name="dataSource" ref="dataSource"></property>
		<property name="configLocation" value="classpath:hibernate.cfg.xml"></property>
	</bean>

   <!-- 配置声明式的事务管理(采用基于注解的方式) -->
	 <bean id="transactionManager" class="org.springframework.orm.hibernate3.HibernateTransactionManager">
		<property name="sessionFactory" ref="sessionFactory"></property>
	</bean>
	<tx:annotation-driven transaction-manager="transactionManager" />

    <!-- more bean definitions go here -->

 	<!-- 配置ProcessEngine -->
	  <bean id="springHelper" class="org.jbpm.pvm.internal.processengine.SpringHelper">
		<property name="jbpmCfg" value="jbpm.cfg.xml"></property>
	</bean>
	<bean id="processEngine" factory-bean="springHelper" factory-method="createProcessEngine" />

</beans>
hibernate.cfg.xml:
<?xml version="1.0" encoding="UTF-8"?>
<!-- <!DOCTYPE hibernate-configuration PUBLIC
		"-//Hibernate/Hibernate Configuration DTD 3.0//EN"
		"http://hibernate.sourceforge.net/hibernate-configuration-3.0.dtd">-->


<!DOCTYPE hibernate-configuration PUBLIC
        "-//Hibernate/Hibernate Configuration DTD 3.0//EN"
        "http://hibernate.sourceforge.net/hibernate-configuration-3.0.dtd">
<hibernate-configuration>
  <session-factory>
    <!-- Database connection settings -->
   	<!--  <property name="connection.driver_class">com.mysql.jdbc.Driver</property>
    <property name="connection.url">jdbc:mysql://127.0.0.1/ssh</property>
    <property name="connection.username">root</property>
    <property name="connection.password">hejingyuan</property>   -->

    <!-- JDBC connection pool (use the built-in) -->
    <!-- <property name="connection.pool_size">1</property> -->

    <!-- SQL dialect -->

    <property name="hibernate.dialect">org.hibernate.dialect.MySQL5InnoDBDialect</property>
    <!-- Enable Hibernate's automatic session context management -->
    <!-- <property name="current_session_context_class">thread</property> -->


    <!-- Echo all executed SQL to stdout -->
    <property name="show_sql">true</property>


    <!-- Drop and re-create the database schema on startup -->
    <property name="hibernate.hbm2ddl.auto">update</property>

    <mapping resource="com/hjy/ssh/beans/User.hbm.xml"/>
    <mapping resource="com/hjy/ssh/beans/Application.hbm.xml"/>
    <mapping resource="com/hjy/ssh/beans/ApproveInfo.hbm.xml"/>

    <!-- 导入JBPM4.4的映射文件 -->
	<mapping resource="jbpm.repository.hbm.xml" />
	<mapping resource="jbpm.execution.hbm.xml" />
	<mapping resource="jbpm.history.hbm.xml" />
	<mapping resource="jbpm.task.hbm.xml" />
	<mapping resource="jbpm.identity.hbm.xml" />

  </session-factory>
</hibernate-configuration>
jbpm.cfg.xml:
<?xml version="1.0" encoding="UTF-8"?>
<jbpm-configuration>

  <import resource="jbpm.default.cfg.xml" />
  <import resource="jbpm.businesscalendar.cfg.xml" />
  <!--
  <import resource="jbpm.tx.hibernate.cfg.xml" />
   -->
   <!-- 与Spring整合需要导入jbpm.tx.spring.cfg.xml文件 -->
  <import resource="jbpm.tx.spring.cfg.xml" />

  <import resource="jbpm.jpdl.cfg.xml" />
  <import resource="jbpm.bpmn.cfg.xml" />
  <import resource="jbpm.identity.cfg.xml" />

</jbpm-configuration>
部署应用:
@Resource
protected ProcessDefinitionService processDefinitionService;

/** 部署 ,即添加一个流程定义(上传png和xml文件)*/
public String add() throws Exception {
	ZipInputStream zipInputStream = new ZipInputStream(new FileInputStream(upload));
	try {
		processDefinitionService.deploy(zipInputStream);
	} finally {
		zipInputStream.close();
	}
	return "toList";
	}
实现类:
@Override
public void deploy(ZipInputStream zipInputStream) {
	// 部署流程
	processEngine.getRepositoryService()//
		.createDeployment()//
		.addResourcesFromZipInputStream(zipInputStream)//
		.deploy();

	}
总结:
以上通过代码的方式展示,主要是让大家更加系统性的来了解工作流的工作原理,而看配置文件也是最简单的一种方式。对于是否与spring或者其他框架整合,相信大家通过做日常项目也能体会到应用框架的优势,以上的对比只是让大家有个直观的认识。

