android phone电话调用流程
|
第一部分:从java端发送at命令的处理流程。 拨出电话流程: 1、Contacts的AndroidManifest.xml 中android:process="android.process.acore"说明此应用程序运行在acore进程中。 DialtactsActivity的intent-filter的action属性设置为main,catelog属性设置为launcher,所以此activity能出现在主菜单中,并且是点击此应用程序的第一个界面。dialtactsactivity包含四个tab,分别由TwelveKeyDialer、RecentCallsListActivity,两个activity-alias DialtactsContactsEntryActivity和DialtactsFavoritesEntryActivity分别表示联系人和收藏tab,但是正真的联系人列表和收藏是由ContactsListActivity负责。 2、进入TwelveKeyDialer 中OnClick方法,按住的按钮id为:R.id.dialButton,执行placecall()方法: Intent intent = new Intent(Intent.ACTION_CALL_PRIVILEGED,Uri.fromParts("tel", number, null)); intent.setFlags(Intent.FLAG_ACTIVITY_NEW_TASK); startActivity(intent); 3、intert.ACTION_CALL_PRIVILEGED实际字符串为android.intent.action.CALL_PRIVILEGED,通过查找知道了packegs/phone下面的AndroidManifest.xml中PrivilegedOutgoingCallBroadcaster activity-alias设置了intent-filter,所以需要找到其targetactivity为OutgoingCallBroadcaster。所以进入OutgoingCallBroadcaster的onCreate()中: String action = intent.getAction(); 获取过来的Action以及Number,并对Action以及Number类型进行判断。 //如果为callNow = true;则启动InCall界面: intent.setClass(this, InCallScreen.class); startActivity(intent); 并发送广播给OutgoingCallReceiver: Intent broadcastIntent = new Intent(Intent.ACTION_NEW_OUTGOING_CALL); if (number != null) broadcastIntent.putExtra(Intent.EXTRA_PHONE_NUMBER, number); broadcastIntent.putExtra(EXTRA_ALREADY_CALLED, callNow); broadcastIntent.putExtra(EXTRA_ORIGINAL_URI, intent.getData().toString()); sendOrderedBroadcast(broadcastIntent, PERMISSION, 4、Intent.ACTION_NEW_OUTGOING_CALL实际字符串android.intent.action.NEW_OUTGOING_CALL,通过查找知道了packegs/phone下面的androidmanifest.xml中OutgoingCallReceiver Receiver接收此intent消息。找到OutgoingCallBroadcaster类中的内部类OutgoingCallReceiver,执行onReceive()函数: 执行doReceive(context, intent);方法: 获取传给来的号码,根据PhoneApp的实例获取PhoneType等。最后启动InCall界面: Intent newIntent = new Intent(Intent.ACTION_CALL, uri); newIntent.putExtra(Intent.EXTRA_PHONE_NUMBER, number); newIntent.setClass(context, InCallScreen.class); newIntent.addFlags(Intent.FLAG_ACTIVITY_NEW_TASK); 5、请求拨号的java部分流程 6、请求拨号的c/c++部分流程 6.1、初始化事件循环,启动串口监听,注册socket监听。
rild.c->main()
(1)、RIL_startEventLoop
//建立事件循环线程
ret = pthread_create(&s_tid_dispatch, &attr, eventLoop, NULL);
//注册进程唤醒事件回调
ril_event_set (&s_wakeupfd_event, s_fdWakeupRead, true,
processWakeupCallback, NULL);
rilEventAddWakeup (&s_wakeupfd_event);
//建立事件循环
ril_event_loop
for (;;) {
...
n = select(nfds, &rfds, NULL, NULL, ptv);
// Check for timeouts
processTimeouts();
// Check for read-ready
processReadReadies(&rfds, n);
// Fire away
firePending();
}
(2)、funcs = rilInit(&s_rilEnv, argc, rilArgv);//实际是通过动态加载动态库的方式执行reference-ril.c中的RIL_Init
//单独启动一个线程读取串口数据
ret = pthread_create(&s_tid_mainloop, &attr, mainLoop, NULL);
fd = open (s_device_path, O_RDWR);
ret = at_open(fd, onUnsolicited);
ret = pthread_create(&s_tid_reader, &attr, readerLoop, &attr);
RIL_requestTimedCallback(initializeCallback, NULL, &TIMEVAL_0);
在initializeCallback中执行的程序:
setRadioState (RADIO_STATE_OFF);
at_handshake();
/* note: we don't check errors here. Everything important will
be handled in onATTimeout and onATReaderClosed */
/* atchannel is tolerant of echo but it must */
/* have verbose result codes */
at_send_command("ATE0Q0V1", NULL);
/* No auto-answer */
at_send_command("ATS0=0", NULL);
...
//注册rild socket端口事件监听到事件循环中
(3)、RIL_register(funcs);
s_fdListen = android_get_control_socket(SOCKET_NAME_RIL);
ret = listen(s_fdListen, 4);
ril_event_set (&s_listen_event, s_fdListen, false,
listenCallback, NULL);//将此端口加入事件select队列
rilEventAddWakeup (&s_listen_event);
如果rild socket端口有数据来了将执行listencallback函数
listencallback
//为此客户端连接创建新的监听句柄,s_fdListen继续监听其他客户端的连接。
s_fdCommand = accept(s_fdListen, (sockaddr *) &peeraddr, &socklen);
ril_event_set (&s_commands_event, s_fdCommand, 1,
processCommandsCallback, p_rs);//将此端口加入事件select队列
rilEventAddWakeup (&s_commands_event);
6.2、socket监听,收到dial的socket请求
processCommandsCallback
//读数据到p_record中
ret = record_stream_get_next(p_rs, &p_record, &recordlen);
processCommandBuffer(p_record, recordlen);
p.setData((uint8_t *) buffer, buflen);
// status checked at end
status = p.readInt32(&request);
status = p.readInt32 (&token);//请求队列中的序号
pRI = (RequestInfo *)calloc(1, sizeof(RequestInfo));
pRI->token = token;
/*
包含#include "ril_commands.h"语句,结构体如下:
typedef struct {
int requestNumber;
void (*dispatchFunction) (Parcel &p, struct RequestInfo *pRI);
int(*responseFunction) (Parcel &p, void *response, size_t responselen);
} CommandInfo;
*/
pRI->pCI = &(s_commands[request]);
pRI->p_next = s_pendingRequests;
s_pendingRequests = pRI;
pRI->pCI->dispatchFunction(p, pRI);
//假设是接收了dial指令,pRI->PCI->dispatchFunction(p,pRI),调用dispatchDial (p,pRI)
dispatchDial (p,pRI)
s_callbacks.onRequest(pRI->pCI->requestNumber, &dial, sizeof(dial), pRI);
in reference-ril.c onRequest()
...
switch (request) {
case RIL_REQUEST_DIAL:
requestDial(data, datalen, t);
asprintf(&cmd, "ATD%s%s;", p_dial->address, clir);
ret = at_send_command(cmd, NULL);
err = at_send_command_full (command, NO_RESULT, NULL, NULL, 0, pp_outResponse);
err = at_send_command_full_nolock(command, type, responsePrefix, smspdu,timeoutMsec, sponse);
err = writeline (command);
//此处等待,直到收到成功应答或失败的应答,如:ok,connect,error cme等
err = pthread_cond_wait(&s_commandcond, &s_commandmutex);
waiting....
waiting....
/* success or failure is ignored by the upper layer here.
it will call GET_CURRENT_CALLS and determine success that way */
RIL_onRequestComplete(t, RIL_E_SUCCESS, NULL, 0);
p.writeInt32 (RESPONSE_SOLICITED);
p.writeInt32 (pRI->token);
errorOffset = p.dataPosition();
p.writeInt32 (e);
if (e == RIL_E_SUCCESS) {
/* process response on success */
ret = pRI->pCI->responseFunction(p, response, responselen);
if (ret != 0) {
p.setDataPosition(errorOffset);
p.writeInt32 (ret);
}
}
sendResponse(p);
sendResponseRaw(p.data(), p.dataSize());
blockingWrite(fd, (void *)&header, sizeof(header));
blockingWrite(fd, data, dataSize);
6.4、串口监听收到atd命令的应答"OK"或"no carrier"等
readerLoop()
line = readline();
processLine(line);
handleFinalResponse(line);
pthread_cond_signal(&s_commandcond);//至此,前面的等待结束,接着执行RIL_onRequestComplete函数
6.5、java层收到应答后的处理,以dial为例子.
ril.java->RILReceiver.run()
for(;;)
{
...
length = readRilMessage(is, buffer);
p = Parcel.obtain();
p.unmarshall(buffer, 0, length);
p.setDataPosition(0);
processResponse(p);
type = p.readInt();
if (type == RESPONSE_SOLICITED) {
processSolicited (p);
serial = p.readInt();
rr = findAndRemoveRequestFromList(serial);
rr.mResult.sendToTarget();
......
}
CallTracker.java->handleMessage (Message msg)
switch (msg.what) {
case EVENT_OPERATION_COMPLETE:
ar = (AsyncResult)msg.obj;
operationComplete();
cm.getCurrentCalls(lastRelevantPoll); |
第二部分:unsolicited 消息从modem上报到java的流程。
C++部分:
readerLoop()
line = readline();
processLine(line);
handleUnsolicited(line);
if (s_unsolHandler != NULL) {
s_unsolHandler (line1, line2);//实际执行的是void onUnsolicited (const char *s, const char *sms_pdu)
if (strStartsWith(s,"+CRING:")|| strStartsWith(s,"RING")
|| strStartsWith(s,"NO CARRIER") || strStartsWith(s,"+CCWA") )
RIL_onUnsolicitedResponse (RIL_UNSOL_RESPONSE_CALL_STATE_CHANGED, NULL, 0);
p.writeInt32 (RESPONSE_UNSOLICITED);
p.writeInt32 (unsolResponse);
ret = s_unsolResponses[unsolResponseIndex].responseFunction(p, data, datalen);
ret = sendResponse(p);
sendResponseRaw(p.data(), p.dataSize());
ret = blockingWrite(fd, (void *)&header, sizeof(header));
blockingWrite(fd, data, dataSize);
Java部分:
ril.java->RILReceiver.run()
for(;;)
{
...
length = readRilMessage(is, buffer);
p = Parcel.obtain();
p.unmarshall(buffer, 0, length);
p.setDataPosition(0);
processResponse(p);
processUnsolicited (p);
response = p.readInt();
switch(response) {
...
case RIL_UNSOL_RESPONSE_CALL_STATE_CHANGED: ret = responseVoid(p); break;
...
}
switch(response) {
case RIL_UNSOL_RESPONSE_CALL_STATE_CHANGED:
if (RILJ_LOGD) unsljLog(response);
mCallStateRegistrants
.notifyRegistrants(new AsyncResult(null, null, null));
...
}
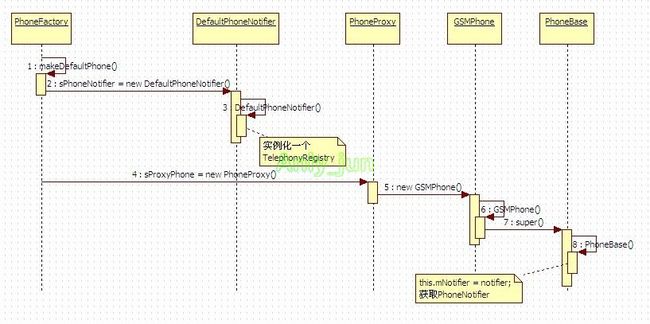
第三部分:猫相关的各种状态的监听和通知机制
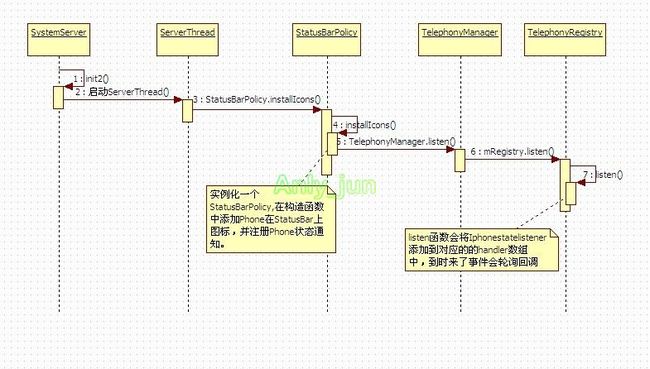
第四部分:通话相关的图标变换的工作原理。
A. 注册监听部分


