Android HAL
硬件抽象层是位于用户空间的Android系统 和位于内核空间的Linux驱动程序中间的一个层次

Android 系统实际关心的只是硬件抽像层,并不关心驱动程序,将Android系统的部分功能和Linux中的驱动程序隔
离,Android不依赖于Linux的驱动程序。
硬件抽象层接口方法
1 hardware模块的方式
Android 的libhardware库提供一种不依赖编译时绑定,可以动态加载硬件抽象层
硬件模块方法的硬件抽象层架构

在使用硬件抽象层的过程中,Android系统的框架层将调用libhardware的接口,根据每一个模块的id,将在指定路径动态打开dlopen各个模块,然后找到符号dlsym,调用硬件模块中的各个接口。
在led.h中定义的id
#define LED_HARDWARE_MODULE_ID "led"
Libhardware的接口在以下目录中定义
hardware/libhardware/include/hardware/hardware.h
/**
* Every hardware module must have a data structure named HAL_MODULE_INFO_SYM
* and the fields of this data structure must begin with hw_module_t
* followed by module specific information.
*/
结构体一 struct hw_module_t 结构体用于定义硬件模块的格式
typedef struct hw_module_t {
    uint32_t tag;    /** tag must be initialized to HARDWARE_MODULE_TAG */
    uint16_t version_major; /** 主版本号 */
    uint16_t version_minor;/** 次版本号*/
    const char *id;   /*模块标识*/
    const char *name;//模块的名称
    const char *author;//模块的作者
    struct hw_module_methods_t* methods;   /** 模块方法*/
    void* dso;  /** 模块的 dso */
    uint32_t reserved[32-7];    /** 填充字节,为以后使用*/
} hw_module_t;
/********************************************************************/
在led.h里定义
struct led_module_t {
   struct hw_module_t common;
};
/*
*struch hw_module_t结构体定义了一个硬件模块的信息,在各个具体硬件模块中,需要以这个结构体为第一个成员,即表示继承了这个结构体。
*/
在led.cpp里定义
extern "C" const struct led_module_t HAL_MODULE_INFO_SYM = {
    common: {
        tag: HARDWARE_MODULE_TAG,
        version_major: 1,
        version_minor: 0,
        id: LED_HARDWARE_MODULE_ID,
        name: "Sample LED Stub",
        author: "The Forlinx Open Source Project",
        methods: &led_module_methods,
    }
};
结构体二 struct hw_module_methods_t 是一个表示模块方法的结构体。
hardware/libhardware/include/hardware/hardware.h中定义

typedef struct hw_module_methods_t {
    /** 打开设备的方法 */
    int (*open)(const struct hw_module_t* module, const char* id,
            struct hw_device_t** device);
} hw_module_methods_t;

struct hw_module_methods_t结构体只包含了一个打开模块的函数指针,这个结构体也作为struct hw_module_t结构体的一个成员
/**************************************************************************/
static struct hw_module_methods_t led_module_methods = {
    open: led_device_open
};

结构体三 struct hw_device_t 表示一个硬件设备
hardware/libhardware/include/hardware/hardware.h中定义


typedef struct hw_device_t {
    uint32_t tag;  /** tag must be initialized to HARDWARE_DEVICE_TAG */
    uint32_t version;//hw_device_t的版本号
    struct hw_module_t* module;//引用这个设备属于的硬件模块
	uint32_t reserved[12];//填充保留字节
	int (*close)(struct hw_device_t* device);//关闭设备
} hw_device_t;

struct hw_device_t 也是需要被具体实现的结构体包含使用,一个硬件模块可以包含多个硬件设备
/*****************************************************************************/
led.h
struct led_control_device_t {
   struct hw_device_t common;
   int fd;

   /* supporting control APIs go here */
   int (*set_on)(struct led_control_device_t *dev, int32_t led);
   int (*set_off)(struct led_control_device_t *dev, int32_t led);
};
硬件的具体调用流程如下
1)通过id得到硬件模块
#define LED_HARDWARE_MODULE_ID "led"
2)从硬件模块中得到hw_module_methods_t,打开得到硬件设备hw_device_t
open: led_device_open
static int led_device_open(const struct hw_module_t* module, const char* name,
struct hw_device_t** device)
{
//打开后得到设备硬件dev
struct led_control_device_t *dev;
dev = (struct led_control_device_t *)malloc(sizeof(*dev));
memset(dev, 0, sizeof(*dev));
dev->common.tag = HARDWARE_DEVICE_TAG;
dev->common.version = 0;//hw_module_t的版本号
dev->common.module = (struct hw_module_t*)module;
dev->common.close = led_device_close;
/********调用hw_device_t中的各个方法****************/
dev->set_on = led_on;
dev->set_off = led_off;
*device = &dev->common;//引用这个设备属于的硬件模块
g_fd = open("/dev/leds0", 0);if (g_fd < 0) { g_fd = open("/dev/leds", 0);} if(g_fd<0) { LOGI("LED Stub: open /dev/leds fail."); }else { LOGI("LED Stub: open /dev/leds success ."); }return 0;}3)调用hw_device_t中的各个方法4)通过hw_device_t的close关闭设备
在以上流程中还需要libhardware提供一个得到模块的函数,hw_get_module
在hardware.h中定义
/**
* Get the module info associated with a module by id.
* @return: 0 == success, <0 == error and *pHmi == NULL
*/
int hw_get_module(const char *id, const struct hw_module_t **module);
hw_get_module()函数的实现在hardware/libhardware/hardware.c文件中实现
int hw_get_module(const char *id, const struct hw_module_t **module)
{
int status;
int i;
const struct hw_module_t *hmi = NULL;
char prop[PATH_MAX];
char path[PATH_MAX];
/*
* Here we rely on the fact that calling dlopen multiple times on
* the same .so will simply increment a refcount (and not load
* a new copy of the library).
* We also assume that dlopen() is thread-safe.
*/
/* Loop through the configuration variants looking for a module */
for (i=0 ; i<HAL_VARIANT_KEYS_COUNT+1 ; i++) {
if (i < HAL_VARIANT_KEYS_COUNT) {
if (property_get(variant_keys[i], prop, NULL) == 0) {
continue;
}
snprintf(path, sizeof(path), "%s/%s.%s.so",
HAL_LIBRARY_PATH1, id, prop);//得到模块的名称
if (access(path, R_OK) == 0) break;
snprintf(path, sizeof(path), "%s/%s.%s.so",
HAL_LIBRARY_PATH2, id, prop);
if (access(path, R_OK) == 0) break;
} else {
snprintf(path, sizeof(path), "%s/%s.default.so",//得到默认模块的名称
HAL_LIBRARY_PATH1, id);
if (access(path, R_OK) == 0) break;//找到模块然后退出
}
}
status = -ENOENT;
if (i < HAL_VARIANT_KEYS_COUNT+1) {
/* load the module, if this fails, we're doomed, and we should not try
* to load a different variant. */
status = load(id, path, module);
}
return status;
}
hw_get_module()函数执行的是一个动态查找的过程,找到硬件动态库*.so打开,当没有动态库的时候,将打开默认的库文件*default.so
在hw_get_module()函数中调用的load()函数,在hardware.c中其主要内容如下
/**
* Load the file defined by the variant and if successful
* return the dlopen handle and the hmi.
* @return 0 = success, !0 = failure.
*/
static int load(const char *id,
const char *path,
const struct hw_module_t **pHmi)
{
int status;
void *handle;
struct hw_module_t *hmi;
/*
* load the symbols resolving undefined symbols before
* dlopen returns. Since RTLD_GLOBAL is not or'd in with
* RTLD_NOW the external symbols will not be global
*/
handle = dlopen(path, RTLD_NOW);进行动态库的打开
if (handle == NULL) {
char const *err_str = dlerror();
LOGE("load: module=%s\n%s", path, err_str?err_str:"unknown");
status = -EINVAL;
goto done;
}
/* Get the address of the struct hal_module_info. */
const char *sym = HAL_MODULE_INFO_SYM_AS_STR;
hmi = (struct hw_module_t *)dlsym(handle, sym);
if (hmi == NULL) {
LOGE("load: couldn't find symbol %s", sym);
status = -EINVAL;
goto done;
}
/* Check that the id matches */
if (strcmp(id, hmi->id) != 0) {
LOGE("load: id=%s != hmi->id=%s", id, hmi->id);
status = -EINVAL;
goto done;
}
hmi->dso = handle;
/* success */
status = 0;
done:
if (status != 0) {
hmi = NULL;
if (handle != NULL) {
dlclose(handle);
handle = NULL;
}
} else {
LOGV("loaded HAL id=%s path=%s hmi=%p handle=%p",
id, path, *pHmi, handle);
}
*pHmi = hmi;
return status;
}
/********************************************************************/
load()函数实际上执行了一个动态的打开dlopen和动态取出符号dlsym的过程,这个过程解除了在编译时的Android本地框架对特有硬件模块依赖
硬件模块的调用方式如下
/----------------------------------------------------------------------------------------------------/
xxx_module_t *gModule;
xxx_device_t *gDevice;
{
xxx_module_t const *module;
err = hw_get_module(XXXX_HARDWARE_MODULE_ID, (const hw_moeule_t **)&module);
gModule = (xxxx_module_t *)module;
gModule->ModuleFunction();//调用模块中的函数
gDevice->DeviceFunction();//调用设备中的函数
}
通常情况下,硬件模块调用者是Android中的本地框架层
libhardware的接口头文件中,除了hardware.h之外,其他各个头文件是相互并列的,每一个文件表示了一种硬件抽象层
lights.h 背光和指示灯模块
copybit.h 位复制模块
overlay.h 叠加视频抽象层模块
qemud.h QEMU的守护进程模块
sensors.h 传感器模块
gralloc.h 用于显示的模块
gprs.h GPRS模块
2 直接接口方式
hardware_legacy库中提供了一些各自独立的接口,由用户实现后形成库,被直接连接到系统中,这是实现硬件抽象层最直接的方式。
hardware/libhardware_legacy/include/hardware_legacy
hardware_legacy库中包含了几个C接口的文件,power,wifi,vibrator,在开发一个新的硬件系统时,可以根据需要去实现这几个库,也可以使用系统默认的实现方式。
这种做法实际上并没有完全将硬件抽象层和Android的本地框架分开,其好处是接口的定义和实现比较简单
3 C++的继承实现方式
使用C++类的继承方式实现硬件抽象层
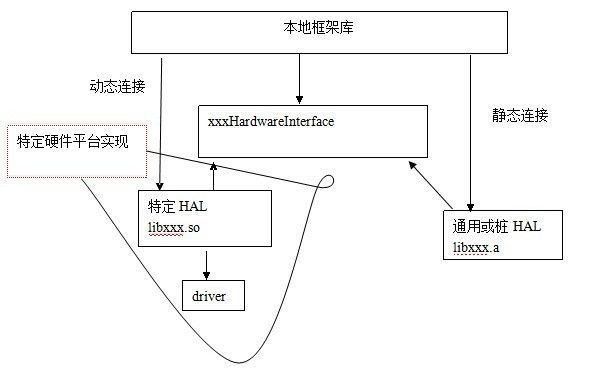
在这种实现方式中,具体的硬件抽象层通常要求被编译成为指定的名称的动态库,由本地框架库连接它,通用的实现被编译成静态库*.a,本地框架库连接这些静态库的时候,其实就是包含了它们在其中。使用特定硬件抽象层还是通用的硬件抽象层,通常需要根据宏来指定
Camera和Audio系统使用的是C++类的继承方式
参考文献:《Android 系统级深入开发--移植与调试》