- android系统selinux中添加新属性property
辉色投像
1.定位/android/system/sepolicy/private/property_contexts声明属性开头:persist.charge声明属性类型:u:object_r:system_prop:s0图12.定位到android/system/sepolicy/public/domain.te删除neverallow{domain-init}default_prop:property
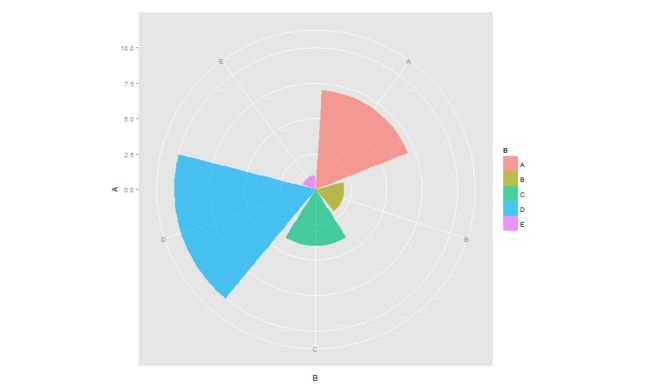
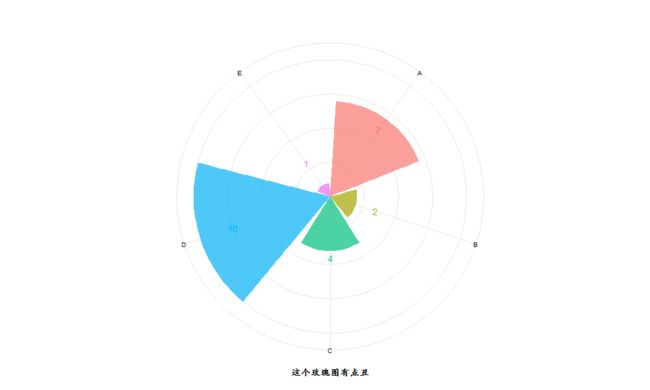
- pyecharts——绘制柱形图折线图
2224070247
信息可视化pythonjava数据可视化
一、pyecharts概述自2013年6月百度EFE(ExcellentFrontEnd)数据可视化团队研发的ECharts1.0发布到GitHub网站以来,ECharts一直备受业界权威的关注并获得广泛好评,成为目前成熟且流行的数据可视化图表工具,被应用到诸多数据可视化的开发领域。Python作为数据分析领域最受欢迎的语言,也加入ECharts的使用行列,并研发出方便Python开发者使用的数据
- 数据仓库——维度表一致性
墨染丶eye
背诵数据仓库
数据仓库基础笔记思维导图已经整理完毕,完整连接为:数据仓库基础知识笔记思维导图维度一致性问题从逻辑层面来看,当一系列星型模型共享一组公共维度时,所涉及的维度称为一致性维度。当维度表存在不一致时,短期的成功难以弥补长期的错误。维度时确保不同过程中信息集成起来实现横向钻取货活动的关键。造成横向钻取失败的原因维度结构的差别,因为维度的差别,分析工作涉及的领域从简单到复杂,但是都是通过复杂的报表来弥补设计
- ARM驱动学习之基础小知识
JT灬新一
ARM嵌入式arm开发学习
ARM驱动学习之基础小知识•sch原理图工程师工作内容–方案–元器件选型–采购(能不能买到,价格)–原理图(涉及到稳定性)•layout画板工程师–layout(封装、布局,布线,log)(涉及到稳定性)–焊接的一部分工作(调试阶段板子的焊接)•驱动工程师–驱动,原理图,layout三部分的交集容易发生矛盾•PCB研发流程介绍–方案,原理图(网表)–layout工程师(gerber文件)–PCB板
- 展现思维导图魅力,不断挖掘人生宝藏
思维导图讲师Mandy
第13期最强思维导图训练营已经结束一周了,但是我依旧是感觉所有学员还在努力的学习,这些学员中有教师、学生、白领、公务员、宝妈等等,只要你努力,只要你想改变自己,任何行业,任何岗位都可以参与进来,28天足以让你见成效,在这28天中,我们的学员不仅仅是收获了一枚毕业证,最重要的是让自己的思维方式得到升级,今天的你为自己投资,明天的你就会感谢你今天的付出,我们来听一听来自13期最强思维导图训练营优秀学员
- 2019-11-04复盘——飞来山上千寻塔,闻说鸡鸣见日升。
那一叶秋
1、大盘篇先上老图,看习惯了,也就知道走势了图1上证指数日线图还是那张老图,自己可以在自己的相关软件上画出来,快变盘了。2、个股篇未加仓、未减仓。分析量能的时候,突然发现这么一个东西:“放量突破年线,缩量回调。”合众科技日线图其实,最近的N只个股,在技术分析上,都到了变盘的临界时候。结合这么久的走势,特别是ZJH不断放开IPO的申请,本质上说是融资难度变大,或者说是为企业的融资开创便利。但现在市场
- Java企业面试题3
马龙强_
java
1.break和continue的作用(智*图)break:用于完全退出一个循环(如for,while)或一个switch语句。当在循环体内遇到break语句时,程序会立即跳出当前循环体,继续执行循环之后的代码。continue:用于跳过当前循环体中剩余的部分,并开始下一次循环。如果是在for循环中使用continue,则会直接进行条件判断以决定是否执行下一轮循环。2.if分支语句和switch分
- 父母教育孩子的方式,将影响孩子一生
树英教育
为什么有些孩子总是充满自信与快乐?独立、有主见又坚强?而有些孩子却自卑、胆怯,软弱又过度依赖父母?为什么有些孩子总是健康、阳光又富于创造力?而有些孩子却悲观、孤僻又思想空乏?一个孩子的行为取决于孩子的思想,思想取决于环境和自己的认知,认知取决于教育。父母是孩子人生中的第一位教育者,父母养育孩子的方式,将决定他们人生的高度,影响他们的一生。网络图,侵权即删优秀的父母就像园丁,既要浇水施肥,又要修剪杂
- 用Python实现读取统计单词个数
程序媛了了
python游戏java
完整实例代码:fromcollectionsimportCounterdefpythonit():danci={}withopen("pythonit.txt","r",encoding="utf-8")asf:foriinf:words=i.strip().split()forwordinwords:ifwordnotindanci:danci[word]=1else:danci[word]+=
- 系统架构设计师 需求分析篇二
AmHardy
软件架构设计师系统架构需求分析面向对象分析分析模型UML和SysML
面向对象分析方法1.用例模型构建用例模型一般需要经历4个阶段:识别参与者:识别与系统交互的所有事物。合并需求获得用例:将需求分配给予其相关的参与者。细化用例描述:详细描述每个用例的功能。调整用例模型:优化用例之间的关系和结构,前三个阶段是必需的。2.用例图的三元素参与者:使用系统的用户或其他外部系统和设备。用例:系统所提供的服务。通信关联:参与者和用例之间的关系,或用例与用例之间的关系。3.识别参
- 黄景瑜工作人员怒怼营销号!肖战事件就是他的前车之鉴
板凳吃瓜小分队
无论社会怎样浮躁,我们自己也不可以浮躁。战胜浮躁的关键是明白自己真正的需要,保持一颗平常心,不要盲目攀比,不要羡慕别人,更不要唯利是图。一辈子很短,我们不能总是望着别人的精彩,羡慕着别人的人生,而忘记了经营自己生活,要知道,通过努力,你也能成为让人仰望的明星。如今,随着娱乐产业越来越成熟,每年的新星也是扎堆冒出。在我看来,与前几年不同的是,如今的新生代质量明显好过从前。“更专业了,更有礼貌了”也是
- 2023-06-19【感恩日记】第246篇
o泡沫o
思想日记:坚持下去,相信自己一定可以的【感恩日记】第246篇1.我真是太幸福啦!感恩孩子早起阅读,放学到学生之家完成作业,平安度过美好的一天。感恩!感恩!感恩!❤️2.我真是太幸福啦!感恩自己早起给孩子煮早餐,完成计划的工作,晚上学习。感恩!感恩!感恩!❤️3.我真是太幸福啦!感恩为我设计效果图的老师。感恩!感恩!感恩!❤️4.我真是太幸福啦!感恩父母养育了我,有妈的孩子真幸福。感恩!感恩!感恩!
- 光盘文件系统 (iso9660) 格式解析
穷人小水滴
光盘文件系统iso9660denoGNU/Linuxjavascript
越简单的系统,越可靠,越不容易出问题.光盘文件系统(iso9660)十分简单,只需不到200行代码,即可实现定位读取其中的文件.参考资料:https://wiki.osdev.org/ISO_9660相关文章:《光盘防水嘛?DVD+R刻录光盘泡水实验》https://blog.csdn.net/secext2022/article/details/140583910《光驱的内部结构及日常使用》ht
- 摄影小白,怎么才能拍出高大上产品图片?
是波妞唉
很多人以为文案只要会码字,会排版就OK了!说实话,没接触到这一行的时候,我的想法更简单,以为只要会写字就行!可是真做了文案才发现,码字只是入门级的基本功。一篇文章离不开排版、配图,说起来很简单!从头做到尾你就会发现,写文章用两个小时,找合适的配图居然要花掉半天的时间,甚至更久!图片能找到合适的就不怕,还有找不到的,比如产品图,只能亲自拍。拿着摆弄了半天,就是拍不出想要的效果,光线不好、搭出来丑破天
- 【Bugs】Python:“ModuleNotFoundError: No module named ‘XXX‘”
系'辞
工具箱pythonbuganaconda
问题描述Python使用库的前提是必须已安装了相应的库,往往利用“命令行指令”实现安装,一般安装解法类似。但,还是具有延伸问题,本博客对此作记录。【1】Nomodulenamed‘seaborn’(1.1):情况1:为Anaconda安装【图1-2】.定位Anaconda路径【图3】.Anaconda路径加入Path>&
- 3286、穿越网格图的安全路径
Lenyiin
题解c++算法leetcode
3286、[中等]穿越网格图的安全路径1、题目描述给你一个mxn的二进制矩形grid和一个整数health表示你的健康值。你开始于矩形的左上角(0,0),你的目标是矩形的右下角(m-1,n-1)。你可以在矩形中往上下左右相邻格子移动,但前提是你的健康值始终是正数。对于格子(i,j),如果grid[i][j]=1,那么这个格子视为不安全的,会使你的健康值减少1。如果你可以到达最终的格子,请你返回tr
- 阅读《别说你懂思维导图》21~23章day27
Ling宝尔
合理期待——思维导图的应用效果很多人问我,思维导图真的有用么?我常常回答,如果你觉得是它“没用”,一定是因为你没“用”,有“用”才“有用”。实际上,学习思维导图和学习木工、驾驶等技能型学习一样,都要经历从了解到应用、从应用到受益的过程。在使用前,我们很多人的思维处于“无意识的低效”状态,经过一段时间的学习,虽然掌握了思维导图的基本使用方法,但可能并没有太好的效果,这个阶段可称为“有意识的低效”状态
- 《跃迁》5/7-5组-橙子-张静12.16
静言物于
【便签5】【片段来源】《跃迁:成为高手的技术》第四章【R原文】一位客户咨询时抱怨:“这个我做不到。”我问他:“如果我请你现在出去裸奔,你能做到吗?”“这个我也做不到”“其实并不是做不到,而是不愿意做,或者不想承担裸奔的代价吧。你不是做不到,而是选择不去做。如果有一天你裸奔能救自己家人、孩子,也许就能做到了。”为什么要做这个区分?如果一个人经常和自己说“做不到”,他的能力范围会越来越小,会成为一个无
- GenVisR 基因组数据可视化实战(三)
11的雾
3.genCov画每个突变位点附件的coverage,跟igv有点相似。这个操作起来很复杂,但是图还是挺有用的。可以考虑。由于我的referencegenomebuild是hg38BiocManager::install(c("TxDb.Hsapiens.UCSC.hg38.knownGene","BSgenome.Hsapiens.UCSC.hg38"))library(TxDb.Hsapien
- 小西妈双语工程打卡2018-1-18
慢蜗牛Erica
这是送给妈妈的,还有一张是爸爸的,现在看着这张小图,觉得好温暖。早上看到了我把它折上了,还好一顿不高兴。妈妈这个是爸爸。爸爸希望之星,Herewecome.复赛通知书这是送给妈妈的小鹿,栩栩如生吧,不过妈妈不确定这是他一个人完成的。还送了妈妈一个小蝴蝶发卡,很暖心哦。小鹿上完课回家就很晚了,自己看了好几本书,没有录阅读打卡。听peppa第一季3集。
- ✔2848. 与车相交的点
程序员小小聪
力扣leetcode
代码实现:方法一:哈希表#definefmax(a,b)((a)>(b)?(a):(b))intnumberOfPoints(int**nums,intnumsSize,int*numsColSize){inthash[101]={0};intmax=0;for(inti=0;i=x){j--;}if(i=nums[i][0]){r=r>nums[i][1]?r:nums[i][1];}else{
- 这样旅行的人,值得拥有丰富而饱满的体验
究竟
01“一张车票就实现了来拉萨的梦想。原以为很遥远,现也觉得旅途值得。也不过山河故人而已。”打开朋友圈,看到了强子新发的动态,配了两张图,一张图里是拉萨火车站,另一张图里是二十来张排列得整整齐齐的火车票,终点站都是拉萨。又想起几天前,姑娘秀了一波在青海湖的美照,照片里的她,身穿鲜艳的红色长裙,坐在牦牛背上,阳光打下来,她笑靥如花。橙色的旗子风中飘扬,那蓝绿色的青海湖和天空再美,也都成了陪衬。再看看自
- 轻风拂柳《春意萦怀》之六
轻风拂柳
图/来自网络轻风拂柳《春意萦怀》之六轻风拂柳《春意萦怀》原韵烂熳芳林赏丽容,春光明媚盼相逢。娇桃绽蕊仙姿艳,淑杏凝脂玉色浓。对对黄莺穿树影,双双彩蝶逐花踪。风情小雅灵犀有,景美难将笔墨封。图/来自网络步轻风拂柳《春意萦怀》原韵(一)诗·时就三月阳春思丽容,花红柳绿也相逢。不歆桃蕊风姿艳,只慕书斋墨色浓。期翼共窗难觅影,时望携手苦寻踪。天涯海角君何有?一颗痴心哪日封?(二)诗·大漠孤烟滴翠丛林展媚容
- 新月|图卡5-8《心》一切始于心,终于心
新月_f578
大家好,我是坚持做图卡,不断精进的新月,近期阅读书籍《心。》,持续输出图卡……截止目前已经读完本书,输出卡片9张~借助9张卡片,回顾本书的整体内容,结构上可以分为:始于心-修心-终于心。首先明确:我们为什么要这么做?其次懂得如何去做,落实到具体的方式方法上,就是修心的过程。最后是知道目标在哪,不断自我提升,向目标靠进,使修心贯穿始终。
- 读《红楼梦》第十九回 情切切良宵花解语 意绵绵静日玉生香
梦一场_c315
元春回宫,贾府上下又忙碌了二三日,方收拾停当,个个是累得人仰马翻。王熙凤为了不落人口舌也只能硬撑着,凡事冲在前头。袭人的母亲来面见贾母,将袭人接回去吃年饭,晚上才会回来,宝玉甚觉无聊。宁府这边唱戏,贾珍来邀宝玉过府观赏,刚欲出门,元春赐了糖蒸酥酪来,宝玉想着平日里袭人最爱吃,便留给袭人,自己出门看戏去了。到了宁府,只闻锣鼓喧天,热闹非凡,宝玉稍坐了片刻,忽想起一间小书房里挂着一张美人图,今日府上这
- 愿你无病无灾,余生由我宠你
沐眠_a1fa
01愿你无病无灾,余生由我宠你图片来源网络,侵权联系删图曾经在书中看到这样一段话:人老了就活成‘大孩子’了,需要你像当初他拉扯你长大一样去拉扯他了。”以前没有什么感触。但是这段时间,生病后到现在,我明显感觉你就是一个‘大孩子’,我们不许,你偏要,我们说你,你也会闹脾气,就活生生像一个三岁小孩。有时候,我真的很烦,很想对您发火,但是最后还是不了了之,因为看到那样的您,我真的不知道该如何开口。在几个月
- 设计模式之建造者模式(通俗易懂--代码辅助理解【Java版】)
ok!ko
设计模式设计模式建造者模式java
文章目录设计模式概述1、建造者模式2、建造者模式使用场景3、优点4、缺点5、主要角色6、代码示例:1)实现要求2)UML图3)实现步骤:1)创建一个表示食物条目和食物包装的接口2)创建实现Packing接口的实体类3)创建实现Item接口的抽象类,该类提供了默认的功能4)创建扩展了Burger和ColdDrink的实体类5)创建一个Meal类,带有上面定义的Item对象6)创建一个MealBuil
- 6月复盘之重新认识自己
插画君王木木
经历了漫长的疫情恐慌期,每个人都想重新开启的2020上半年一不小心就结束了,但疫情还在继续,趁着这段特殊时期,邀请你一起打开重新认识自己的大门。趁早图先来回顾一下关于你的上半年是怎样过来的呢?看看我们是不是有一样的状况呢?在1月份信誓旦旦的立下全年目标,可能经历了2周时间,这面旗子就倒了;1月底-2月中的春节期间,完全陷入了低谷期,面对大环境的变革,我该何去何从?2月底回上海,意识到真的不能这样堕
- 【加密算法基础——RSA 加密】
XWWW668899
网络服务器笔记python
RSA加密RSA(Rivest-Shamir-Adleman)加密是非对称加密,一种广泛使用的公钥加密算法,主要用于安全数据传输。公钥用于加密,私钥用于解密。RSA加密算法的名称来源于其三位发明者的姓氏:R:RonRivestS:AdiShamirA:LeonardAdleman这三位计算机科学家在1977年共同提出了这一算法,并发表了相关论文。他们的工作为公钥加密的基础奠定了重要基础,使得安全通
- HarmonyOS开发实战( Beta5.0)搜索框热搜词自动切换
让开,我要吃人了
OpenHarmonyHarmonyOS鸿蒙开发harmonyos华为鸿蒙移动开发鸿蒙系统前端开发语言
鸿蒙HarmonyOS开发往期必看:HarmonyOSNEXT应用开发性能实践总结最新版!“非常详细的”鸿蒙HarmonyOSNext应用开发学习路线!(从零基础入门到精通)介绍本示例介绍使用TextInput组件与Swiper组件实现搜索框内热搜词自动切换。效果图预览使用说明页面顶部搜索框内热搜词条自动切换,编辑搜索框时自动隐藏。实现思路使用TextInput实现搜索框TextInput({te
- 对股票分析时要注意哪些主要因素?
会飞的奇葩猪
股票 分析 云掌股吧
众所周知,对散户投资者来说,股票技术分析是应战股市的核心武器,想学好股票的技术分析一定要知道哪些是重点学习的,其实非常简单,我们只要记住三个要素:成交量、价格趋势、振荡指标。
一、成交量
大盘的成交量状态。成交量大说明市场的获利机会较多,成交量小说明市场的获利机会较少。当沪市的成交量超过150亿时是强市市场状态,运用技术找综合买点较准;
- 【Scala十八】视图界定与上下文界定
bit1129
scala
Context Bound,上下文界定,是Scala为隐式参数引入的一种语法糖,使得隐式转换的编码更加简洁。
隐式参数
首先引入一个泛型函数max,用于取a和b的最大值
def max[T](a: T, b: T) = {
if (a > b) a else b
}
因为T是未知类型,只有运行时才会代入真正的类型,因此调用a >
- C语言的分支——Object-C程序设计阅读有感
darkblue086
applec框架cocoa
自从1972年贝尔实验室Dennis Ritchie开发了C语言,C语言已经有了很多版本和实现,从Borland到microsoft还是GNU、Apple都提供了不同时代的多种选择,我们知道C语言是基于Thompson开发的B语言的,Object-C是以SmallTalk-80为基础的。和C++不同的是,Object C并不是C的超集,因为有很多特性与C是不同的。
Object-C程序设计这本书
- 去除浏览器对表单值的记忆
周凡杨
html记忆autocompleteform浏览
&n
- java的树形通讯录
g21121
java
最近用到企业通讯录,虽然以前也开发过,但是用的是jsf,拼成的树形,及其笨重和难维护。后来就想到直接生成json格式字符串,页面上也好展现。
// 首先取出每个部门的联系人
for (int i = 0; i < depList.size(); i++) {
List<Contacts> list = getContactList(depList.get(i
- Nginx安装部署
510888780
nginxlinux
Nginx ("engine x") 是一个高性能的 HTTP 和 反向代理 服务器,也是一个 IMAP/POP3/SMTP 代理服务器。 Nginx 是由 Igor Sysoev 为俄罗斯访问量第二的 Rambler.ru 站点开发的,第一个公开版本0.1.0发布于2004年10月4日。其将源代码以类BSD许可证的形式发布,因它的稳定性、丰富的功能集、示例配置文件和低系统资源
- java servelet异步处理请求
墙头上一根草
java异步返回servlet
servlet3.0以后支持异步处理请求,具体是使用AsyncContext ,包装httpservletRequest以及httpservletResponse具有异步的功能,
final AsyncContext ac = request.startAsync(request, response);
ac.s
- 我的spring学习笔记8-Spring中Bean的实例化
aijuans
Spring 3
在Spring中要实例化一个Bean有几种方法:
1、最常用的(普通方法)
<bean id="myBean" class="www.6e6.org.MyBean" />
使用这样方法,按Spring就会使用Bean的默认构造方法,也就是把没有参数的构造方法来建立Bean实例。
(有构造方法的下个文细说)
2、还
- 为Mysql创建最优的索引
annan211
mysql索引
索引对于良好的性能非常关键,尤其是当数据规模越来越大的时候,索引的对性能的影响越发重要。
索引经常会被误解甚至忽略,而且经常被糟糕的设计。
索引优化应该是对查询性能优化最有效的手段了,索引能够轻易将查询性能提高几个数量级,最优的索引会比
较好的索引性能要好2个数量级。
1 索引的类型
(1) B-Tree
不出意外,这里提到的索引都是指 B-
- 日期函数
百合不是茶
oraclesql日期函数查询
ORACLE日期时间函数大全
TO_DATE格式(以时间:2007-11-02 13:45:25为例)
Year:
yy two digits 两位年 显示值:07
yyy three digits 三位年 显示值:007
- 线程优先级
bijian1013
javathread多线程java多线程
多线程运行时需要定义线程运行的先后顺序。
线程优先级是用数字表示,数字越大线程优先级越高,取值在1到10,默认优先级为5。
实例:
package com.bijian.study;
/**
* 因为在代码段当中把线程B的优先级设置高于线程A,所以运行结果先执行线程B的run()方法后再执行线程A的run()方法
* 但在实际中,JAVA的优先级不准,强烈不建议用此方法来控制执
- 适配器模式和代理模式的区别
bijian1013
java设计模式
一.简介 适配器模式:适配器模式(英语:adapter pattern)有时候也称包装样式或者包装。将一个类的接口转接成用户所期待的。一个适配使得因接口不兼容而不能在一起工作的类工作在一起,做法是将类别自己的接口包裹在一个已存在的类中。 &nbs
- 【持久化框架MyBatis3三】MyBatis3 SQL映射配置文件
bit1129
Mybatis3
SQL映射配置文件一方面类似于Hibernate的映射配置文件,通过定义实体与关系表的列之间的对应关系。另一方面使用<select>,<insert>,<delete>,<update>元素定义增删改查的SQL语句,
这些元素包含三方面内容
1. 要执行的SQL语句
2. SQL语句的入参,比如查询条件
3. SQL语句的返回结果
- oracle大数据表复制备份个人经验
bitcarter
oracle大表备份大表数据复制
前提:
数据库仓库A(就拿oracle11g为例)中有两个用户user1和user2,现在有user1中有表ldm_table1,且表ldm_table1有数据5千万以上,ldm_table1中的数据是从其他库B(数据源)中抽取过来的,前期业务理解不够或者需求有变,数据有变动需要重新从B中抽取数据到A库表ldm_table1中。
- HTTP加速器varnish安装小记
ronin47
http varnish 加速
上午共享的那个varnish安装手册,个人看了下,有点不知所云,好吧~看来还是先安装玩玩!
苦逼公司服务器没法连外网,不能用什么wget或yum命令直接下载安装,每每看到别人博客贴出的在线安装代码时,总有一股羡慕嫉妒“恨”冒了出来。。。好吧,既然没法上外网,那只能麻烦点通过下载源码来编译安装了!
Varnish 3.0.4下载地址: http://repo.varnish-cache.org/
- java-73-输入一个字符串,输出该字符串中对称的子字符串的最大长度
bylijinnan
java
public class LongestSymmtricalLength {
/*
* Q75题目:输入一个字符串,输出该字符串中对称的子字符串的最大长度。
* 比如输入字符串“google”,由于该字符串里最长的对称子字符串是“goog”,因此输出4。
*/
public static void main(String[] args) {
Str
- 学习编程的一点感想
Cb123456
编程感想Gis
写点感想,总结一些,也顺便激励一些自己.现在就是复习阶段,也做做项目.
本专业是GIS专业,当初觉得本专业太水,靠这个会活不下去的,所以就报了培训班。学习的时候,进入状态很慢,而且当初进去的时候,已经上到Java高级阶段了,所以.....,呵呵,之后有点感觉了,不过,还是不好好写代码,还眼高手低的,有
- [能源与安全]美国与中国
comsci
能源
现在有一个局面:地球上的石油只剩下N桶,这些油只够让中国和美国这两个国家中的一个顺利过渡到宇宙时代,但是如果这两个国家为争夺这些石油而发生战争,其结果是两个国家都无法平稳过渡到宇宙时代。。。。而且在战争中,剩下的石油也会被快速消耗在战争中,结果是两败俱伤。。。
在这个大
- SEMI-JOIN执行计划突然变成HASH JOIN了 的原因分析
cwqcwqmax9
oracle
甲说:
A B两个表总数据量都很大,在百万以上。
idx1 idx2字段表示是索引字段
A B 两表上都有
col1字段表示普通字段
select xxx from A
where A.idx1 between mmm and nnn
and exists (select 1 from B where B.idx2 =
- SpringMVC-ajax返回值乱码解决方案
dashuaifu
AjaxspringMVCresponse中文乱码
SpringMVC-ajax返回值乱码解决方案
一:(自己总结,测试过可行)
ajax返回如果含有中文汉字,则使用:(如下例:)
@RequestMapping(value="/xxx.do") public @ResponseBody void getPunishReasonB
- Linux系统中查看日志的常用命令
dcj3sjt126com
OS
因为在日常的工作中,出问题的时候查看日志是每个管理员的习惯,作为初学者,为了以后的需要,我今天将下面这些查看命令共享给各位
cat
tail -f
日 志 文 件 说 明
/var/log/message 系统启动后的信息和错误日志,是Red Hat Linux中最常用的日志之一
/var/log/secure 与安全相关的日志信息
/var/log/maillog 与邮件相关的日志信
- [应用结构]应用
dcj3sjt126com
PHPyii2
应用主体
应用主体是管理 Yii 应用系统整体结构和生命周期的对象。 每个Yii应用系统只能包含一个应用主体,应用主体在 入口脚本中创建并能通过表达式 \Yii::$app 全局范围内访问。
补充: 当我们说"一个应用",它可能是一个应用主体对象,也可能是一个应用系统,是根据上下文来决定[译:中文为避免歧义,Application翻译为应
- assertThat用法
eksliang
JUnitassertThat
junit4.0 assertThat用法
一般匹配符1、assertThat( testedNumber, allOf( greaterThan(8), lessThan(16) ) );
注释: allOf匹配符表明如果接下来的所有条件必须都成立测试才通过,相当于“与”(&&)
2、assertThat( testedNumber, anyOf( g
- android点滴2
gundumw100
应用服务器android网络应用OSHTC
如何让Drawable绕着中心旋转?
Animation a = new RotateAnimation(0.0f, 360.0f,
Animation.RELATIVE_TO_SELF, 0.5f, Animation.RELATIVE_TO_SELF,0.5f);
a.setRepeatCount(-1);
a.setDuration(1000);
如何控制Andro
- 超简洁的CSS下拉菜单
ini
htmlWeb工作html5css
效果体验:http://hovertree.com/texiao/css/3.htmHTML文件:
<!DOCTYPE html>
<html xmlns="http://www.w3.org/1999/xhtml">
<head>
<title>简洁的HTML+CSS下拉菜单-HoverTree</title>
- kafka consumer防止数据丢失
kane_xie
kafkaoffset commit
kafka最初是被LinkedIn设计用来处理log的分布式消息系统,因此它的着眼点不在数据的安全性(log偶尔丢几条无所谓),换句话说kafka并不能完全保证数据不丢失。
尽管kafka官网声称能够保证at-least-once,但如果consumer进程数小于partition_num,这个结论不一定成立。
考虑这样一个case,partiton_num=2
- @Repository、@Service、@Controller 和 @Component
mhtbbx
DAOspringbeanprototype
@Repository、@Service、@Controller 和 @Component 将类标识为Bean
Spring 自 2.0 版本开始,陆续引入了一些注解用于简化 Spring 的开发。@Repository注解便属于最先引入的一批,它用于将数据访问层 (DAO 层 ) 的类标识为 Spring Bean。具体只需将该注解标注在 DAO类上即可。同时,为了让 Spring 能够扫描类
- java 多线程高并发读写控制 误区
qifeifei
java thread
先看一下下面的错误代码,对写加了synchronized控制,保证了写的安全,但是问题在哪里呢?
public class testTh7 {
private String data;
public String read(){
System.out.println(Thread.currentThread().getName() + "read data "
- mongodb replica set(副本集)设置步骤
tcrct
javamongodb
网上已经有一大堆的设置步骤的了,根据我遇到的问题,整理一下,如下:
首先先去下载一个mongodb最新版,目前最新版应该是2.6
cd /usr/local/bin
wget http://fastdl.mongodb.org/linux/mongodb-linux-x86_64-2.6.0.tgz
tar -zxvf mongodb-linux-x86_64-2.6.0.t
- rust学习笔记
wudixiaotie
学习笔记
1.rust里绑定变量是let,默认绑定了的变量是不可更改的,所以如果想让变量可变就要加上mut。
let x = 1; let mut y = 2;
2.match 相当于erlang中的case,但是case的每一项后都是分号,但是rust的match却是逗号。
3.match 的每一项最后都要加逗号,但是最后一项不加也不会报错,所有结尾加逗号的用法都是类似。
4.每个语句结尾都要加分