GeoWebCache的配置与使用
最近在做一个开源GIS的demo的工作,工作中涉及到了地图瓦片,选取的开发环境是geoserver+openlayers,那么地图瓦片自然而然也就使用geowebcache,geowebcache就相当于是openlayer和geoserver之间的中介,首先,geowebcache会根据你的配置信息,把相应的地图图层切好图,存放在磁盘中,然后在使用openlayer加载地图服务的时候,把地图服务的地址指向geowebcache,geowebcache接收到这些请求后,会根据请求的位置和比例尺在切片目录中找到对应的瓦片,然后返回给你,省去了动态生成地图的过程,速度大幅度提高,而且由于请求的图片资源是事先生成好的,浏览器加载这些图片之后,下一次再去请求同样的图片,就会从浏览器的缓存中拉去,速度进一步提高!
下面说一下geowebcache的配置使用。首先下载war包,在tomcat中解压后,会在WEB-INF目录下找到一系列配置文件,先找到web.xml,然后在web-app根元素下添加:
<context-param>
    <param-name>GEOWEBCACHE_CACHE_DIR</param-name>
    <param-value>D:/data/cache</param-value>
</context-param>
param-value的值就是你要存放geowebcache瓦片的位置,配置好这里,重启tomcat,你会发现在你的瓦片目录下生成了一些文件,其中就有geowebcache.xml,这个文件是geowebcache配置的关键所在,以下是这个文件的配置信息:
<?xml version="1.0" encoding="utf-8"?>
<gwcConfiguration xmlns:xsi="http://www.w3.org/2001/XMLSchema-instance"
  xmlns="http://geowebcache.org/schema/1.5.3"
  xsi:schemaLocation="http://geowebcache.org/schema/1.5.3 http://geowebcache.org/schema/1.5.3/geowebcache.xsd">
  <version>1.5.3</version>
  <backendTimeout>120</backendTimeout>
  <serviceInformation>
    <title>GeoWebCache</title>
    <description>GeoWebCache is an advanced tile cache for WMS servers.It supports a large variety of protocols and
      formats, including WMS-C, WMTS, KML, Google Maps and Virtual Earth.</description>
    <keywords>
      <string>WFS</string>
      <string>WMS</string>
      <string>WMTS</string>
      <string>GEOWEBCACHE</string>
    </keywords>
    <serviceProvider>
      <providerName>lzugis</providerName>
      <providerSite>http://blog.csdn.net/gisshixisheng</providerSite>
      <serviceContact>
        <individualName>lzugis</individualName>
        <positionName>GIS工程师</positionName>
        <addressType>工程师</addressType>
        <addressStreet>海淀区翠微路甲3号</addressStreet>
        <addressCity>北京</addressCity>
        <addressAdministrativeArea>海淀区</addressAdministrativeArea>
        <addressPostalCode>010010</addressPostalCode>
        <addressCountry>中国,China</addressCountry>
        <phoneNumber>+81 189 1133 7984</phoneNumber>
        <faxNumber>+81 189 1133 7984</faxNumber>
        <addressEmail>[email protected]</addressEmail>
      </serviceContact>
    </serviceProvider>
    <fees>NONE</fees>
    <accessConstraints>NONE</accessConstraints>
  </serviceInformation>

  <gridSets>
    <!-- Grid Set Example, by default EPSG:900913 and EPSG:4326 are defined -->
    <gridSet>
      <!-- This does not have to be an EPSG code, you can also have multiple gridSet elements per SRS -->
      <name>EPSG:4326</name>
      <srs>
        <number>4326</number>
      </srs>
      <extent>
        <coords>
          <double>73.45100463600005</double>
          <double>18.16324718800007</double>
          <double>134.976797647</double>
          <double>53.53194315200005</double>
        </coords>
      </extent>
      <scaleDenominators>
        <double>25000000</double>
        <double>1000000</double>
        <double>100000</double>
        <double>25000</double>
      </scaleDenominators>
      <tileHeight>256</tileHeight>
      <tileWidth>256</tileWidth>
    </gridSet>
  </gridSets>

  <layers>
    <wmsLayer>
      <name>china</name>
      <mimeFormats>
        <string>image/gif</string>
        <string>image/jpeg</string>
        <string>image/png</string>
        <string>image/png8</string>
      </mimeFormats>
      <wmsUrl>
        <string>http://200.200.200.220:8888/geoserver/wms</string>
      </wmsUrl>
      <wmsLayers>geoserver:china</wmsLayers>
    </wmsLayer>
  </layers>
</gwcConfiguration>
配置好上面的信息之后,进入:http://localhost:8080/geowebcache/demo,点击"
Reload Configuration
"重新读取配置信息,如下所示:
如果配置信息没错,你会发现,你所配置的图层信息已经显示在这个页面上了,点击“Seed this layer”,然后你需要输入下面这些信息:
设置好,点submit就开始切图了。在资源管理器中打开,如下图:
配置完成以后,就是如何在地图中显示了,下面是显示的源代码:
<pre name="code" class="html"><html xmlns="http://www.w3.org/1999/xhtml">
<head>
<meta http-equiv="Content-Type" content="text/html; charset=utf-8" />
<title>china EPSG:4326 image/png</title>
<link rel="stylesheet" type="text/css" href="http://200.200.200.220/OpenLayers-2.12/theme/default/style.css"/>
<style type="text/css">
	body { font-family: sans-serif; font-weight: bold; font-size: .8em; }
	body { border: 0px; margin: 0px; padding: 0px; }
	#map { width: 100%; height: 100%; border: 0px; padding: 0px; }
</style>
<script type="text/javascript" src="http://200.200.200.220/OpenLayers-2.12/OpenLayers.js"></script>
<script type="text/javascript" src="http://200.200.200.220/OpenLayers-2.12/lib/OpenLayers/Lang/zh-CN.js"></script>
<script type="text/javascript">
	var map, demolayer;
	OpenLayers.DOTS_PER_INCH = 90.71428571428572;
	OpenLayers.Util.onImageLoadErrorColor = 'transparent';
	function init(){
		var mapOptions = {
			resolutions: [0.703125, 0.3515625, 0.17578125, 0.087890625, 0.0439453125, 0.02197265625,
				0.010986328125, 0.0054931640625, 0.00274658203125, 0.001373291015625, 6.866455078125E-4,
				3.4332275390625E-4, 1.71661376953125E-4, 8.58306884765625E-5, 4.291534423828125E-5,
				2.1457672119140625E-5, 1.0728836059570312E-5, 5.364418029785156E-6, 2.682209014892578E-6,
				1.341104507446289E-6, 6.705522537231445E-7, 3.3527612686157227E-7
			],
			projection: new OpenLayers.Projection('EPSG:4326'),
			maxExtent: new OpenLayers.Bounds(-180.0,-90.0,180.0,90.0),
			units: "degrees",
			controls: []
		};
		map = new OpenLayers.Map('map', mapOptions );

		map.addControl(new OpenLayers.Control.PanZoomBar({
				position: new OpenLayers.Pixel(2, 15)
		}));
		map.addControl(new OpenLayers.Control.Navigation());
		map.addControl(new OpenLayers.Control.Scale($('scale')));
		map.addControl(new OpenLayers.Control.MousePosition({element: $('location')}));

		demolayer = new OpenLayers.Layer.WMS(
			"china","http://200.200.200.220:8080/geowebcache/service/wms",
			{layers: 'china', format: 'image/png' },
			{ tileSize: new OpenLayers.Size(256,256)}
		);
		map.addLayer(demolayer);
		map.zoomToExtent(new OpenLayers.Bounds(73.45100463600005, 18.16324718800007,
			134.976797647, 53.53194315200005)
		);
	}
</script>
</head>
<body onLoad="init()">
	<div id="map"></div>
</body>
</html>
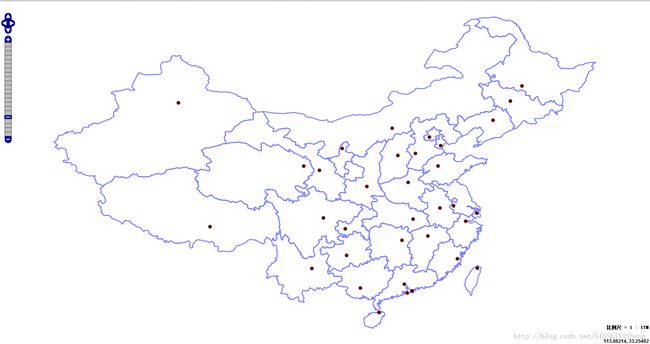
显示的结果如下:
附件:
geowebcache-1.5.3-war.zip
或者我的百度网盘,地址:http://pan.baidu.com/s/1kTJt91l


