Introduction of ASP.NET Webhooks
转载自:http://blogs.msdn.com/b/webdev/archive/2015/09/04/introducing-microsoft-asp-net-webhooks-preview.aspx
We are very pleased to announce ASP.NET WebHooks preview as a new addition to the ASP.NET family. WebHooks is a lightweight HTTP pattern providing a simple pub/sub model for wiring together Web APIs and SaaS services. When an event happens in a service, a notification is sent in the form of an HTTP POST request to registered subscribers. The POST request contains information about the event which makes it possible for the receiver to act accordingly.
Because of their simplicity, WebHooks are already exposed by a large number of services including Dropbox, GitHub,Instagram, MailChimp, PayPal, Slack, Trello, and many more. For example, a WebHook can indicate that a file has changed in Dropbox, or a code change has been committed in GitHub, or a payment has been initiated in PayPal, or a card has been created in Trello – the possibilities are endless!
Microsoft ASP.NET WebHooks makes it easier to both send and receive WebHooks as part of your ASP.NET application:
- On the receiving side, it provides a common model for receiving and processing WebHooks from any number of WebHook providers. It comes out of the box with support for Azure Alerts, Dropbox, GitHub, Kudu, Instagram,MailChimp, PayPal, Pusher, Salesforce, Slack, Stripe, Trello, and WordPress but it is easy to add support for more.
- On the sending side it provides support for managing and storing subscriptions as well as for sending event notifications to the right set of subscribers. This allows you to define your own set of events that subscribers can subscribe to and notify them when things happens.
The two parts can be used together or apart depending on your scenario. If you only need to receive WebHooks from other services then you can use just the receiver part; if you only want to expose WebHooks for others to consume, then you can do just that.
The WebHook code targets ASP.NET Web API 2 and ASP.NET MVC 5, is available as OSS on GitHub, and as preview Nuget packages.
We are also adding topics to the Microsoft ASP.NET WebHooks online documentation so please also check there for additional details as they become available.
WebHooks Overview
WebHooks is a pattern which means that it varies how it is used from service to service but the basic idea is the same. You can think of WebHooks as a simple pub/sub model where a user can subscribe to events happening elsewhere. The event notifications are propagated as HTTP POST requests containing information about the event itself.
Typically the HTTP POST request contains a JSON object or HTML form data determined by the WebHook sender including information about the event causing the WebHook to trigger. For example, an example of a WebHook POST request body from GitHub looks like this as a result of a new issue being opened in a particular repository:
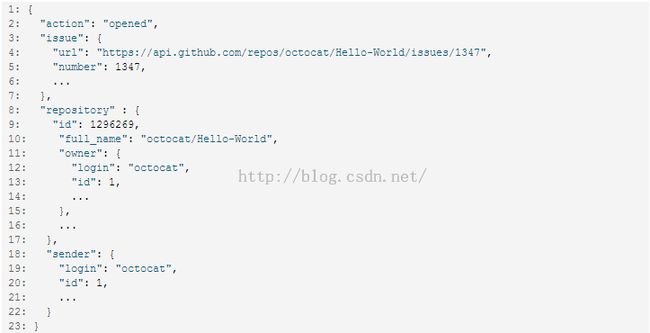
To ensure that the WebHook is indeed from the intended sender, the POST request is secured in some way and then verified by the receiver. For example, GitHub includes an ‘X-Hub-Signature’ HTTP header with a hash of the request body which is checked by the receiver implementation so you don’t have to worry about it.
The WebHook flow generally goes something like this:
- The WebHook sender exposes events that a client can subscribe to. The events describe observable changes to the system, for example that a new data item has been inserted, that a process has completed, or something else.
- The WebHook receiver subscribes by registering a WebHook consisting of four things:
- A URI for where the event notification should be posted in the form of an HTTP POST request;
- A set of filters describing the particular events for which the WebHook should be fired;
- A secret key which is used to sign the HTTP POST request;
- Additional data which is to be included in the HTTP POST request. This can for example be additional HTTP header fields or properties included in the HTTP POST request body
- Once an event happens, the matching WebHook registrations are found and HTTP POST requests are submitted. Typically, the generation of the HTTP POST requests are retried several times if for some reason the recipient is not responding or the HTTP POST request results in an error response.
As mentioned, Microsoft ASP.NET WebHooks support both sending and receiving WebHooks but in this blog we will focus on the receiving side. In the blog Sending WebHooks with ASP.NET WebHooks Preview we dive into the details of sending WebHooks.
Receiving WebHooks
Dealing with WebHooks depends on who the sender is. Sometimes there are additional steps registering a WebHook verifying that the subscriber is really listening. Some WebHooks provide a push-to-pull model where the HTTP POST request only contains a reference to the event information which is then to be retrieved independently. Often the security model varies quite a bit.
The purpose of Microsoft ASP.NET WebHooks is to make it both simpler and more consistent to wire up your API without spending a lot of time figuring out how to handle any particular variant of WebHooks.
To enable ASP.NET WebHooks, you first install the Nuget package for the WebHook provider or providers you want to receive WebHooks from. The Nuget packages are named Microsoft.AspNet.WebHooks.Receivers.* where the last part indicates the service supported. For example Microsoft.AspNet.WebHooks.Receivers.GitHub provides support for receivingWebHooks from GitHub and Microsoft.AspNet.WebHooks.Receivers.Custom provides support for receiving WebHooks generated by ASP.NET WebHooks.
Out of the box you can find support for Dropbox, GitHub, MailChimp, PayPal, Pusher, Slack, Stripe, Trello, and WordPress but it is possible to support any number of other providers. Here we will show how to receive WebHooks from GitHub – in follow up blogs we will describe in detail how to do it for other service and explain how you can extend the list yourself. See also these blogs:
- Integrating with Slack Using ASP.NET WebHooks Preview
- Integrating with Salesforce using ASP.NET WebHooks Preview
- Integrating with Instagram using ASP.NET WebHooks Preview
- Receive WebHooks from Azure Alerts and Kudu (Azure Web App Deployment)
WebHook Configuration
Once you have the preview Nuget for the WebHook sender you want to receive WebHooks from, you need to configure it. This typically requires two parts:
- Configuring the WebHook sender,
- Configuring the receiver with security settings.
Configuration of the WebHook sender differs somewhat from service to service. Here we show how it works for GitHub but many other services provide a corresponding experience.
By installing Microsoft ASP.NET WebHooks you get a WebHook controller which accepts WebHook requests from an open-ended number of services. When a request arrives, it picks the appropriate receiver that you have installed for handling a particular WebHook sender. The URI of this controller is the WebHook URI that you register with the service and is of the form:
- https://<host>/api/webhooks/incoming/<receiver>
For GitHub, the receiver name is github. For security reasons, many WebHook providers require that the the URI is an ‘https’ URI. Further, the URI has to be publically available so that Slack service can reach it. The easiest way of doing this is to deploy your ASP.NET application as an Azure Web App which you can do directly from Visual Studio.
To register the WebHook with GitHub, you obviously need a GitHub account. Then go to GitHub, pick a repository that you own, and select settings:
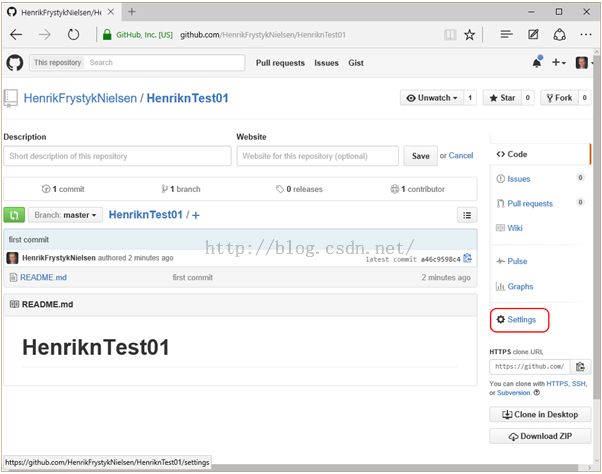
Under settings select WebHooks and Services and fill in the data in the red boxes (substituting the URI with yours):
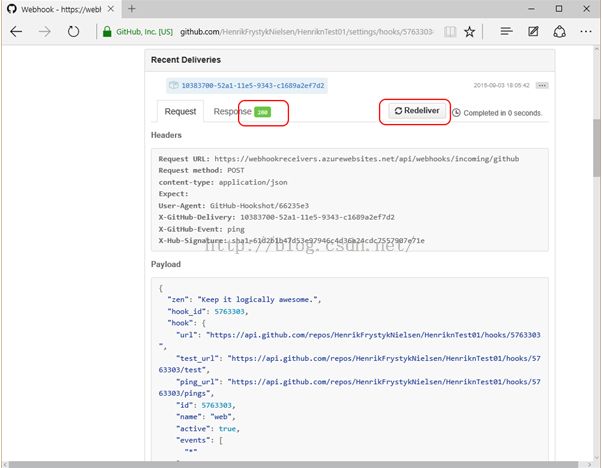
As secret, you should pick a value that has a high entropy. A good idea is to pick something like a SHA256 hash which you for example can get from FreeFormatter Online Tools For Developers. Once you hit Add WebHook, GitHub sends a test event notification to check that the URI is correct. However, as we haven’t configured the receiver yet, this will show an error underRecent Deliveries.
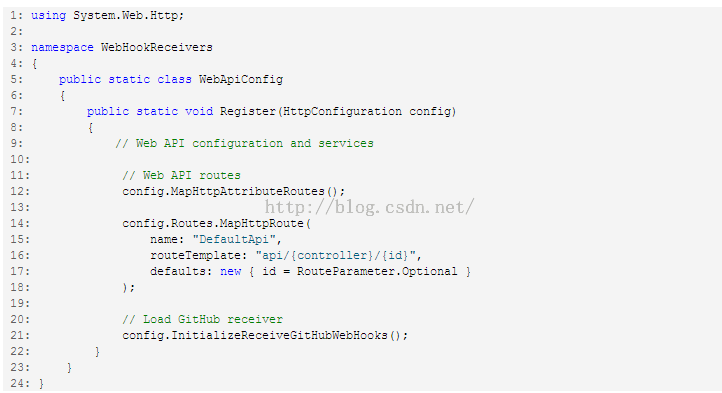
Before going further, let’s therefore configure the receiver back in your Web Application. The first part of the configuration is done in WebApiConfig.cs where you add line 21 like this:
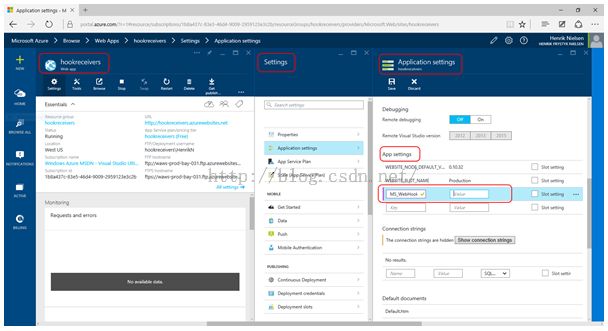
The second part is to set the secret token so that it can be verified by the receiver. This is done by setting theMS_WebHookReceiverSecret_GitHub app setting for your Web Application to the value of the secret from before. This can either be done directly in the Web.Config file or better yet, configured through the Azure portal:
With the receiver configured, you should be able to go back to the WebHooks page on GitHub, hit Redeliver and see a 200 OK response:
WebHook Processing
You are now ready to receive WebHooks from GitHub and process them however you want. To do this, once the receiver is done processing the WebHook, it calls one or more handlers which is where your code runs processing the actual event notification.
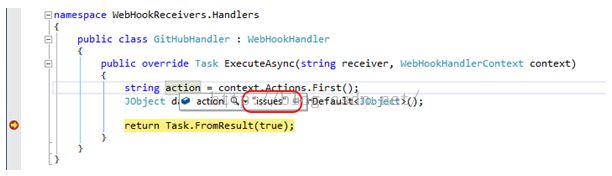
Here is a sample handler illustrating the basic model. No registration is necessary – it will automatically get picked up and called:

The Actions property contains the name of the event and Data contains the actual notification which can either be operated on directly as a JObject instance or cast to an actual type if desired.
Trying it Out
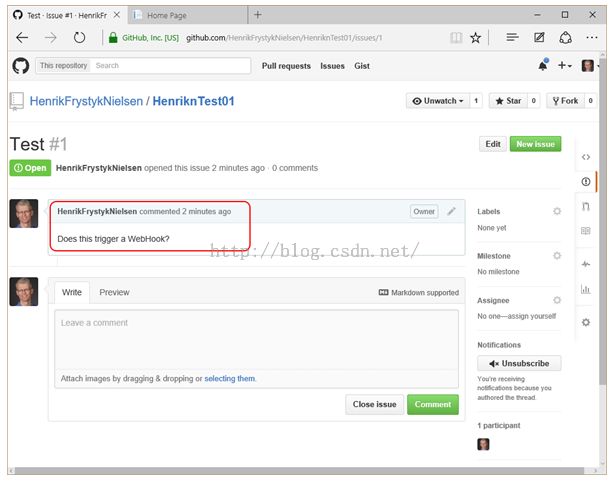
Once deployed, we are now ready to try this out end-to-end: In the GitHub repository, we add a new issue like this:
And if we attach a debugger to the receiver then we will see the following:
This should give a quick overview of what ASP.NET WebHooks can do for you. In follow-up blogs we will dive into the the receivers as well as how to build your own as well as of course sending WebHook yourself.