Qt浅谈之十三:抓图截屏
一、简介
因Windows下无法登录QQ时就不能抓图了,就很纠结了,而在Linux下,有时也无法抓图。所以专门使用Qt仿照Centos的抓图界面写了一个抓图软件,能实现自己的大部分需求。感兴趣的可以扩展到图片的分割组合及录屏等功能。
二、运行图
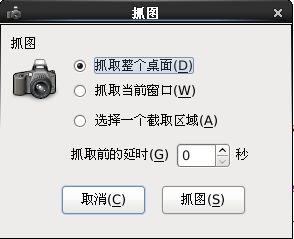
(1)本程序运行如下图1所示。
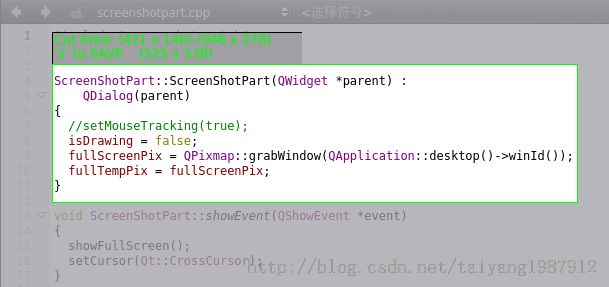
(2)其他相关截图程序的界面,如下图2所示。
三、详解
1、中文问题
(1)不同的操作系统采用编码方式不同,因此必须使用国际化翻译才能减少乱码的实现。其过程如下:
1.pro工程文件里面添加 TRANSLATIONS+=mypro.ts
2.选择Qt Creator环境的菜单栏 工具->外部->Qt语言家->更新翻译
3.桌面开始菜单里面Qt目录打开 Linguist工具
4.Linguist工具加载生成好的mypro.ts文件
5.填好翻译, 保存, Release, 就生成好编译后的qm文件
6.在工程的源文件中, 这样加载qm文件:
QTranslator translator;
translator.load("grabwindows.qm",":/");
a.installTranslator(&translator);
2、系统托盘
void GrabWindows::initTrayiconMenu()
{
  trayIcon = new QSystemTrayIcon(QIcon(tr(":/applets-screenshooter.ico")), this);
  trayiconMenu = new QMenu;
  restoreAction = new QAction(tr("Restore"), this);
  quitAction = new QAction(tr("Quit"), this);
  trayiconMenu->addAction(restoreAction);
  trayiconMenu->addAction(quitAction);
  trayIcon->setContextMenu(trayiconMenu);
  trayIcon->show();
  connect(trayIcon,SIGNAL(activated(QSystemTrayIcon::ActivationReason)),
          this,SLOT(slotIconActivated(QSystemTrayIcon::ActivationReason)));

  connect(restoreAction,SIGNAL(triggered()),this,SLOT(showNormal()));
  connect(quitAction,SIGNAL(triggered()),this,SLOT(close()));
}
分析:QSystemTrayIcon的使用,并结合槽来捕获鼠标左键的信号,鼠标右键信号会自动弹出定义的右键菜单。
3、抓取全屏
fullScreenPixmap = QPixmap::grabWindow(QApplication::desktop()->winId());
fullScreenPixmap->save("fullScreen.jpg","JPG");
或
fullScreenPixmap->save("Screenshot.png","png");
只要完成了布局,剩下的截图代码非常简单,Qt已经做了很好的封装。
4、抓取当前窗口
if (QApplication::activeWindow()) {
        currentScreenPixmap = QPixmap::grabWindow( QApplication::activeWindow()->winId(), -2, -26, QApplication::activeWindow()->width() + 4, QApplication::activeWindow()->height() + 30);
        //currentScreenPixmap = QPixmap::grabWindow( QApplication::activeWindow()->winId());
}
分析:暂时还有一些问题,不知道为什么当前活动的窗体只能是本窗体,其它窗体的返回值为NULL,其它的函数也试过。也无法获取到相对与本窗口的次窗口指针,感觉Qt没有提供相关的接口,要借助于系统的api接口。该问题先放置,以后有机会解决。
5、抓取任意部分
ScreenShotPart::ScreenShotPart(QWidget *parent) :
    QDialog(parent)
{
  //setMouseTracking(true);
  isDrawing = false;
  fullScreenPix = QPixmap::grabWindow(QApplication::desktop()->winId());
  fullTempPix = fullScreenPix;
}

void ScreenShotPart::showEvent(QShowEvent *event)
{
  showFullScreen();
  setCursor(Qt::CrossCursor);
}

void ScreenShotPart::paintEvent(QPaintEvent *event)
{
  QPainter painter(this);
  painter.drawPixmap(0, 0, fullTempPix);
  QDialog::paintEvent(event);
}
分析:先截图全屏图片,显示图片占据全屏,然后使用双缓冲技术(否则会出现很多选区框)在该图片上画出选区,然后保存。其原理简单,主要是鼠标时间时记录好初始点和结束点。
void ScreenShotPart::mousePressEvent(QMouseEvent *event)
{
  if (event->button() == Qt::LeftButton) {
      isDrawing = true;
      startPoint = event->pos();
  }
}

void ScreenShotPart::mouseMoveEvent(QMouseEvent *event)
{
    QPoint pt = event->pos();
    if (isDrawing) {
        fullTempPix = fullScreenPix;
        endPonit = event->pos();
        paint(fullTempPix);
    }
}

void ScreenShotPart::mouseReleaseEvent(QMouseEvent *event)
{
    if (event->button() == Qt::LeftButton) {
      isDrawing = false;
      endPonit = event->pos();
      shotRect = QRect(startPoint, endPonit);
      paint(fullTempPix);
      savePixMap();
    }
}
6、定时器
timer = new QTimer(this);
timer->start(200 + timeComBox->value() * 1000);
分析:定时器在此处作用还是挺大的,主要是提供延时让本窗口隐藏,以获得截取的全屏图片,否则全屏总是会有本窗口的内容。
四、不足之处
(1)无法很好的抓取当前窗口,正在考虑如何截取本窗口的下一层窗体。在Windows下截图的当前窗口为空白。
(2)ComboBox下的文件系统路径无法使用,加载了文件系统也无法一次进行选择,效果图也不是很美观,这个问题还待深究。截图图片暂时只能保存到当前程序的运行目录下。
五、总结
(1)还可以根据需要在截图时将背景图片设置成灰色,效果更好。
(2)源码已经打包上传到csdn上可登录下载(http://download.csdn.net/detail/taiyang1987912/7693465)。
(3)本人思路有限,若有更好的设计建议,也可发邮件沟通,在此先感谢!邮箱地址[email protected]。

