Setting Up WS2016 Storage Spaces Direct SOFS
In this post I will show you how to set up a Scale-Out File Server using Windows Server 2016 Storage Spaces Direct (S2D). Note that:
- I’m assuming you have done all your networking. Each of my 4 nodes has 4 NICs: 2 for a management NIC team called Management and 2 un-teamed 10 GbE NICs. The two un-teamed NICs will be used for cluster traffic and SMB 3.0 traffic (inter-cluster and fromHyper-V hosts). The un-teamed networks do not have to be routed, and do not need the ability to talk to DCs; they do need to be able to talk to the Hyper-V hosts’ equivalent 2 * storage/clustering rNICs.
- You have read my notes from Ignite 2015
- This post is based on WS2016 TPv2
Also note that:
- I’m building this using 4 x Hyper-V Generation 2 VMs. In each VM SCSI 0 has just the OS disk and SCSI 1 has 4 x 200 GB data disks.
- I cannot virtualize RDMA. Ideally the S2D SOFS is using rNICs.
Deploy Nodes
Deploy at least 4 identical storage servers with WS2016. My lab consists of machines that have 4 DAS SAS disks. You can tier storage using SSD or NVMe, and your scalable/slow tier can be SAS or SATA HDD. There can be a max of tiers only: SSD/NVMe and SAS/SATA HDD.
Configure the IP addressing of the hosts. Place the two storage/cluster network into two different VLANs/subnets.
My nodes are Demo-S2D1, Demo-S2D2, Demo-S2D3, and Demo-S2D4.
Install Roles & Features
You will need:
- File Services
- Failover Clustering
- Failover Clustering Manager if you plan to manage the machines locally.
Here’s the PowerShell to do this:
Add-WindowsFeature –Name File-Services, Failover-Clustering –IncludeManagementTools
You can use -ComputerName <computer-name> to speed up deployment by doing this remotely.
Validate the Cluster
It is good practice to do this … so do it. Here’s the PoSH code to validate a new S2D cluster:
Create your new cluster
You can use the GUI, but it’s a lot quicker to use PowerShell. You are implementing Storage Spaces so DO NOT ADD ELGIBLE DISKS. My cluster will be called Demo-S2DC1 and have an IP of 172.16.1.70.
New-Cluster -Name Demo-S2DC1 -Node Demo-S2D1, Demo-S2D2, Demo-S2D3, Demo-S2D4 -NoStorage -StaticAddress 172.16.1.70
There will be a warning that you can ignore:
There were issues while creating the clustered role that may prevent it from starting. For more information view the report file below.
What about Quorum?
You will probably use the default of dynamic quorum. You can either use a cloud witness (a storage account in Azure) or a file share witness, but realistically, Dynamic Quorum with 4 nodes and multiple data copies across nodes (fault domains) should do the trick.
Enable Client Communications
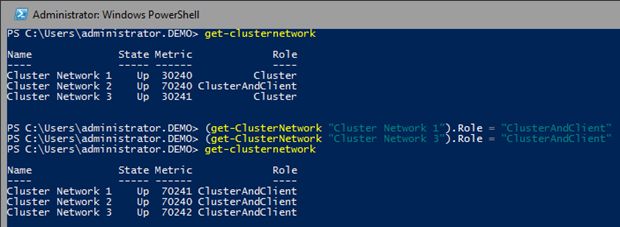
The two cluster networks in my design will also be used for storage communications with the Hyper-V hosts. Therefore I need to configure these IPs for Client communications:
Doing this will also enable each server in the S2D SOFS to register it’s A record of with the cluster/storage NIC IP addresses, and not just the management NIC.
Enable Storage Spaces Direct
This is not on by default. You enable it using PowerShell:
(Get-Cluster).DASModeEnabled=1
Browsing Around FCM
Open up FCM and connect to the cluster. You’ll notice lots of stuff in there now. Note the new Enclosures node, and how each server is listed as an enclosure. You can browse the Storage Spaces eligible disks in each server/enclosure.
Creating Virtual Disks and CSVs
I then create a pool called Pool1 on the cluster Demo-S2DC1 using PowerShell – this is because there are more options available to me than in the UI:
New-StoragePool -StorageSubSystemName Demo-S2DC1.demo.internal -FriendlyName Pool1 -WriteCacheSizeDefault 0 -FaultDomainAwarenessDefault StorageScaleUnit -ProvisioningTypeDefault Fixed -ResiliencySettingNameDefault Mirror -PhysicalDisk (Get-StorageSubSystem -Name Demo-S2DC1.demo.internal | Get-PhysicalDisk)
Get-StoragePool Pool1 | Get-PhysicalDisk |? MediaType -eq SSD | Set-PhysicalDisk -Usage Journal
The you create the CSVs that will be used to store file shares in the SOFS. Rules of thumb:
- 1 share per CSV
- At least 1 CSV per node in the SOFS to optimize flow of data: SMB redirection and redirected IO for mirrored/clustered storage spaces
Using this PoSH you will lash out your CSVs in no time:
$CSVNumber = “4”
$CSVName = “CSV”
$CSV = “$CSVName$CSVNumber”
New-Volume -StoragePoolFriendlyName Pool1 -FriendlyName $CSV -PhysicalDiskRedundancy 2 -FileSystem CSVFS_REFS –Size 200GB
Set-FileIntegrity “C:\ClusterStorage\Volume$CSVNumber” –Enable $false
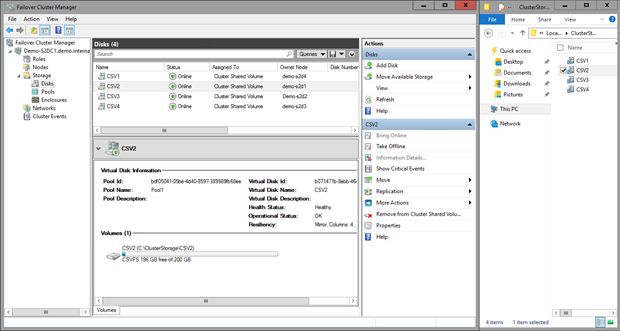
The last line disables ReFS integrity streams to support the storage of Hyper-V VMs on the volumes. You’ll see from the screenshot what my 4 node S2D SOFS looks like, and that I like to rename things:
Note how each CSV is load balanced. SMB redirection will redirect Hyper-V hosts to the owner of a CSV when the host is accessing files for a VM that is stored on that CSV. This is done for each VM connection by the host using SMB 3.0, and ensures optimal flow of data with minimized/no redirected IO.
There are some warnings from Microsoft about these volumes:
- They are likely to become inaccessible on later Technical Preview releases.
- Resizing of these volumes is not supported.
Oops! This is a technical preview and this should be pure lab work that your willing to lose.
Create a Scale-Out File Server
The purpose of this post is to create a SOFS from the S2D cluster, with the sole purpose of the cluster being to store Hyper-V VMs that are accessed by Hyper-V hosts via SMB 3.0. If you are building a hyperconverged cluster (not supported by the current TPv2 preview release) then you stop here and proceed no further.
Each of the S2D cluster nodes and the cluster account object should be in an OU just for the S2D cluster. Edit the advanced security of the OU and grand the cluster account object create computer object and delete compute object rights. If you don’t do this then the SOFS role will not start after this next step.
Next, I am going to create an SOFS role on the S2D cluster, and call it Demo-S2DSOFS1.
New-StorageFileServer -StorageSubSystemName Demo-S2DC1.demo.internal -FriendlyName Demo-S2DSOFS1 -HostName Demo-S2DSOFS1Create a -Protocols SMB
Create and Permission Shares
Create 1 share per CSV. If you need more shares then create more CSVs. Each share needs the following permissions:
- Each Hyper-V host
- Each Hyper-V cluster
- The Hyper-V administrators
You can use the following PoSH to create and permission your shares. I name the share folder and share name after the CSV that it is stored on, so simply change the $ShareName variable to create lots of shares, and change the permissions as appropriate.
$ShareName = “CSV1″
$SharePath = “$RootPath\$ShareName\$ShareName”md $SharePath
New-SmbShare -Name $ShareName -Path $SharePath -FullAccess Demo-Host1$, Demo-Host2$, Demo-HVC1$, “Demo\Hyper-V Admins”
Set-SmbPathAcl -ShareName $ShareNameCreate Hyper-V VMs
On your hosts/clusters create VMs that store all of their files on the path of the SOFS, e.g. \\Demo-S2DSOFS1\CSV1\VM01, \\Demo-S2DSOFS1\CSV1\VM02, etc.
Remember that this is a Preview Release
This post was written not long after the release of TPv2:
- Expect bugs – I am experiencing at least one bad one by the looks of it
- Don’t expect support for a rolling upgrade of this cluster
- Bad things probably will happen
- Things are subject to change over the next year
Technorati Tags: Windows Server 2016, Hyper-V, Storage Spaces, Storage, Virtualisation, Failover Clustering, PowerShell


