cocos2d-x启动过程
做游戏~
1.建立cocos2d-x-3.5的项目
进入cocos.py所在的文件夹,使用python cocos.py new HelloCpp3 -p com.cocos2dx.org -l cpp -d ~/destination
2.打开HelloCpp3的文件夹,看一下文件结构:
可以看到proj.android,proj.ios_mac,proj.linux,proj.win8.1-universal,proj.win32,proj.wp8-xaml是与平台相关,而Classes和Resources是与游戏逻辑相关的,其中Classes是放置的代码,而Resources里面则是图片和字体文件。
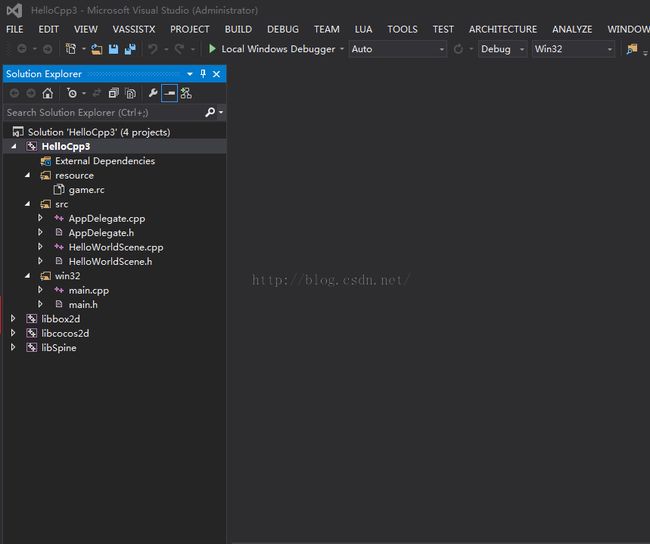
3.程序结构如下:
Src文件夹下是Classes的文件,分别是平台入口,以及HelloWorldScene的场景类
Win32下main.cpp是Win32的入口类启动程序
4.打开入口程序
5.打开Application类,这个是平台相关的类
看一下run函数
applicationDidFinishLauning()是由Appdelegate实现的,代码如下:
bool AppDelegate::applicationDidFinishLaunching() {
    // initialize director
    //获得导演类
    auto director = Director::getInstance();
   //获得OpenGL实例
    auto glview = director->getOpenGLView();
    if(!glview) {
        glview = GLViewImpl::create("My Game");
	//设置OpenGL视图
        director->setOpenGLView(glview);
    }
    // turn on display FPS
    //显示每秒帧速率,即每秒重绘的帧数
    director->setDisplayStats(true);
    // set FPS. the default value is 1.0/60 if you don't call this
    //<span class="comment"> 设置绘制间隔</span>
    director->setAnimationInterval(1.0 / 60);
    register_all_packages();
    // create a scene. it's an autorelease object
    //绘制场景
    auto scene = HelloWorld::createScene();
    // run
    //设置下一帧的scene
    director->runWithScene(scene);
    return true;
}
6.进入到createScene()里看一下
<pre class="html" name="code">Scene* HelloWorld::createScene()
{
    // 'scene' is an autorelease object
    //创建场景
    auto scene = Scene::create();
    //创建layer
    // 'layer' is an autorelease object
    auto layer = HelloWorld::create();
    // add layer as a child to scene
    scene->addChild(layer);
    // return the scene
    return scene;
}
7进入create()里看里面发生了什么
// implement the "static create()" method manually CREATE_FUNC(HelloWorld);
点击F12进入这个函数,这个函数的具体实现是
#define CREATE_FUNC(__TYPE__) \static __TYPE__* create() \{ \ __TYPE__ *pRet = new(std::nothrow) __TYPE__(); \ if (pRet && pRet->init()) \ { \ pRet->autorelease(); \ return pRet; \ } \ else \ { \ delete pRet; \ pRet = NULL; \ return NULL; \ } \}
这个函数最终会调用HelloWorld里的init(),并返回指向HelloWorld的指针
8.进入HelloWorld类看一下此类的init()的函数
<pre class="html" name="code">bool HelloWorld::init()
{
    //////////////////////////////
    // 1. super init first
    if ( !Layer::init() )
    {
        return false;
    }

    Size visibleSize = Director::getInstance()->getVisibleSize();
    Vec2 origin = Director::getInstance()->getVisibleOrigin();

    /////////////////////////////
    // 2. add a menu item with "X" image, which is clicked to quit the program
    //    you may modify it.

    // add a "close" icon to exit the progress. it's an autorelease object
    auto closeItem = MenuItemImage::create(
                                           "CloseNormal.png",
                                           "CloseSelected.png",
                                           CC_CALLBACK_1(HelloWorld::menuCloseCallback, this));

	closeItem->setPosition(Vec2(origin.x + visibleSize.width - closeItem->getContentSize().width/2 ,
                                origin.y + closeItem->getContentSize().height/2));

    // create menu, it's an autorelease object
    auto menu = Menu::create(closeItem, NULL);
    menu->setPosition(Vec2::ZERO);
    this->addChild(menu, 1);

    /////////////////////////////
    // 3. add your codes below...

    // add a label shows "Hello World"
    // create and initialize a label
    //创建字体
    auto label = Label::createWithTTF("Hello World", "fonts/Marker Felt.ttf", 24);

    // position the label on the center of the screen
    //设置字体位置
    label->setPosition(Vec2(origin.x + visibleSize.width/2,
                            origin.y + visibleSize.height - label->getContentSize().height));

    // add the label as a child to this layer
    //设置字体在此层中的位置
    this->addChild(label, 1);

    // add "HelloWorld" splash screen"
    //创建精灵
    auto sprite = Sprite::create("HelloWorld.png");
    //设置精灵位置
    // position the sprite on the center of the screen
    sprite->setPosition(Vec2(visibleSize.width/2 + origin.x, visibleSize.height/2 + origin.y));

    // add the sprite as a child to this layer
    //设置精灵层次
    this->addChild(sprite, 0);

    return true;
}
9.创建完此帧的显示元素后,run进入mainLoop()
在run中用此 while(!glview->windowShouldClose())控制mainLoop的调用
void DisplayLinkDirector::mainLoop()
{
    if (_purgeDirectorInNextLoop)
    {
        _purgeDirectorInNextLoop = false;
        purgeDirector();
    }
    else if (_restartDirectorInNextLoop)
    {
        _restartDirectorInNextLoop = false;
        restartDirector();
    }
    else if (! _invalid)
    {
        drawScene();

        // release the objects
        PoolManager::getInstance()->getCurrentPool()->clear();
    }
}
在mainLoop里(转自 http://www.cnblogs.com/liangzhimy/p/4425442.html)
void Director::drawScene()
{
    // calculate "global" dt
    calculateDeltaTime();

    if (_openGLView)
    {
        _openGLView->pollEvents();
    }

    //tick before glClear: issue #533
    if (! _paused)
    {
        _scheduler->update(_deltaTime);
        _eventDispatcher->dispatchEvent(_eventAfterUpdate);
    }

    _renderer->clear();

    /* to avoid flickr, nextScene MUST be here: after tick and before draw.
     * FIXME: Which bug is this one. It seems that it can't be reproduced with v0.9
     */
    if (_nextScene)
    {
        setNextScene();
    }

    pushMatrix(MATRIX_STACK_TYPE::MATRIX_STACK_MODELVIEW);

    if (_runningScene)
    {
	#if CC_USE_PHYSICS
        auto physicsWorld = _runningScene->getPhysicsWorld();
        if (physicsWorld && physicsWorld->isAutoStep())
        {
            physicsWorld->update(_deltaTime, false);
        }
	#endif
        //clear draw stats
        _renderer->clearDrawStats();

        //render the scene
        _runningScene->render(_renderer);

        _eventDispatcher->dispatchEvent(_eventAfterVisit);
    }

    // draw the notifications node
    if (_notificationNode)
    {
        _notificationNode->visit(_renderer, Mat4::IDENTITY, 0);
    }

    if (_displayStats)
    {
        showStats();
    }
    _renderer->render();

    _eventDispatcher->dispatchEvent(_eventAfterDraw);

    popMatrix(MATRIX_STACK_TYPE::MATRIX_STACK_MODELVIEW);

    _totalFrames++;

    // swap buffers
    if (_openGLView)
    {
        _openGLView->swapBuffers();
    }

    if (_displayStats)
    {
        calculateMPF();
    }
}
setNextScene();
1> 清理正在运行的Scene
_runningScene->release();
2> 设置当前Scene
 _runningScene = _nextScene;
_nextScene->retain();
_nextScene = nullptr;
3> 调用当前场景onEnter
_runningScene->onEnter();
// draw children zOrder < 0
        for( ; i < _children.size(); i++ )
        {
            auto node = _children.at(i);

            if ( node && node->_localZOrder < 0 )
                node->visit(renderer, _modelViewTransform, flags);
            else
                break;
        }
 for(auto it=_children.cbegin()+i; it != _children.cend(); ++it)
            (*it)->visit(renderer, _modelViewTransform, flags);

