03-百思不得姐(第三天)
一、登录注册模块
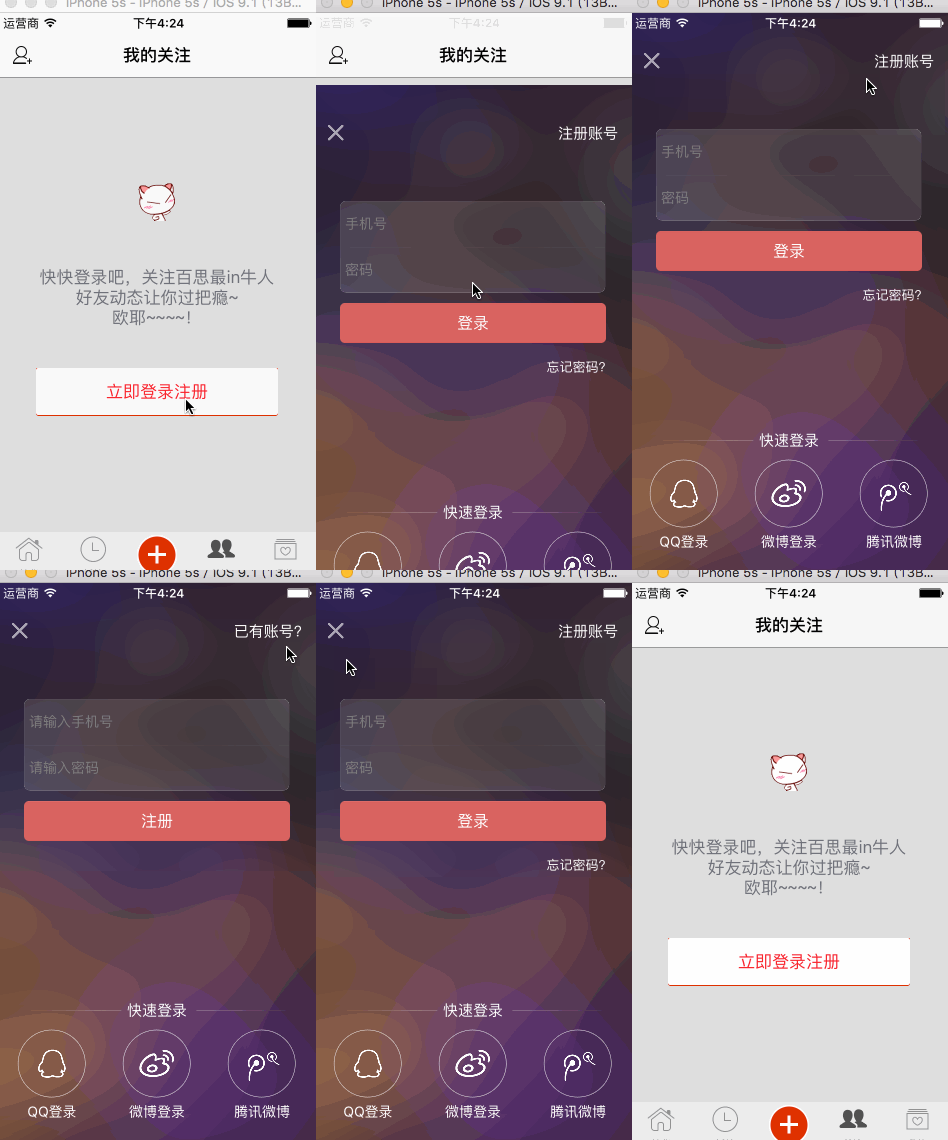
这个模块呢,东西比较固定,而且需要排布很多控件,所以就采用xib的形式完成。
因为xib的原因,所以不是很好详细的进行描述,就直接说一下完成该界面过程中的一些注意点和技术点!
1> 当我们需要设置一个控件的属性需要在xib中完成的话,比如上述界面的登录按钮的圆角,可以利用kvc来完成,这样就不用在代码中完成了!
2> 关于textField的占位文字(placehoder)属性。我们的需求是当点击占位文字的时候变成白色,不点击的时候变成灰色。
在xib中,是没有属性可以设置placehoder的颜色属性的!所以接下来就列数三种方法来完成这个需求
- 使用“富文本技术”(NSAttributedString:带有属性的文字)
@property(nonatomic,copy)   NSAttributedString     *attributedPlaceholder;

// 文字属性
NSMutableDictionary *attrs = [NSMutableDictionary dictionary];
attrs[NSForegroundColorAttributeName] = [UIColor grayColor];

// NSAttributedString : 带有属性的文字(富文本技术)
NSAttributedString *placeholder = [[NSAttributedString alloc] initWithString:@"手机号" attributes:attrs];
self.phoneField.attributedPlaceholder = placeholder;

NSMutableAttributedString *placehoder = [[NSMutableAttributedString alloc] initWithString:@"手机号"];
[placehoder setAttributes:@{NSForegroundColorAttributeName : [UIColor whiteColor]} range:NSMakeRange(0, 1)];
[placehoder setAttributes:@{
                            NSForegroundColorAttributeName : [UIColor yellowColor],
                            NSFontAttributeName : [UIFont systemFontOfSize:30]
                            } range:NSMakeRange(1, 1)];
[placehoder setAttributes:@{NSForegroundColorAttributeName : [UIColor redColor]} range:NSMakeRange(2, 1)];
self.phoneField.attributedPlaceholder = placehoder;- 重写drawPlaceholderInRect方法
 - (void)drawPlaceholderInRect:(CGRect)rect
{
    [self.placeholder drawInRect:CGRectMake(0, 10, rect.size.width, 25) withAttributes:@{
                                                       NSForegroundColorAttributeName : [UIColor grayColor],
                                                       NSFontAttributeName : self.font}];
}
利用这个方法直接将placehoder画出来,需要传入“画出的位置”和“字体”两个参数!
- 利用runtime(运行时)和kvc
运行时是苹果官方的一套C语言库,能做很多底层操作(比如访问隐藏的一些成员变量\成员方法。。。)
下面是如何访问成员变量的举例:
unsigned int count = 0;

// 拷贝出所有的成员变量列表
Ivar *ivars = class_copyIvarList([UITextField class], &count);

for (int i = 0; i<count; i++) {
    // 取出成员变量
    // Ivar ivar = *(ivars + i);
    Ivar ivar = ivars[i];

    // 打印成员变量名字
    DSLog(@"%s", ivar_getName(ivar));
}

// 释放
free(ivars);
这个时候会打印出一个叫_placeholderLabel的成员变量,看名字就知道是显示placehoder的label,接下来就利用kvc将placehoder的文字颜色改变
[self setValue:[UIColor whiteColor] forKeyPath:@"_placeholderLabel.textColor"];其实这个界面也就这两个需要注意的地方了!
二、精华首页的搭建
- 在导航栏下面设置一个标题栏,用来切换子控制器
- 给控制器view添加一个全屏的scrollView
- 给scrollView添加子控制器(tableViewController)
接下来就按照步骤来完成!
1> 设置标题栏
创建一个titleView,然后在titleView里面添加五个titlteButton,点击一个按钮时,下面会有一个红色的指示器,而且自身文字会变红色
 - (void)setupTitleView
{
    // 1.创建顶部的标签栏
    UIView *titleView = [[UIView alloc] init];
    titleView.backgroundColor = [[UIColor whiteColor] colorWithAlphaComponent:0.7];
    titleView.height = 35;
    titleView.width = self.view.width;
    titleView.y = self.navigationController.navigationBar.height + 20;
    [self.view addSubview:titleView];
    self.titleView = titleView;

    // 2.创建指示标签
    UIView *indicatorView = [[UIView alloc] init];
    indicatorView.height = 2;
    indicatorView.y = titleView.height - indicatorView.height;
    indicatorView.backgroundColor = [UIColor redColor];
    self.indicatorView = indicatorView;


    // 3.创建内部的按钮
    NSArray *titleArray = @[@"全部", @"视频", @"图片", @"段子", @"声音"];

    CGFloat buttonW = self.view.width / titleArray.count;
    CGFloat butttonH = titleView.height;
    CGFloat buttonY = 0;

    for (NSInteger i = 0; i < titleArray.count; i++) {
        UIButton *button = [[UIButton alloc] init];
        button.tag = i;
        button.width = buttonW;
        button.height = butttonH;
        button.y = buttonY;
        button.x = i * buttonW;
        [button setTitle:titleArray[i] forState:(UIControlStateNormal)];

        [button setTitleColor:[UIColor grayColor] forState:(UIControlStateNormal)];
        [button setTitleColor:[UIColor redColor] forState:(UIControlStateDisabled)];
        button.titleLabel.font = [UIFont systemFontOfSize:14];
        [button addTarget:self action:@selector(titleButtonClick:) forControlEvents:(UIControlEventTouchUpInside)];
        [titleView addSubview:button];

        if (i == 0) {
            button.enabled = NO;
            self.selectedBuuton = button;

            // 让按钮内部的label根据文字来计算尺寸(如果没有这一句,按钮titleLabel的宽度为0)
            [button.titleLabel sizeToFit];

            // 强制布局(让按钮立刻计算里面label文字的尺寸,效果和上面一样)
//            [button.titleLabel layoutIfNeeded];

            self.indicatorView.width = button.titleLabel.width;
            self.indicatorView.centerX = button.centerX;
        }
    }

    [titleView addSubview:indicatorView];
}
- (void)titleButtonClick:(UIButton *)titleButton
{
// 1.设置选中按钮状态
self.selectedBuuton.enabled = YES;
titleButton.enabled = NO;
self.selectedBuuton = titleButton;
// 2.设置选中按钮后指示条的位置
[UIView animateWithDuration:0.25 animations:^{
self.indicatorView.width = titleButton.titleLabel.width;
self.indicatorView.centerX = titleButton.centerX;
}];
// 3.滚动
CGPoint offset = self.contentView.contentOffset;
offset.x = self.view.width * titleButton.tag;
[self.contentView setContentOffset:offset animated:YES];
}注意点:
我们需要在点击按钮后完成指示条(indicatorView)的X移动,而且其宽度等于按钮titleLabel的宽度。
关于按钮的选中,我们采用disable,因为当一个按钮被点击后就不能再被点击。
应该默认选中第一个,这里不可以直接调用按钮的点击方法,因为指示条在一进界面时,会滑动过来,但是需求是应该让它静止,所以只能重新调整其X的值,而且这个地方有个注意点:就是关于sizeToFit的问题,因为按钮刚加载,此时按钮内部文字的尺寸还没有计算出来,所以指示条就不会出来,在这个我们应该让按钮立即计算出其文字的尺寸!
2>添加scrollView
- (void)setupContentView
{
    self.automaticallyAdjustsScrollViewInsets = NO;

    UIScrollView *contentView = [[UIScrollView alloc] init];
    contentView.bounces = NO;
    contentView.delegate = self;
    contentView.frame = self.view.bounds;
    contentView.pagingEnabled = YES;
    [self.view addSubview:contentView];
    contentView.contentSize = CGSizeMake(self.childViewControllers.count * contentView.width, 0);
    [self.view insertSubview:contentView atIndex:0];
    self.contentView = contentView;

    // 将第一个控制器的view添加进去
    [self scrollViewDidEndScrollingAnimation:contentView];
}
3>添加子控制器
- (void)setupChildVc
{
    DSAllViewController *allVc = [[DSAllViewController alloc] init];
    [self addChildViewController:allVc];

    DSVideoViewController *videoVc = [[DSVideoViewController alloc] init];
    [self addChildViewController:videoVc];

    DSPictureViewController *pictureVc = [[DSPictureViewController alloc] init];
    [self addChildViewController:pictureVc];

    DSTopicViewController *topicVc = [[DSTopicViewController alloc] init];
    [self addChildViewController:topicVc];

    DSVoiceViewController *voiceVc = [[DSVoiceViewController alloc] init];
    [self addChildViewController:voiceVc];
}
3> 点击按钮,切换控制器,并且显示view
这个时候我们应该在点击完按钮后,设置scrollView的setContentOffset,让其滚动。(上面代码中)
然后,当滚动动画完成后,就显示控制器的view,这个时候会调用scrollView的代理方法scrollViewDidEndScrollingAnimation,在这个方法里面设置控制器的view,并且添加到scrollView中
 - (void)scrollViewDidEndScrollingAnimation:(UIScrollView *)scrollView
{
    // 1.取出索引
    NSInteger index = scrollView.contentOffset.x / scrollView.width;

    // 2.取出子控制器
    UITableViewController *childVc = self.childViewControllers[index];
    childVc.view.y = 0;
    childVc.view.x = scrollView.contentOffset.x;
    childVc.view.height = scrollView.height;
    childVc.tableView.contentInset = UIEdgeInsetsMake(self.navigationController.navigationBar.height + 20 + self.titleView.height, 0, self.tabBarController.tabBar.height, 0);
    childVc.tableView.scrollIndicatorInsets = childVc.tableView.contentInset;

    [scrollView addSubview:childVc.view];

}
注意点:
- 为了显示穿透效果,而且让tableView正常显示,这里我们需要设置tableView的contentInsert属性!旁边的滚动条也是如此(设置这个属性之前,得让automaticallyAdjustsScrollViewInsets设置为NO,这个代码在创建scrollView中)
- tableView因为默认会离顶部会有20的间距,所以设置其Y值为0
- 应该一进来就显示第一个控制器(该代码也是在在创建scrollView中)
4> 滚动scrollView,切换控制器,而且按钮也随之改变
这就需要实现scrollView的另一个scrollViewDidEndDecelerating代理方法了,在手拖拽结束后,就会调用!
- (void)scrollViewDidEndDecelerating:(UIScrollView *)scrollView
{
    [self scrollViewDidEndScrollingAnimation:scrollView];

    // 点击titleBuuton
    NSInteger index = (scrollView.contentOffset.x / scrollView.width);
    [self titleButtonClick:self.titleView.subviews[index]];
}
这个方法里面需要做的就是,重复第三条的行为,因此直接调用scrollViewDidEndScrollingAnimation方法即可,同时让其点击该位置上的按钮,至于按钮的位置,可以利用contentOffset来算出然后调用按钮点击方法就完成了!

